Flourless Hazelnut Cake with Whipped Chocolate & Nutella Ganache
Nutty, fluffy, and fully flourless (and by flourless I mean there’s no wheat flour; it’s made with naturally gluten-free hazelnut flour), this tender and flavorful hazelnut cake has a soft, supple and satisfying texture and a swirl of fluffy...
 JaneWalter

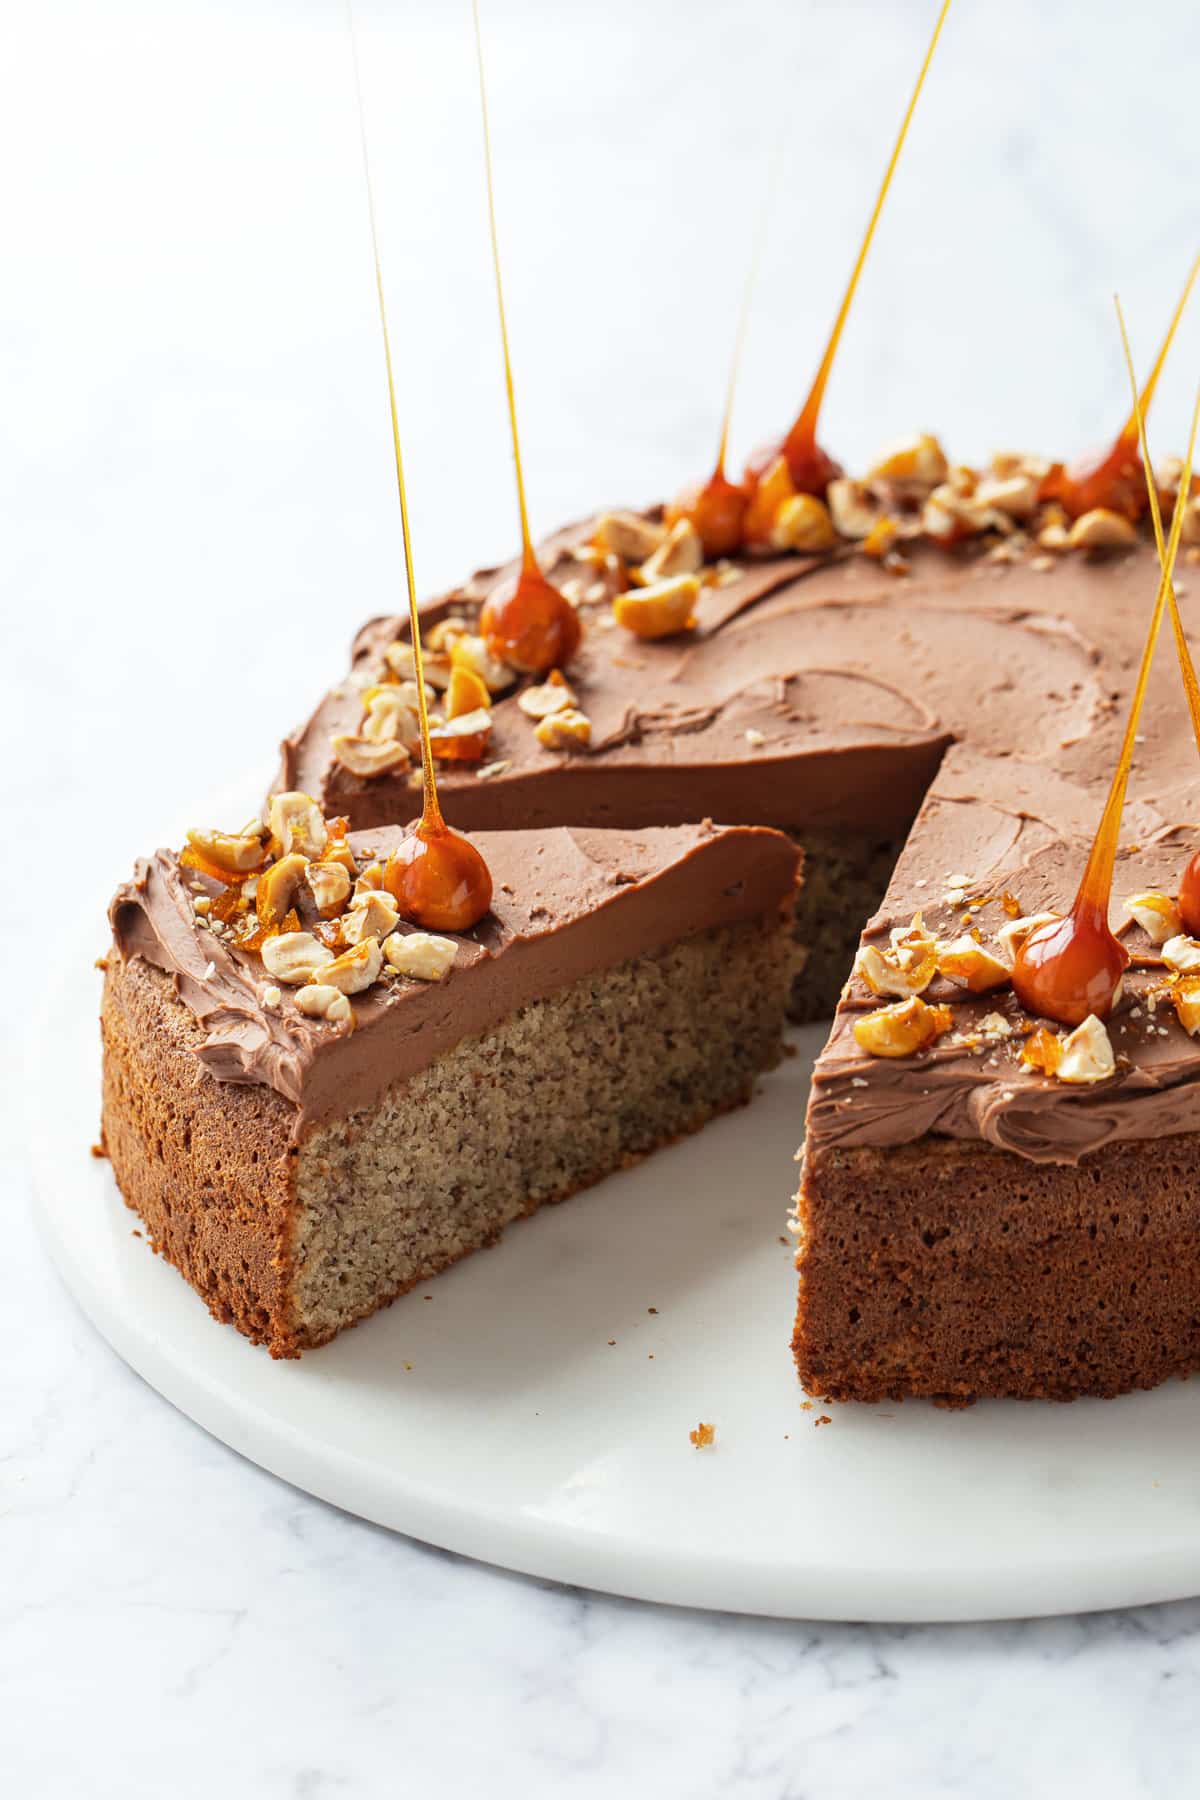
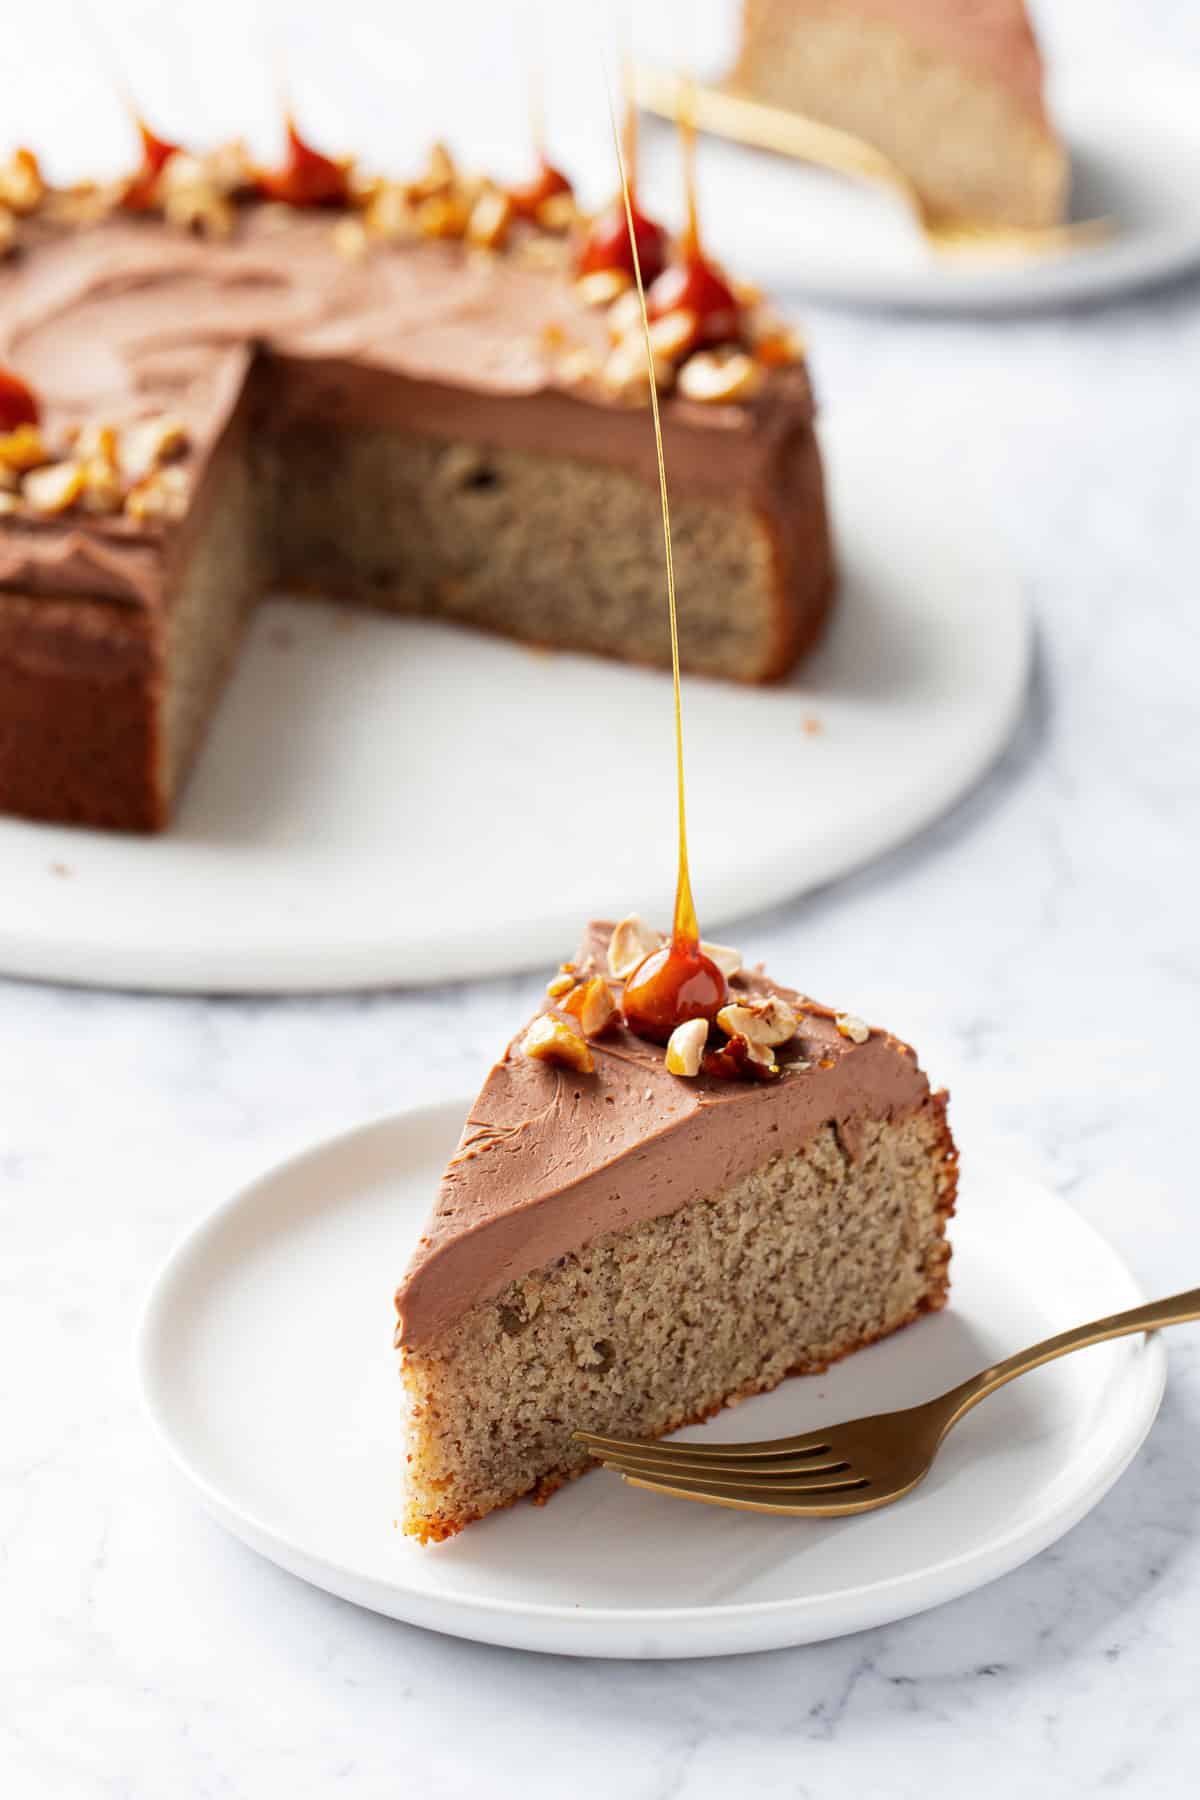
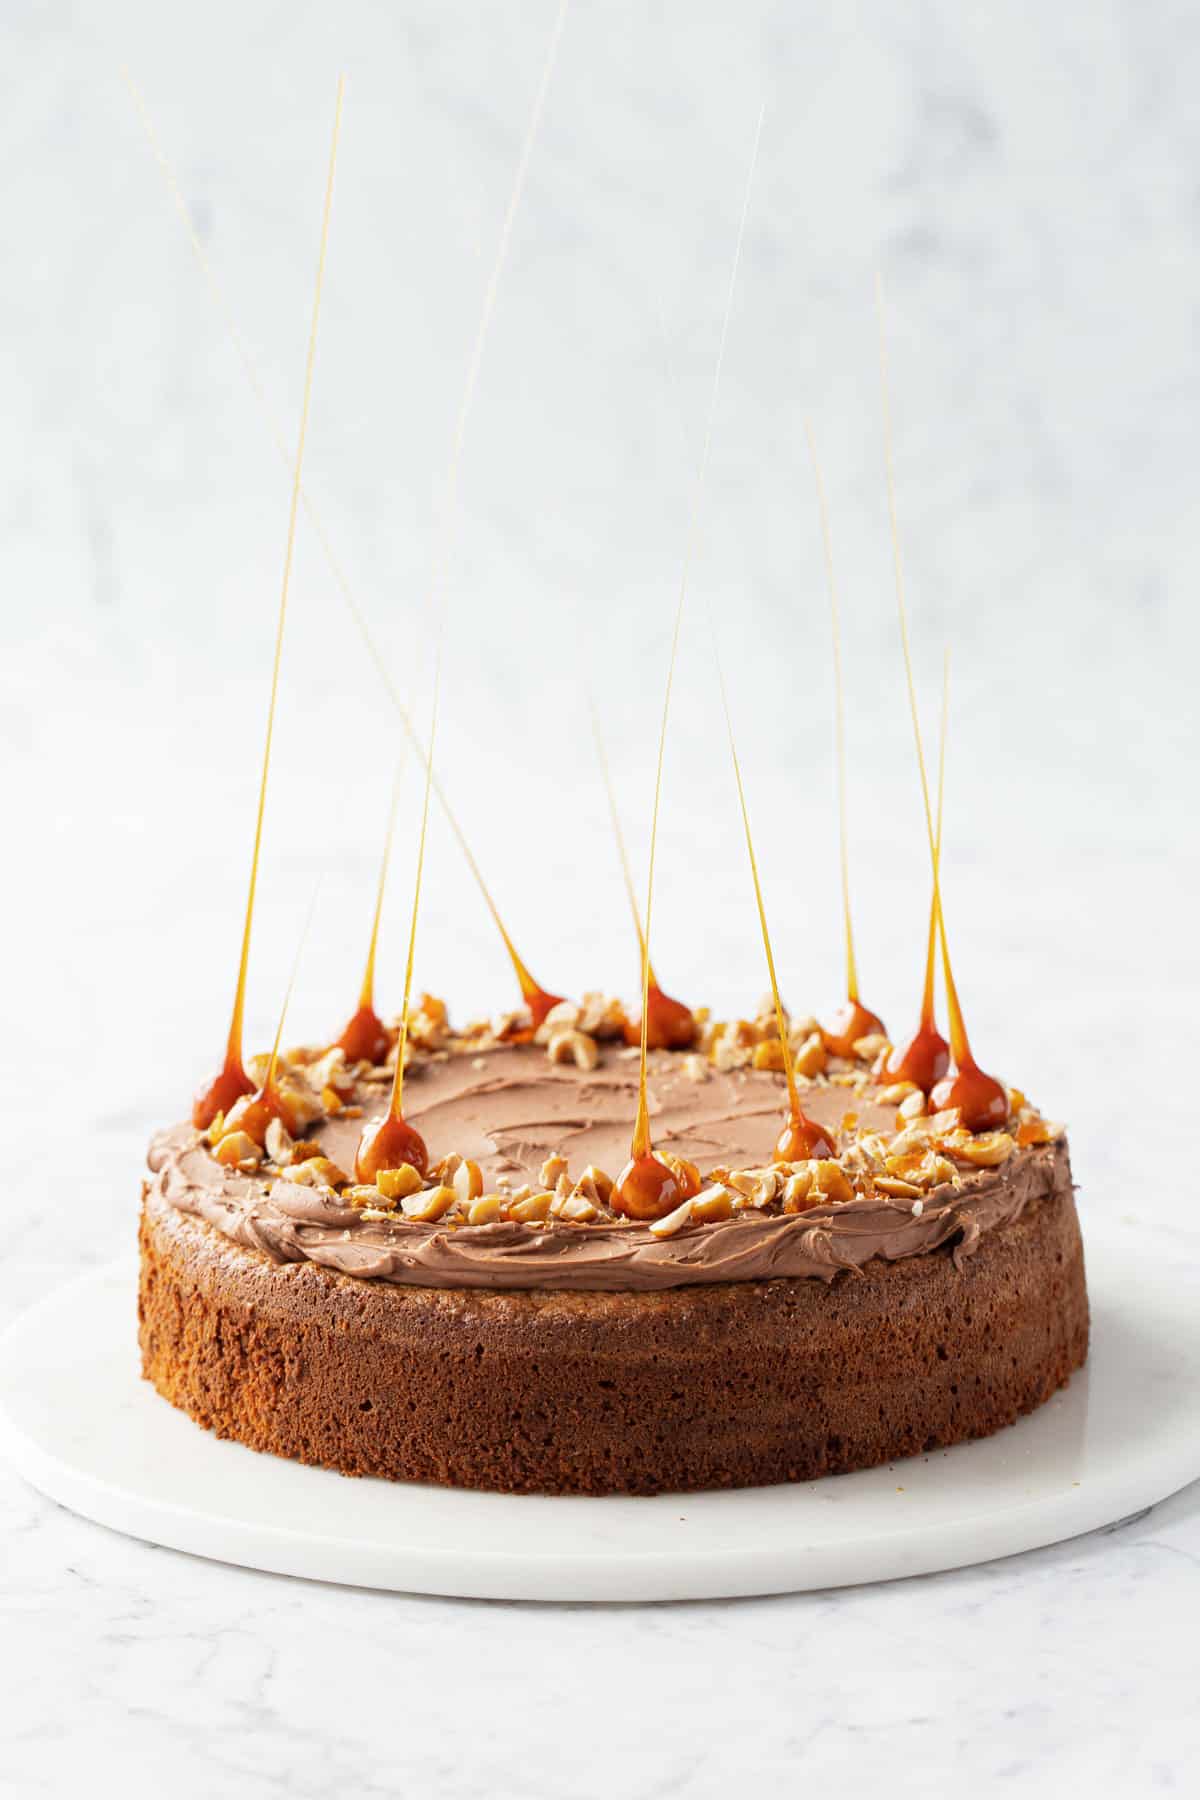
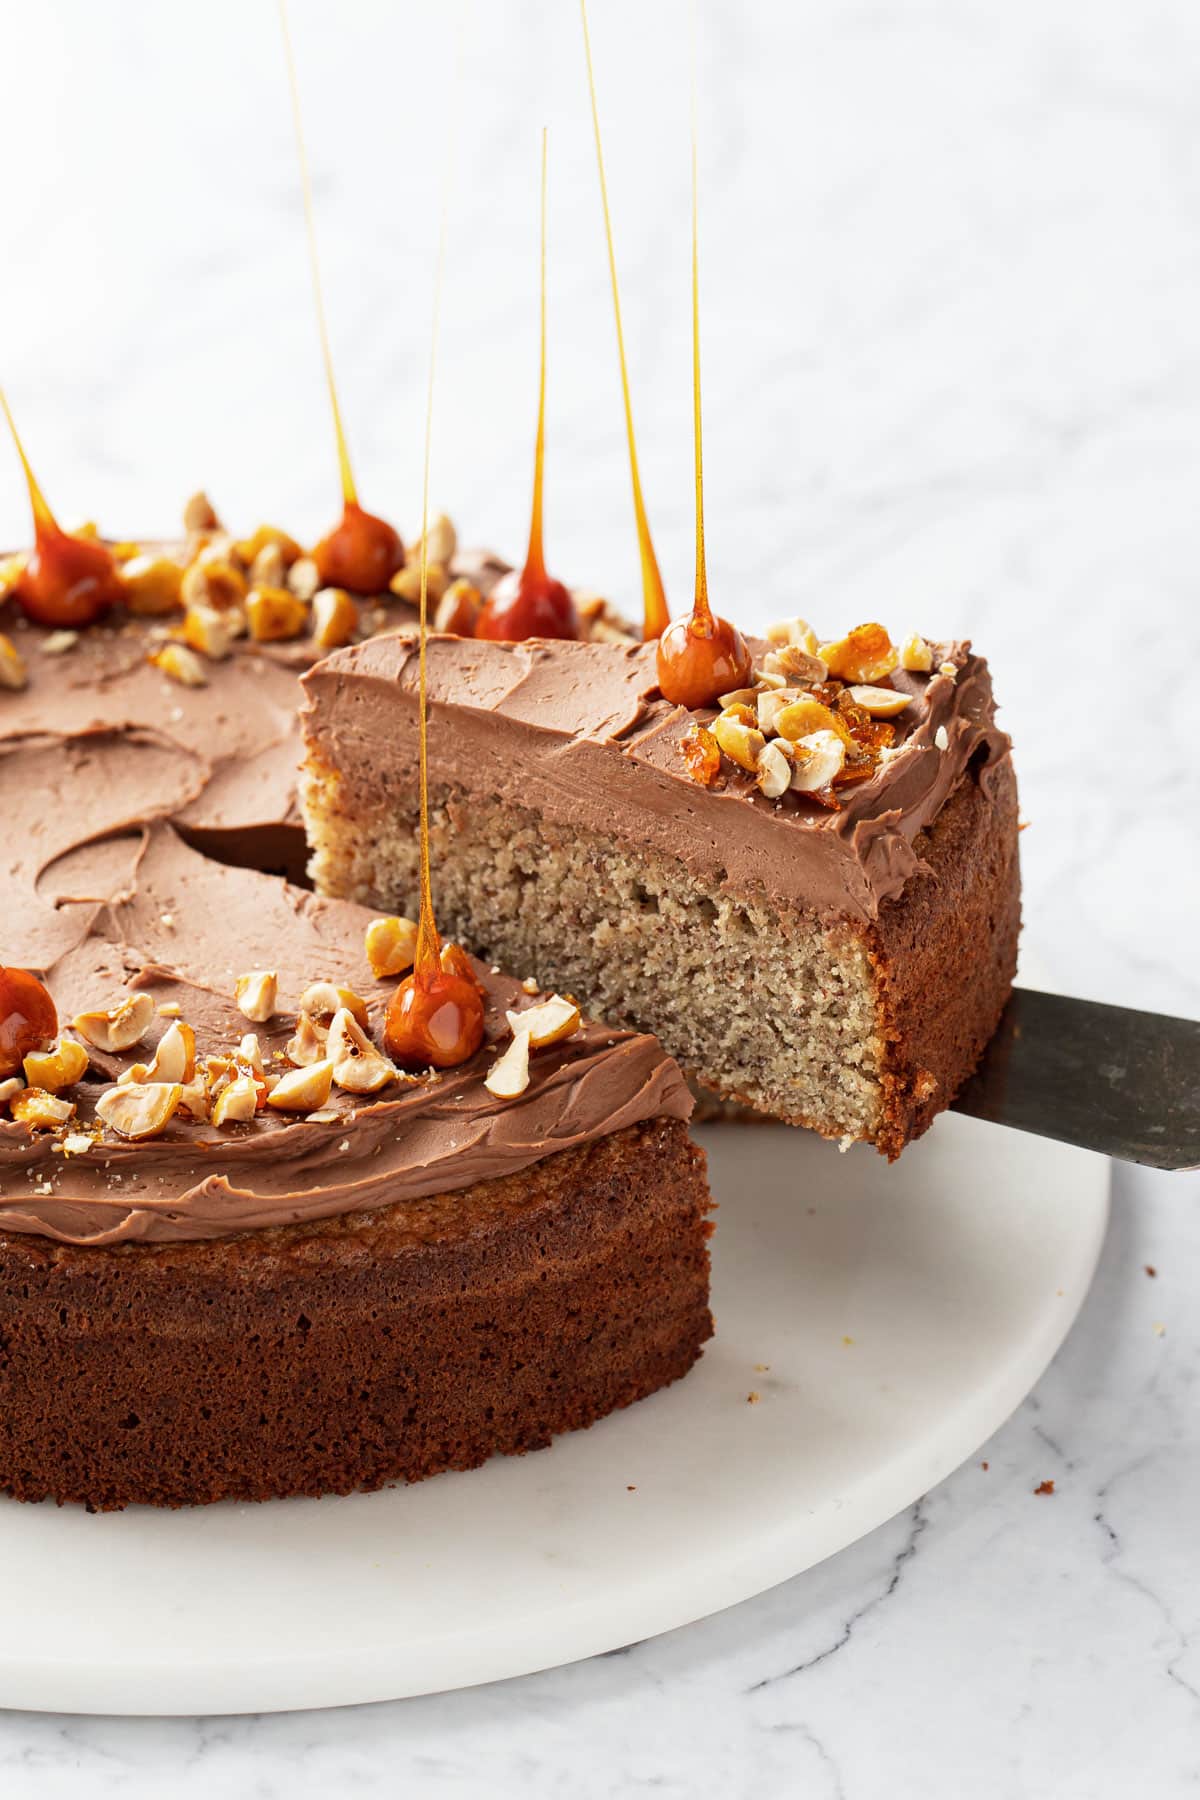
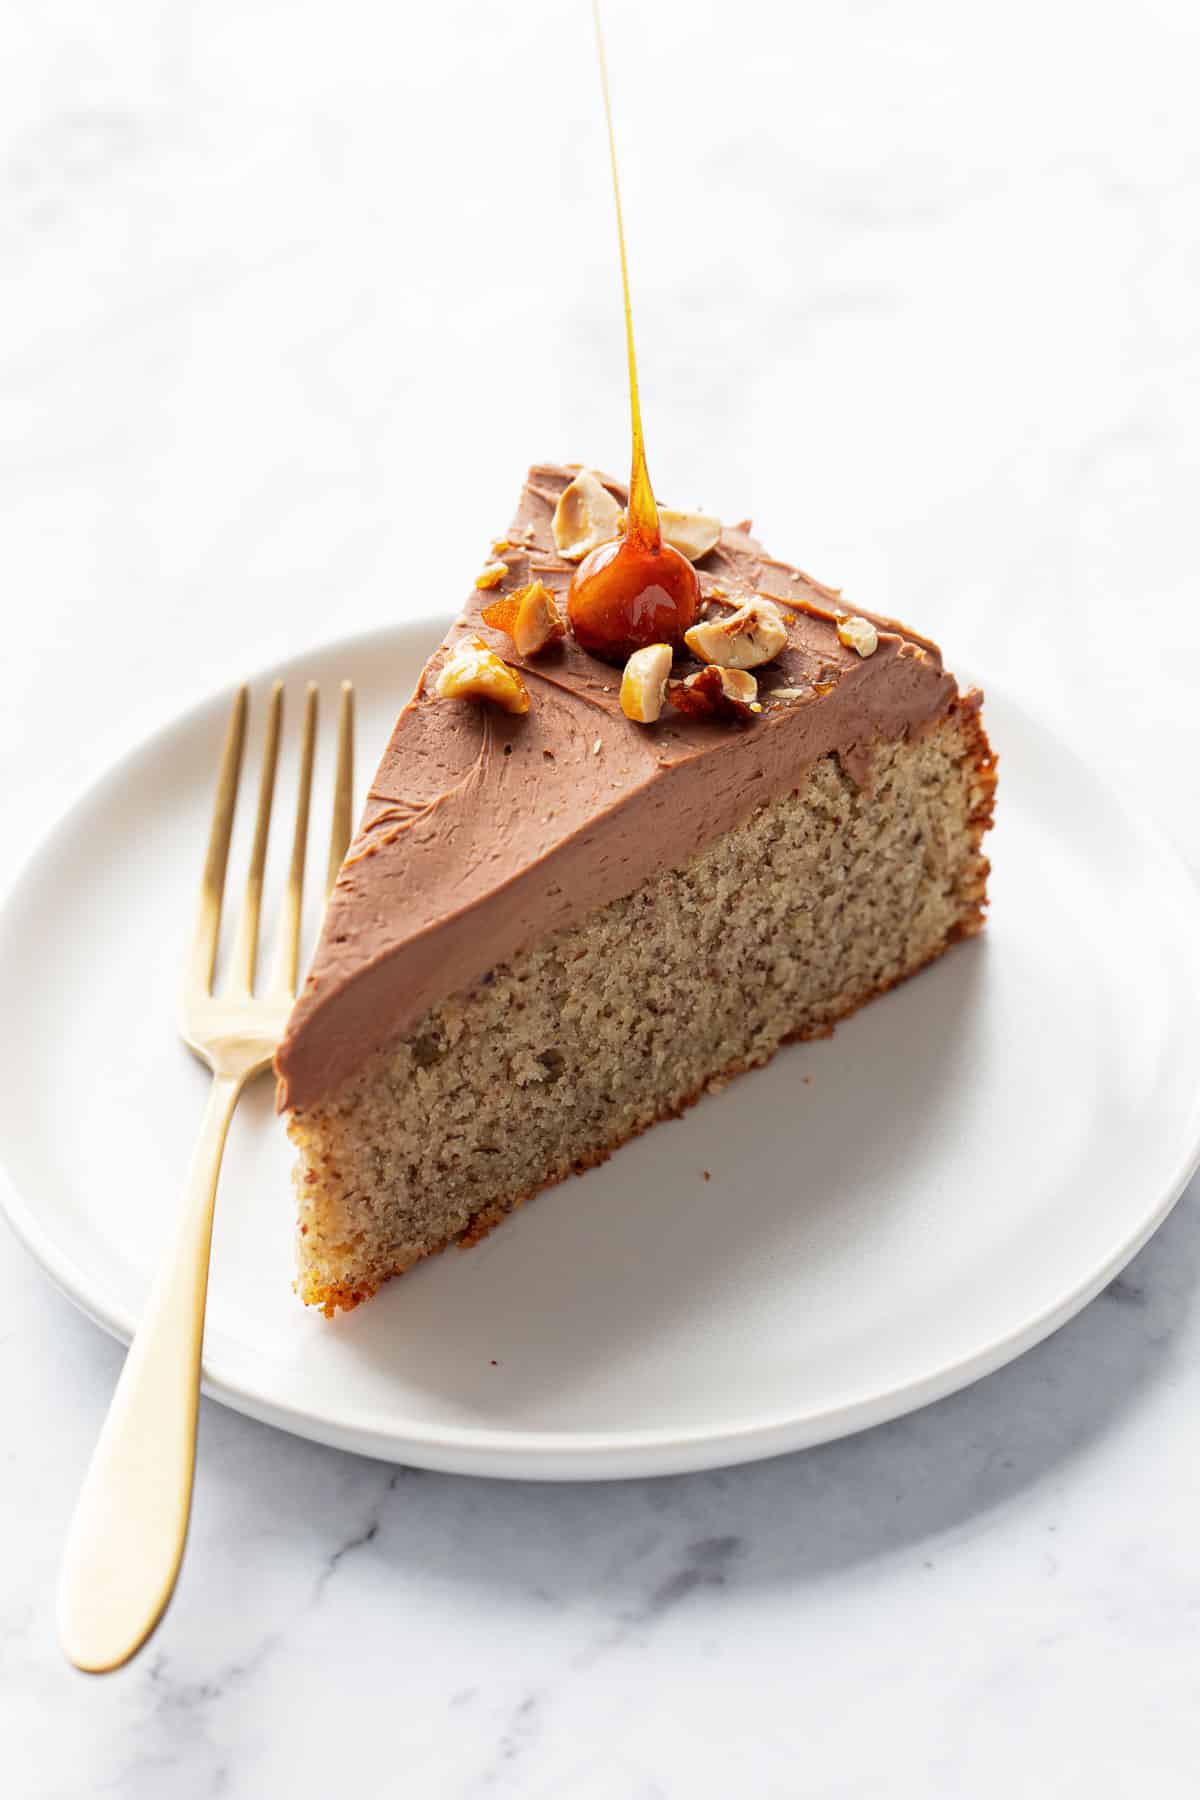
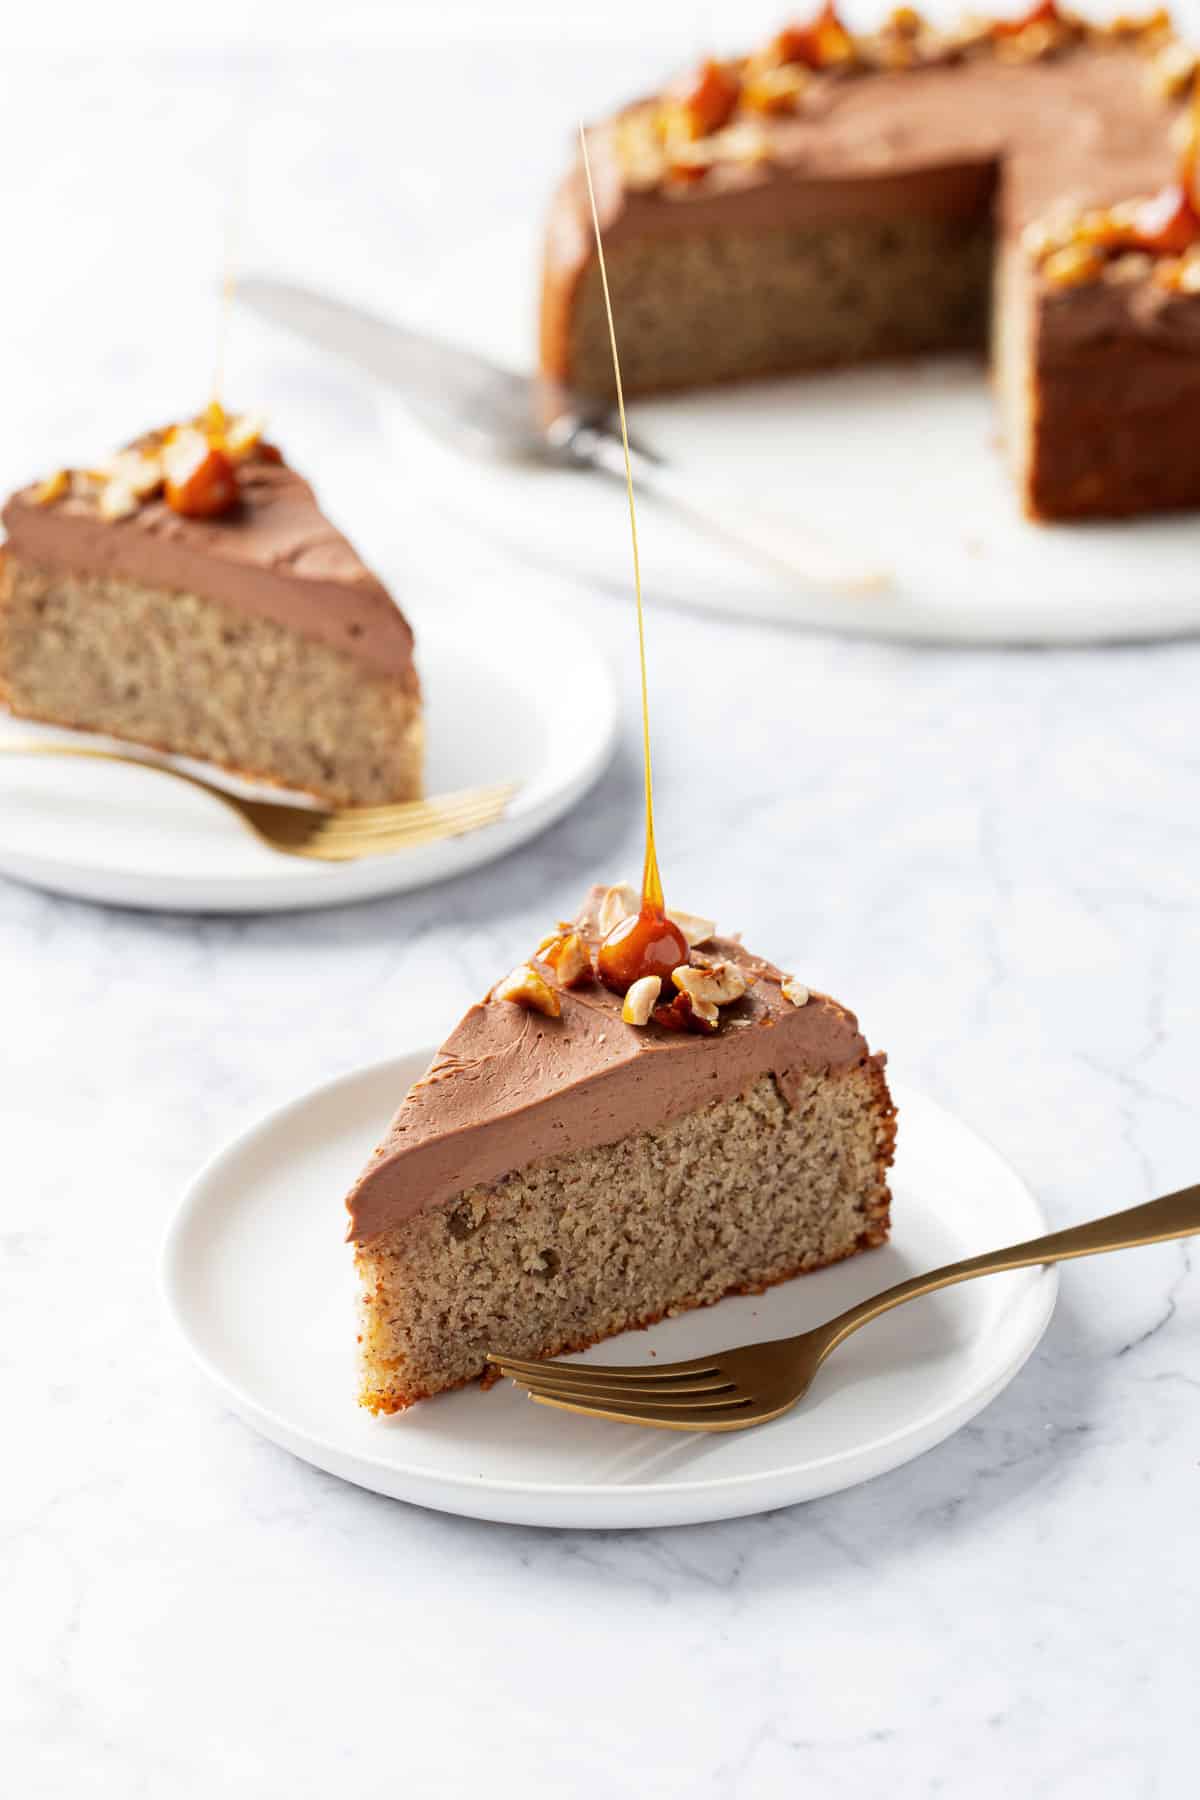
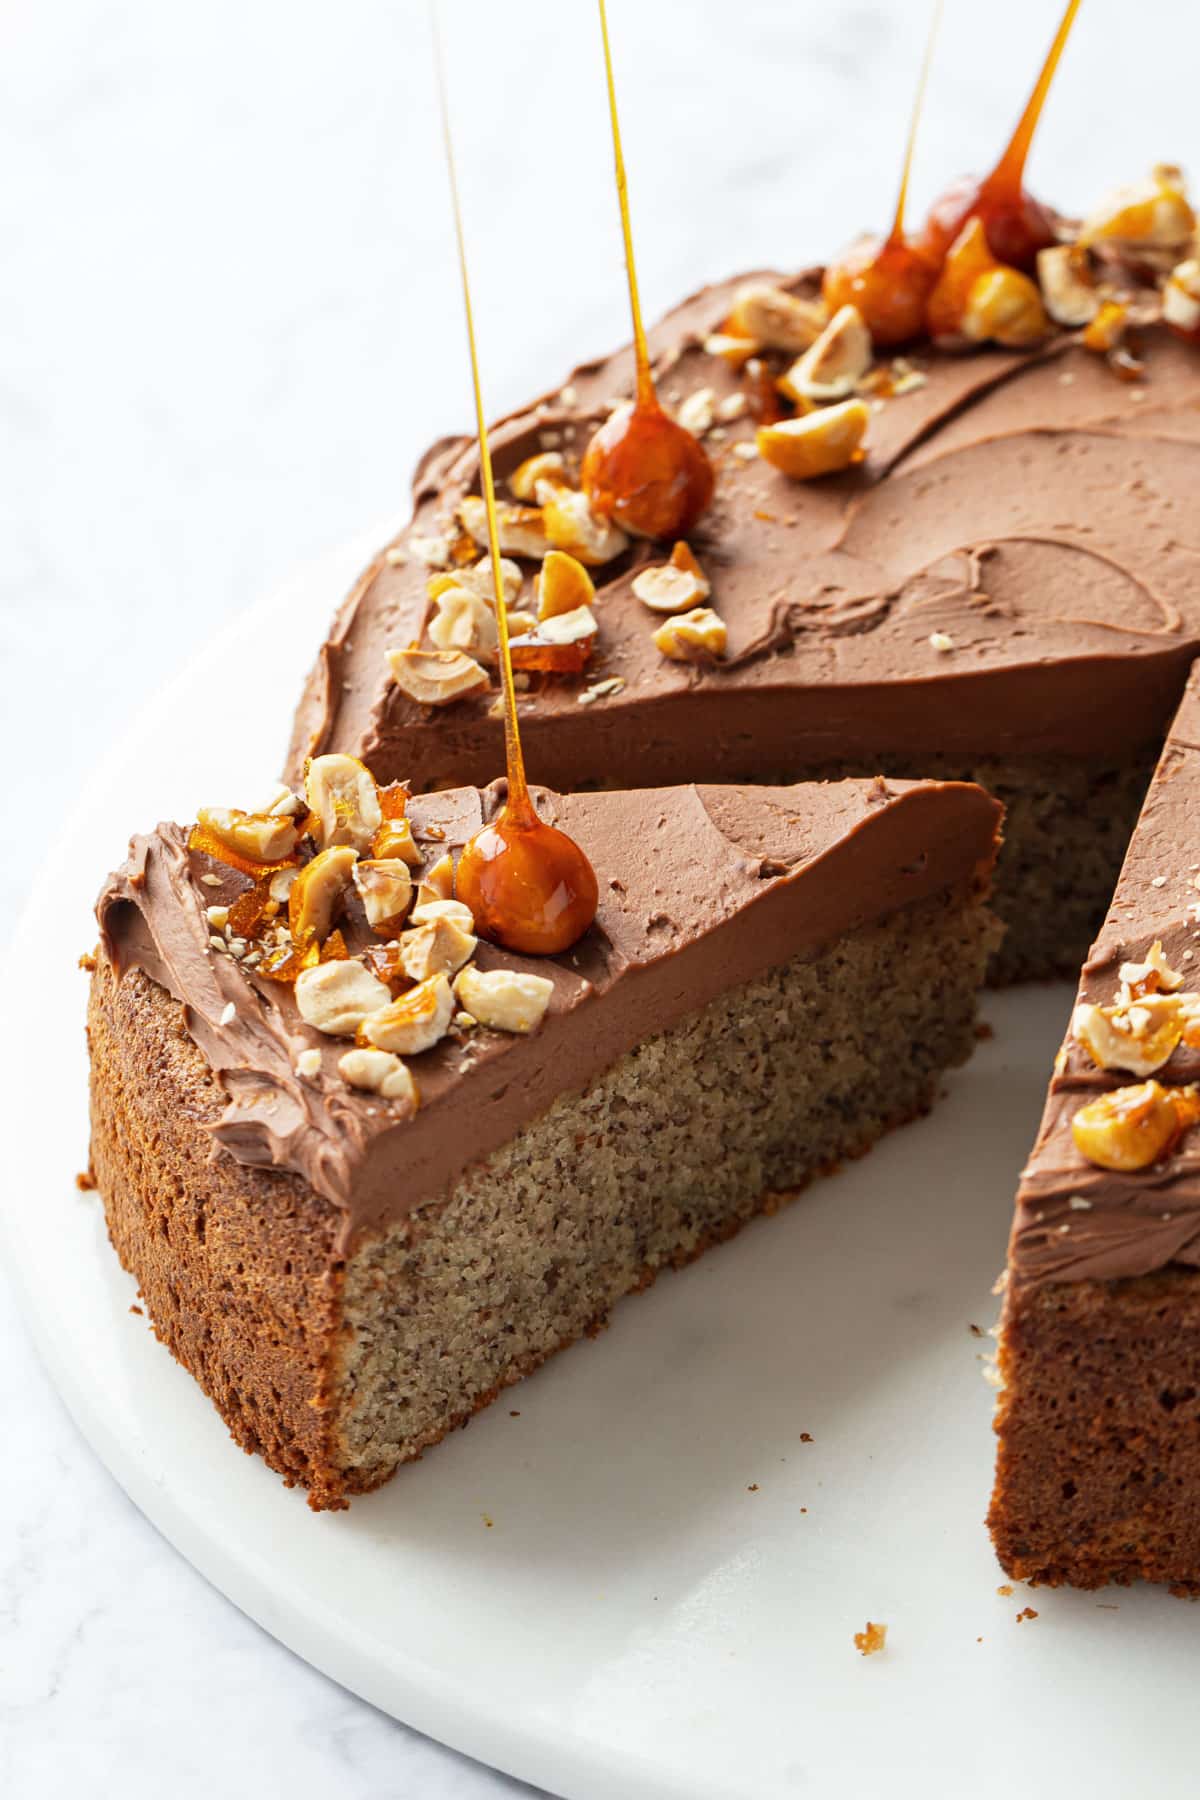
Nutty, fluffy, and fully flourless (and by flourless I mean there’s no wheat flour; it’s made with naturally gluten-free hazelnut flour), this tender and flavorful hazelnut cake has a soft, supple and satisfying texture and a swirl of fluffy whipped Nutella ganache on top, with candied hazelnut spikes for a showstopping finish.
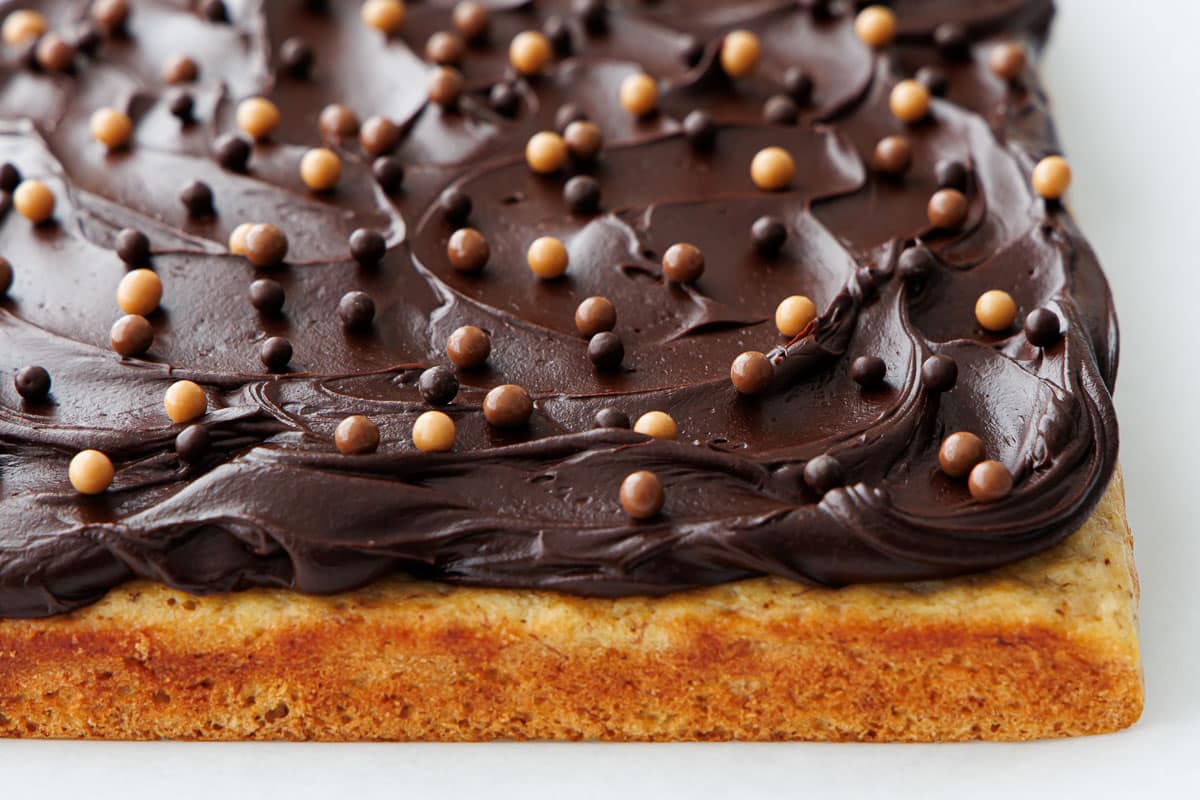
Hazelnuts have a distinctive, earthy and nutty flavor compared to other nuts, and this cake showcases a triple dose of it, with a tender cake base made with hazelnut flour (or very finely ground hazelnuts), a cloud of whipped milk chocolate and Nutella ganache, and a sprinkle of candied hazelnuts on top for a little extra crunch and pinache.
Finally, my flourless cake trifecta is complete: pistachio, almond, and now hazelnut!
I topped this stunner with a swirl of fluffy whipped Nutella ganache and a sprinkle of candied hazelnuts for added texture and crunch (and also a few hazelnut spikes because, why not?)
There’s a reason I keep returning to to this kind of cake, where the magic of nut flour (in this case, hazelnut) combines with eggs, sugar, and butter and miraculously bakes up into a fluffy, tender cake with a texture unlike anything you’ve ever had before (unless you’ve made one of my other flourless cake recipes, of course!)
I feel like most other flourless hazelnut cake recipes out there are heavy on the chocolate, more a flourless chocolate cake with an undertone of hazelnut. This recipe, on the other hand, while it does bring in some chocolate in the topping (hazelnuts and chocolate do go oh so well together after all), it is, first and foremost, a hazelnut cake, and that’s the flavor that shines.
And if you don’t like chocolate (who are you and why are you here? lol jk), you can easily swap the topping with something else entirely (maybe a fluffy whipped cream spiked with a little Frangelico, perhaps?) or even just a dusting of powdered sugar.
This recipe differs slightly from my flourless almond and pistachio cakes in that the egg whites are separated and whipped separately and then folded into the batter last, preserving even more air and giving this cake the lightest texture out of all three. Although it does require an extra mixing bowl (or an extra wash) to accomplish, but it’s definitely worth it. If you prefer a denser texture, you can certainly follow the process as outlined in the flourless almond cake and whip the eggs whole instead. The basic ratios of the recipe are nearly identical otherwise.
While I’m normally skeptical of gluten-free recipes which usually rely on flour replacements in an attempt to replicate a gluten-full recipe, that’s not the case here, where we’re using the nut flour specifically for its unique characteristics. Which means, yes this recipe is gluten-free, but you’re not sacrificing anything by it (and really, if you tried to make this recipe with a wheat flour instead of a nut flour it’d be rather unseemly and I don’t recommend it).
Weighting Game.
Interestingly, when testing this recipe I found that hazelnut flour weighs less per cup than almond flour, anywhere from a 10% to 35% difference depending on how it was measured (this is why you should make it your 2025 resolution to buy a kitchen scale and actually use it!)
For this reason, I’ve written this recipe to call for lightly packed hazelnut flour, which should bring it closer to the weight per cup of almond flour, instead of the typical “scoop and sweep” method for measuring flour. You want to lightly compress the flour in the cup, then add more as needed until the top is level. You’re looking for 90-100g per cup ideally.
 Measuring hazelnut flour using the scoop and sweet method results in a much lighter weight.
 A cup of hazelnut flour measured using the scoop and sweep method is noticeably lighter.
 Lightly packing the hazelnut flour into the measuring cups results in a slightly heavier cup that’s more comparable to almond flour.
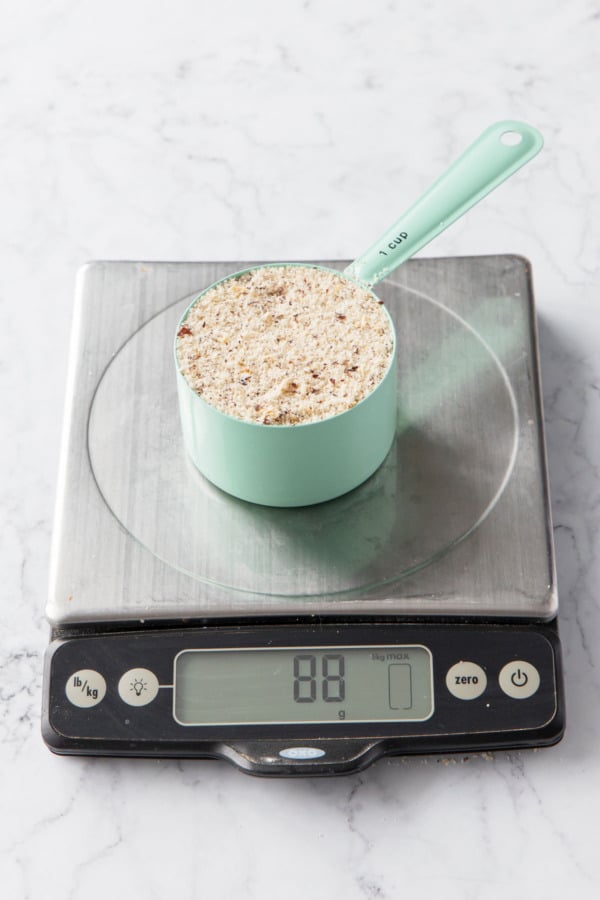 The lightly packed flour weighs about 35% more!
You can buy hazelnut flour already ground (I got mine from nuts.com, but Bob’s makes it as do a few other online brands). You can also make your own by pulverizing peeled hazelnuts (use the process outlined in my homemade almond flour recipe, although with hazelnuts you can lightly toast them to peel instead of blanching, or just grind them up whole).
I recommend sifting the hazelnut flour for a more even consistency, but be sure you do your measuring/weighing after sifting, not before as you’ll likely end up discarding a good amount of larger bits and need to make up the difference.
If you don’t have enough hazelnut flour, you can make up the difference with almond flour (replace an equal amount by weight).
Separation anxiety.
This recipe calls for beating the egg yolks separately from the egg whites, folding the whipped egg whites into the batter in alternating additions with the hazelnut flour to preserve as much of the air as possible.
The separation does make this recipe a bit more tricky, logistically.
Ideally, if you have two bowls for your stand mixer, whip the egg yolk portion first, then just swap in a new bowl and you only have to wash the whisk attachment (unless you have two of those too).
If you only have one bowl for your stand mixer, however, you’ll need to play a little musical chairs. Mix up the egg yolk portion first (with half of the sugar, then the butter), then transfer it to a second large bowl and set aside. Wash the mixer bowl and whisk attachment very well (even a speck of fat left on the bowl will prevent the egg whites from whipping up properly). Whip the egg whites in the newly clean bowl and then fold it into the egg yolk mixture alternating with additions of hazelnut flour.
You can also use a hand mixer for the egg yolks and a stand mixer for the whites if that works better with your setup (that said, a hand mixer for the whites isn’t ideal as it’ll take a solid 10 minutes at least. Trust me, I used a hand mixer for the process photos below and my arm was about ready to fall off by the end of it.)
Even though it’d be a bit easier logistically to reverse the order (you wouldn’t have to wash the bowl after whipping the whites before you do the yolks like you have to do the other way around), I don’t recommend whipping the egg whites first, as whipped egg whites tend to get a little weird and watery if they sit for too long.
(If you haven’t yet invested in a second bowl for your stand mixer, maybe now’s the time?)
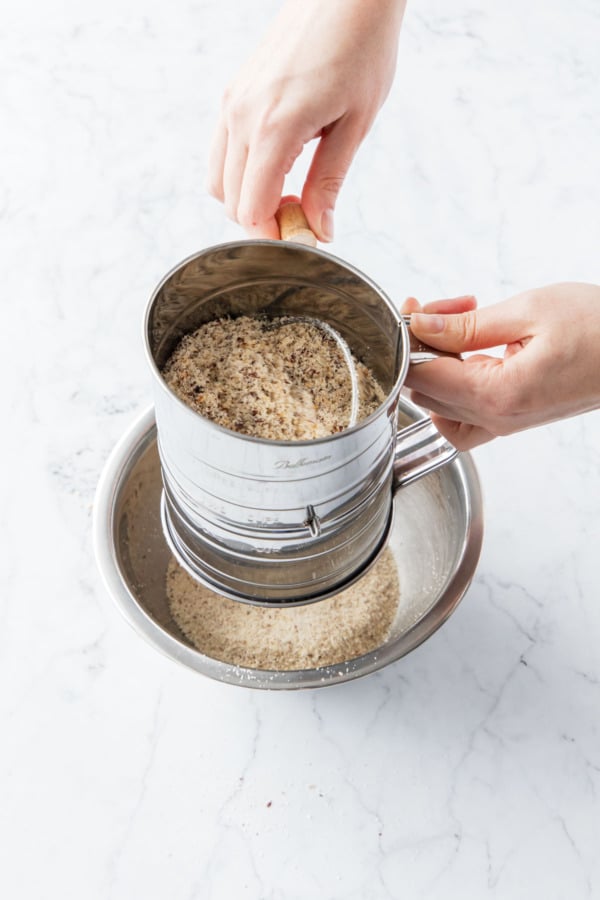 Sift hazelnut flour to remove any large chunks; be sure you have 300g after sifting.
 Whisk hazelnut flour with cornstarch, espresso powder (optional), and salt and set aside.
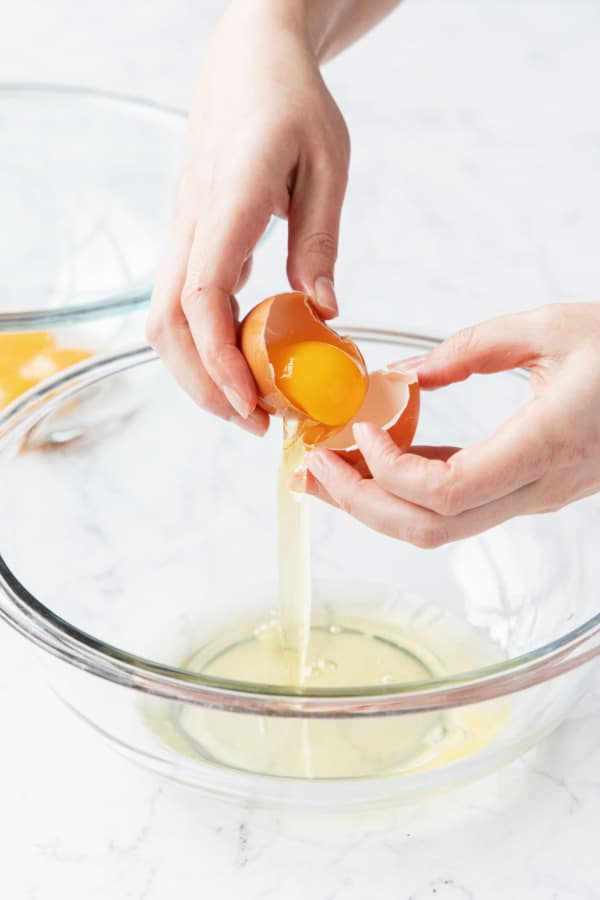 Separate your eggs, putting the whites in one mixing bowl and the yolks in another.
 Combing egg yolks and granulated sugar in a mixing bowl or the bowl of a stand mixer.
 With an electric mixer, beat egg yolks with 1 cup of sugar.
 Whip until egg yolks are thick and pale yellow in color.
 Gradually pour in lukewarm melted butter, in 3-4 additions, letting it incorporate fully after each addition. Mix in vanilla and set aside.
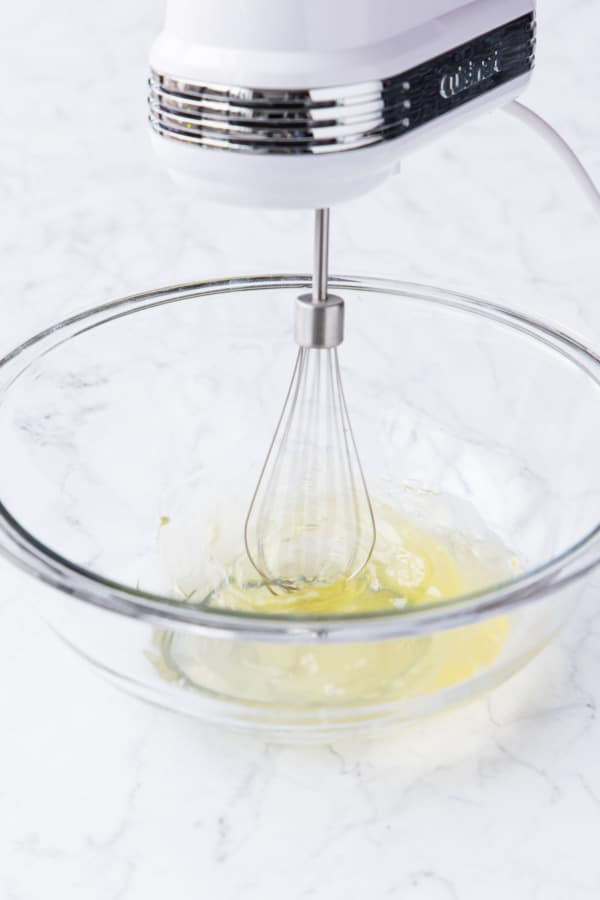 In a clean mixing bowl (and I recommend using a stand mixer for this if you have one), whip egg whites on medium speed.
 Once the egg whites are frothy, add remaining 1/3 cup granulated sugar, a little bit at a time, until fully incorporated.
 Increase mixer speed to high and beat until egg whites form medium-soft peaks. This could take anywhere from 5 to 10 minutes or longer.
 Transfer half of the whipped egg whites to the egg yolk mixture.
 Using a wide rubber spatula, gently fold in the egg whites to lighten and loosen the thicker egg yolk mixture.
 Add half of hazelnut flour mixture.
 Gently fold in hazelnut flour until almost fully incorporated.
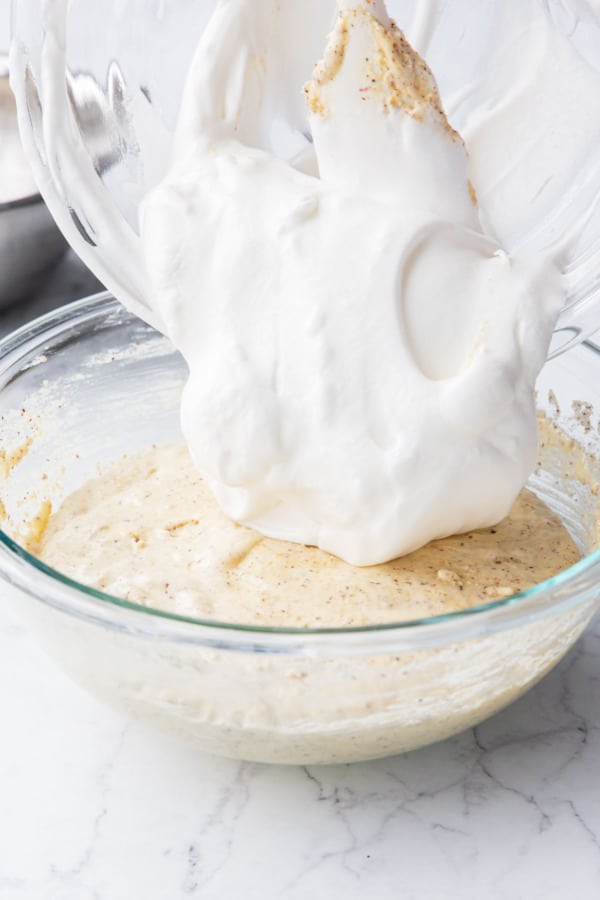 Add the remaining egg whites and gently fold to incorporate, preserving as much of the air as possible.
 I’d describe the motion of ‘folding’ as cutting through the center with your spatula, then swiping it around the outside (like you’re making a backwards letter D). Then rotate the bowl 90 degrees and repeat.
 Add in the rest of the hazelnut flour (it was at this point I wished I had a bigger bowl!)
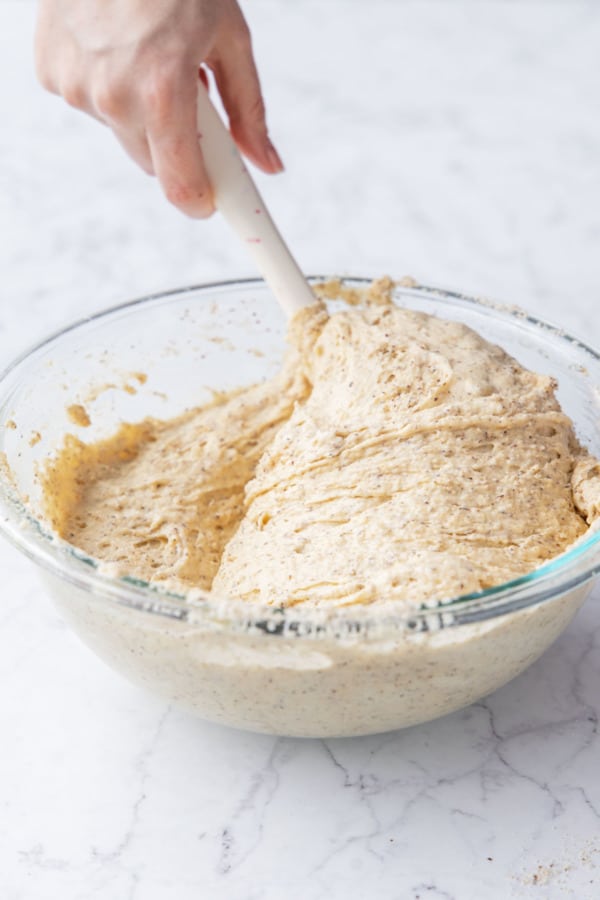 Fold everything together, scraping the sides and bottom of the bowl very well, until fully incorporated and no streaks of dry flour remain.
 Pour the batter into a 9-inch cake pan (ideally with a removable bottom) that’s been buttered and the bottom lined with parchment paper.
 Smooth out the top of the batter (it won’t settle much when baking); bake at 350 degrees F for about 40 minutes or until edges are golden and a cake tester comes out clean.
Note that I used a hand mixer for these process photos, however, I’d strongly recommend using a stand mixer if you have one at least for the egg whites. It took me forever to whip those up with the hand mixer, my arm was about to fall off (totally fine to use a hand mixer for the egg yolks and ganache though!)
Also, use a bigger mixing bowl than I did; by the last addition of hazelnut flour, the batter was close to overflowing (the stand mixer bowl works much better for this, which is what we used when we made it a second time for the video).
While I recommend using a 9-inch cake pan with a removable bottom, I don’t recommend using a springform pan as they tend to be thin and don’t conduct heat as evenly (leading to overdone edges and underdone centers). You can use a regular 9-inch cake pan, you’ll just need to invert the cake when it’s done to remove it from the pan.
Whip it good.
The topping is a fluffy whipped nutella chocolate ganache. It’s lighter than a traditional ganache, somewhere between a rich truffle filling and a chocolate mousse.
Whipped ganache has a much higher proportion of cream than a standard ganache so that it can be whipped into an airy, fluffy topping much liked whipped cream. If you prefer a thicker ganache that you can pour or spread on top rather than whipping it, increase the chocolate to 150g.
Additionally, if you use different chocolate percentages, you’ll need to adjust the cream as well. I’ve used half milk chocolate (35%) and half semisweet chocolate (56%); if you use all semisweet or darker chocolate, you’ll need a little more cream to keep the topping whippable.
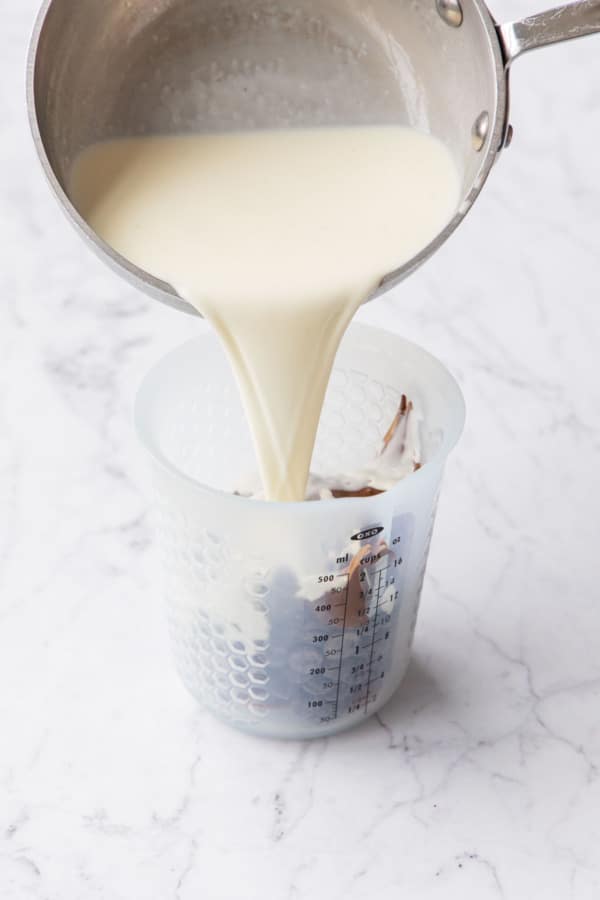 Combine milk and semisweet chocolate and nutella in a bowl or tall container (if using an immersion blender).
 Let sit for 30 seconds, then use a whisk or immersion blender to mix until smooth and chocolate is completely melted.
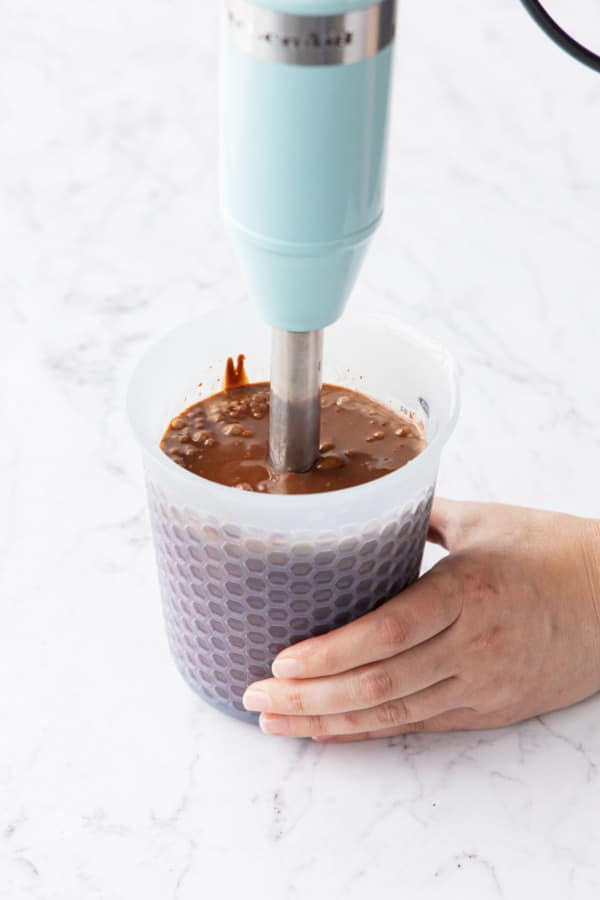 Once smooth and fully emulsified, transfer to a mixing bowl (whatever you will whip it in), cover with plastic wrap and chill.
 The ganache needs to chill fully (at least 4-6 hours or ideally overnight) otherwise it won’t whip up properly.
 Mix with an electric mixer for a few minutes or until thickened and fluffy, taking care not to overwhip.
 Spread ganache onto fully-cooled cake using an offset spatula (you can also pipe it on if you prefer).
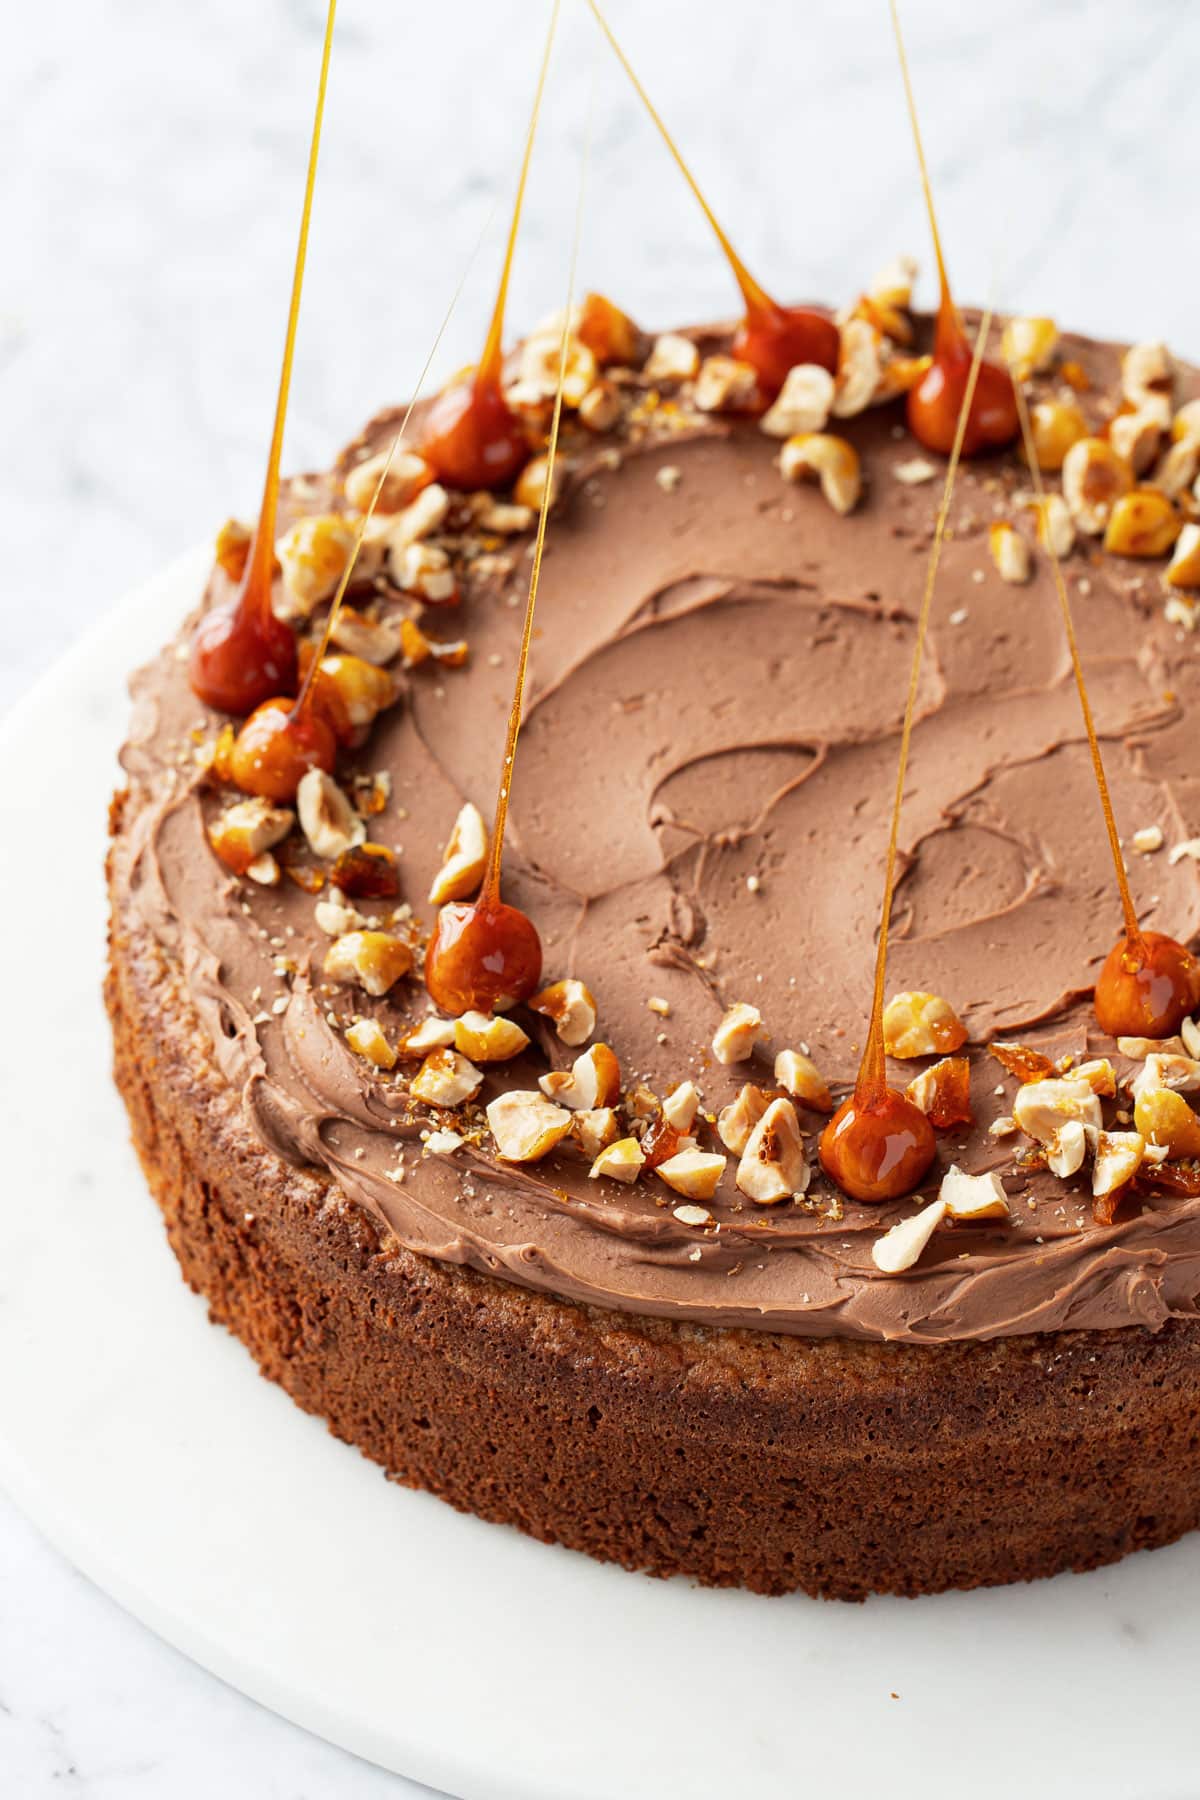
 Decorate with chopped candied hazelnuts or chopped toasted hazelnuts if desired.
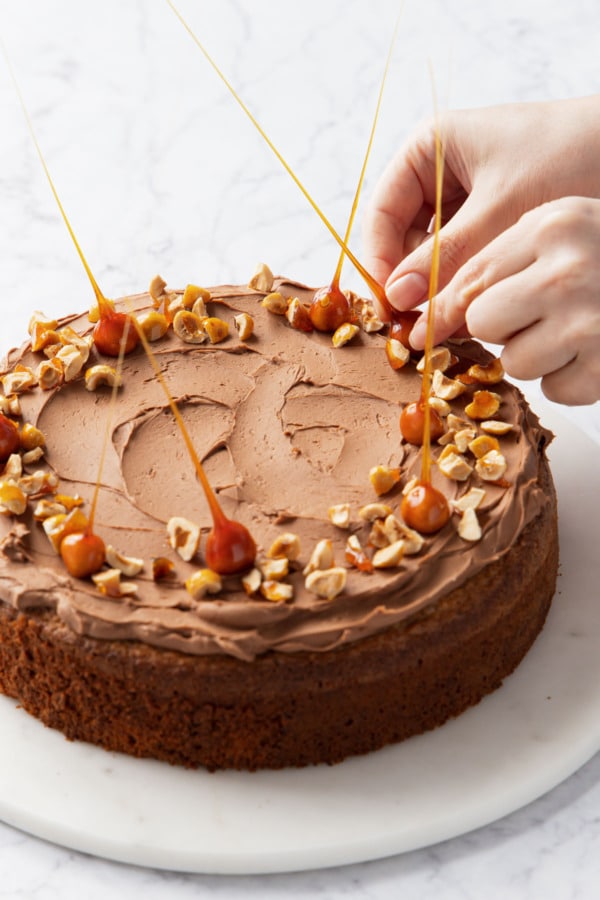 You can also decorate with candied hazelnut spikes for a dramatic finish!
Whipped ganache needs to chill for at least 4-6 hours or overnight if possible (lukewarm cream will not whip). Feel free to make it a day ahead of time (the cake can also be chilled overnight as well).
When whipping the ganache, unlike straight whipped cream, it’s going to take less time than you think. Like a minute or two at most. Overwhipping ganache will make it way thicker and harder to spread, with a flat finish instead of a satin one.
I decorated my cake with a sprinkle of chopped candied hazelnuts and a few hazelnut spikes for added drama (so sharp!) I’ll share the recipe for these in a separate post very soon, so keep your eyes peeled for that. You could also use chopped toasted hazelnuts, chocolate sprinkles or even chocolate curls.
While the cake and ganache keep remarkably well for days, I recommend waiting to add the candied nuts the day you plan to serve it as the sugar coating tends to melt and dissolve when stored in the fridge (or outside on humid days).

Ingredient Notes & Substitutions
Hazelnut flour: You can purchase hazelnut flour or make it yourself, using a similar method to my homemade almond and pistachio flour recipes, though no blanching is required to remove the skins. Instead, lightly toast the nuts for about 10 minutes at 350 degrees F, then rub them vigorously between layers of paper towels or a clean cotton dish towel—the skins should flake right off (it’s ok if they’re not perfectly clean, it’ll just add a speckled appearance to your final cake which I actually like here). Then you can process the nuts in a food processor or coffee grinder until you have a fine flour.
I definitely recommend sifting your hazelnut flour, whether using store-bought or homemade, to ensure a more evenly textured cake. I’ve made this recipe twice using different batches/brands of hazelnut flour, and some have much coarser bits than others. The more consistent your flour, the better the texture of the cake will be.
You can replace some of the hazelnut flour with more affordable almond flour if need be. But be sure to use an equal amount by weight, as almond flour tends to be denser and weighs more per cup than hazelnut flour does. Using an equivalent weight will ensure you don’t end up with too much flour.
Instant Espresso Powder: I think it the hint of espresso compliments the nutty richness of the hazelnuts beautifully (it’s only a teaspoon and is not a super prominent flavor in the final cake, feel free to double it if you want a stronger coffee flavor, or omit it entirely if you prefer).
Butter: for this recipe I splurged on some cultured salted butter, I also think a European-style butter would be lovely here too. If you’re using unsalted butter increase the salt in the recipe to 3/4 teaspoon.
Semisweet/milk chocolate: the whipped ganache uses a mix of milk and semisweet chocolates. If you use all semisweet or a darker chocolate, add another few tablespoons of heavy cream to make up the difference. Luckily since we’re whipping the ganache, the consistency isn’t quite as important, you just don’t want the ganache to be too thick or you won’t be able to whip it.
Vanilla extract: instead of or in addition to the vanilla, you could add a tablespoon or two of hazelnut liqueur like Frangelico.
Flourless Hazelnut Cake with Whipped Nutella Ganache
Prep Time: 1 hour
Cook Time: 45 minutes
Total Time: 5 hours
This naturally gluten-free cake is made with a mix of hazelnut and almond flours, sugar, whole eggs, and butter, and topped with a layer of luscious whipped Nutella ganache and candied hazelnuts.
For Cake:
▢ 3 cups / 300 g lightly packed hazelnut flour*▢ 2 tablespoons / 16 g cornstarch▢ ½ teaspoon fine sea salt▢ 1 ⅓ cups / 266 g granulated sugar, divided▢ 1 teaspoon instant espresso powder▢ 6 large eggs, separated, at room temperature▢ 10 tablespoons / 141 g European-style salted butter, increase salt to 3/4 teaspoon if using unsalted butter▢ 2 teaspoons vanilla extractFor Ganache Topping:
▢ 2 oz / 56 g 55-60% semisweet chocolate, finely chopped▢ 2 oz / 56 g 30-35% milk chocolate, finely chopped▢ ⅓ cup / 100 g Nutella▢ 1 cup / 240 g heavy whipping cream▢ 1 tablespoon / 22 g glucose or light corn syrup▢ candied hazelnuts, optional, for decorationPreheat oven to 350 degrees F. Butter and line the bottom of a 9-inch round cake pan (ideally with a removable bottom) with parchment paper; lightly butter parchment.
Sift hazelnut flour into a mixing bowl. If you have a lot of larger bits leftover, either add some more flour in or pulse the large bits a few times in a food processor to shrink them down, then sift again. You should have a total of 300g after sifting. Whisk in cornstarch, espresso powder and salt; set aside.
In the bowl of stand mixer fitted with the whisk attachment, whip egg yolks and 1 cup of granulated sugar on medium-high speed for 5 to 6 minutes or until thick and pale yellow in color.
Place butter in a heat proof measuring cup or container. Microwave at 50% power for 10 seconds, then stir. Repeat, microwaving in 10 second intervals, stirring in between, until butter is just barely melted. Ideally the butter should be melted and pourable, but still uniformly light yellow in color and not separated. Let cool slightly.
With the mixer running on low, gradually pour butter into mixing bowl with egg yolks, in 3-4 additions, letting it incorporate fully before adding more. Mix in vanilla extract.
If you only have one bowl for your stand mixer, transfer the egg yolk mixture to a separate large mixing bowl, then wash the mixer bowl and whisk attachment very well (even a speck of fat left on the bowl will prevent the egg whites from whipping up). Or if you have two bowls (which is ideal), swap them out and just wash the whisk attachment.
In a clean mixing bowl with a clean whisk attachment, whip egg whites on medium speed until frothy. Add remaining 1/3 cup sugar in 3 or 4 additions with the mixer running. Once all the sugar has been added, increase the speed to medium high and continue to whip until egg whites hold medium peaks, this could take up to 5 to 10 minutes.
Using a wide spatula, fold a little less than half of the whipped egg whites into egg yolk mixture to lighten it, until mostly incorporated. Then fold in half of the sifted hazelnut flour until it is almost-but-not-quite incorporated, followed by remaining egg whites and then remaining hazelnut flour. Be sure you are scraping the bottom and sides of the bowl as you go to ensure the ingredients are evenly mixed, but try not to overmix lest you deflate the air in the batter.
Pour batter into prepared cake pan. If your pan has a removable bottom, set it on a baking sheet (just in case).
Bake for about 40 minutes or until top is set, edges are light golden brown, and a toothpick inserted in the middle comes out clean.
Remove from oven and set on a wire rack and let cool. Run a knife around the edge of the cake, then remove sides (or invert to remove it from the pan). Let cool completely. The cake itself can be made ahead of time and stored covered in the refrigerator overnight if necessary; it can also be wrapped in plastic and frozen for up to a month. Let thaw overnight in the fridge before topping with the ganache.
For Ganache Topping:
Place chopped chocolate and nutella in a heat-proof bowl or, if you have an immersion blender, the blender canister works really well for this.
Warm cream and glucose in a small saucepan over low heat until it just begins to steam (don't let it fully boil).
Immediately pour hot cream over chopped chocolate; let sit for 30 seconds, then whisk until the chocolate is fully melted and emulsified, or use an immersion blender to blend until smooth.
Transfer to a large mixing bowl (whatever bowl you plan to whip it in ideally); press piece of plastic wrap down on the surface of the ganache and then refrigerate for 4-6 hours or overnight to cool completely.
When the ganache is fully chilled, whip with an electric hand mixer for a few minutes until lightened in color and increased in volume; try not to overwhip (the ganache will become very thick with almost a matte finish if overwhipped, still edible it just won't spread as smoothly). Spread or pipe onto cake; top with candied hazelnuts if desired then slice and serve immediately or refrigerate until ready to serve.
To store, press a piece of plastic or parchment to the cut surfaces, or store in an airtight container if you have one that fits (but it's not essential). The cake keeps quite well in the refrigerator for up to 5 days (though I recommend not adding the candied hazelnuts until just before serving as they might start to dissolve).
All images and text ©
for Love & Olive Oil.
Let us know what you think! Leave a Review below or share a photo and tag me on Instagram with the hashtag #loveandoliveoil.
There may be affiliate links in this post. We are a participant in the Amazon Services LLC Associates Program, an affiliate advertising program designed to provide a means for us to earn fees by linking to Amazon.com and affiliated sites.