Gate Pose (Parighasana) Guide: All About This Side Body Stretch, With Step-by-Step Instructions
The post Gate Pose (Parighasana) Guide: All About This Side Body Stretch, With Step-by-Step Instructions appeared first on The Yoga Nomads.
Wherever you happen to be sitting right now, pause and take a deep breath. Can you feel your rib cage expand as your lungs fill with air? What about the sides of your rib cage? If your breath feels a bit two-dimensional, it might be a sign that you need to give some attention to the side of your body!
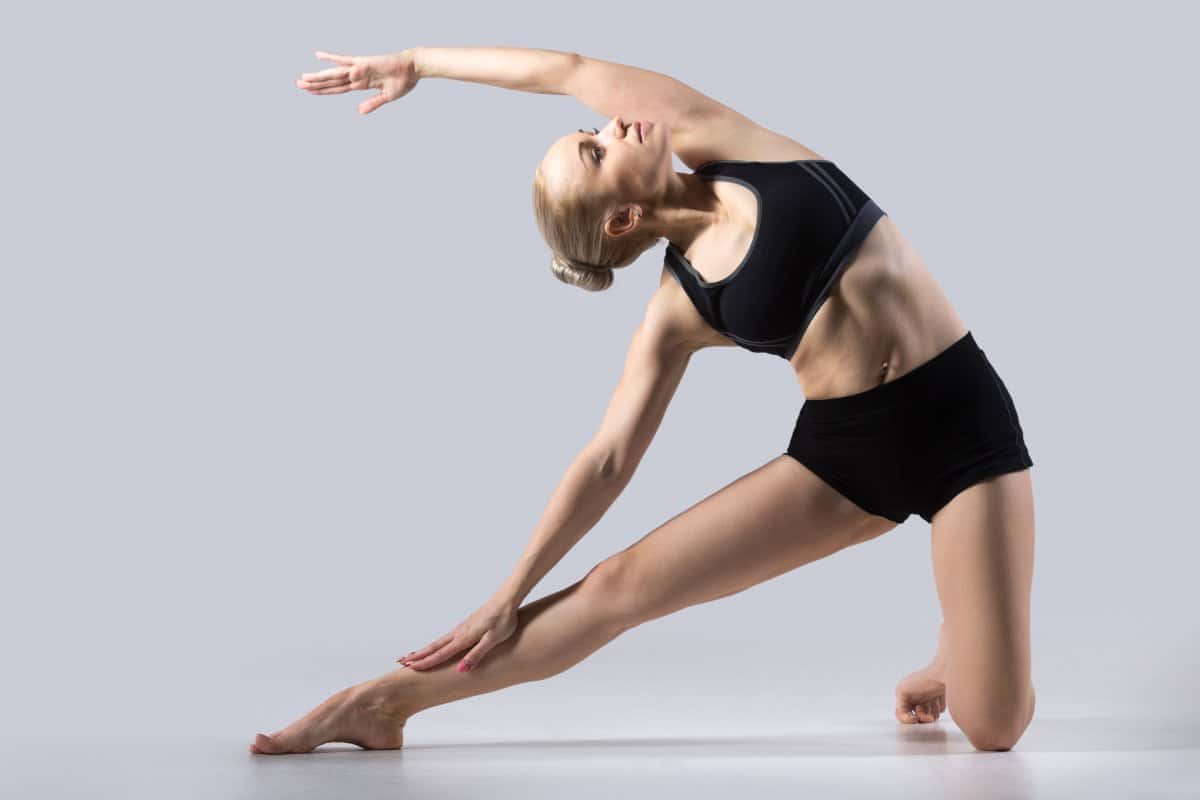
Gate Pose is a beginner-level, side bending yoga pose that stretches not only the torso but the lower body as well. This kneeling pose will help you develop strength and balance, as one side of the body lengthens while the opposite side supports your posture.
You might have heard this pose called by its Sanskrit name, Parighasana. The name is more or less a direct translation: parigha refers to the bar that closes a gate, while asana means “pose.” Put it together, and we have the common English name, Gate Pose.
Parighasana is a versatile yoga posture that might be used in a number of ways, as it engages and lengthens different areas of the body simultaneously. You can practice Gate pose in preparation for more intermediate postures like Triangle, or to stretch the entire side body after poses that work the obliques, like Side Plank.
We believe this beneficial pose should be in regular rotation in your yoga routine. Let’s break it down to explore all the amazing effects of practicing Gate Pose!
Benefits of Gate Pose
Gate Pose, while suitable for beginners, is actually a rather complex pose when broken down. Here’s what’s happening in your body when you practice Parighasana:
Lengthening: hamstrings, calves, inner thighs of the extended leg More lengthening on the opposite side of the body: hip flexors, IT band, abdominal obliques, back muscles (latissimus dorsi and quadratus lumborum), intercostal muscles, and triceps Strengthening: spine; glutes and side body (abdominal obliques) on bent sidePretty impressive for a beginning yoga posture! But, there’s even more you stand to gain from Gate Pose.
Easier Breathing
One of the most important aspects of Parighasana is opening up the sides of the body, and the positive effect this has on your breathing.
Your intercostal muscles (in between your ribs) and diaphragm are also known as your respiratory muscles. The correct function of these muscles are directly related to your breathing: if these muscles become tight or fatigued, it will be difficult to take a full, deep breath. Tight intercostal muscles can actually contribute to worse anxiety symptoms! Unfortunately, these muscles along the sides of our body are too often neglected, and become tight over the course of long sedentary periods.
When you give some much-needed love to the sides of your body, you open up your whole torso and give your lungs extra room to expand.
Overall Benefits
Once you’ve been practicing Gate Pose regularly, here are a few more positive effects you can expect to experience:
Reduced stiffness and in the back and spine, and relief from lower back pain through strengthening the back muscles Improved spinal mobility, especially in the thoracic spine (upper back) More open hips Better digestion, through the lateral stretch compressing the abdominal organsAs you can see, Gate Pose is really amazing for your body, from your head to your toes!
How To Practice Gate Pose (Parighasana)
To experience all the wonderful effects of Parighasana, try it out for yourself! Here’s how:
Begin in a kneeling position with your knees hip width distance apart. Rise up so your hips are stacked over your knees with your torso upright, shoulders aligned over the hips. You may keep the tops of your feet pressing into the floor, or tuck your toes for a bit more stability. Check that your core muscles are engaged by pulling your navel in and up. This will help you balance as you extend one leg to the side. Begin with your hands on your hips, or press your palms together in a prayer position in the center of your chest. This also will help you maintain balance as you move your lower body into position. Carefully extend your right leg straight out to your side, keeping your right ankle and right knee in line with your right hip. Turn your right foot in slightly with your right toes facing forward. Place your foot flat on the floor and ground down through the outer edge of the right foot. As you breathe in, left your arms straight overhead, and grow taller through the top of your head to lengthen your spine. With your exhale, bend your upper body to the right, over your stretched leg. Place your right palm on the top of your right shin (or higher up on the leg, depending on your flexibility). Keep your left arm reaching up and over to your right, left palm facing the floor.. Use your neck muscles to keep your head in line with your spine, with your left ear next to your left bicep. Keep gazing straight ahead. As you stretch sideways, feel the entire left side of your body lengthen, from the outside of the thigh, up through your left hip and side wall of your torso, through your left arm and into your fingertips. Hold Gate Pose on this side for a few breaths. Breathe deeply so you feel the muscles in between your ribs on your left side expand and soften with each breath. When you are ready to exit the pose, use your core strength to return your body to an upright position with your arms reaching up. Then, bring your right leg back in and return to a kneeling position. If you like, you may sit back on your heels in Hero Pose to rest for a moment before switching sides. When you are ready, begin in the same upright kneeling position and repeat Gate Pose with your left leg extending out to the side, reaching your right arm up and over to stretch the whole right side of your body.Variations of Gate Pose
In some yoga classes, or practicing yoga on your own, you might try an alternative alignment of gate pose. The difference is the positioning of the leg extending to the side. In this variation, rather than planting the foot with the toes facing forward, you externally rotate the stretched leg so that the foot and toes all point in the same direction (rather than the foot being perpendicular to the leg).
Having the leg in external rotation will change the feeling in your hip quite a bit as the rotator muscles work to turn your leg outwards.
While in this varied position of Gate Pose, you may also deepen the stretch on the back of your straight leg by pulling your toes up and back, foot flexed. You’ll feel a more intense stretch in your hamstring, as well as your calf and soleus muscle (the back of your ankle).
Alignment Pro-Tips and Yoga Teacher Cues
To refine your alignment, expand your body awareness, and deepen your experience of Gate Pose, try incorporating these tips. Similarly, if you are a yoga teacher, these are great cues to share with your students!
Tip #1: As you stretch sideways, avoid putting too much weight on your hand that is resting on your straightened leg. To do this, you’ll need to engage your core, especially the oblique abdominal muscles on the bent side of your body.
Tip #2: To keep your chest open in your side bend, think about keeping your shoulders in line with one another, rather than letting your top shoulder roll forward. Another way you might think of this is keeping your top armpit open towards the sky.
Tip #3: If you are practicing Gate Pose with your straight leg externally rotated, try to avoid hyperextending or locking out your knee. To prevent this, pull up on your knee cap to engage your quadricep muscles on top of the thigh, and keep a micro-bend in your knee.
Contraindications
Gate Pose is a rather dynamic asana as it involves many muscles of the body either working or lengthening. For this reason, there are several reasons you might need to skip this pose:
Knee injury; although, if only a mild injury you can modify the pose with a folded blanket (see following section) Shoulder injury, recent heart surgery or recently being fitted with a pacemaker; all of these cases affect your range of motion and must be cleared by a medical professional before you attempt to raise your arms overhead. Ankle injury Hernia of any kind; this pose stretches the diaphragm, abdomen, and groin areas and could affect the healing process when recovering from a hernia. 3rd trimester of pregnancy; the body position of Gate Pose puts pressure on the uterus, ribs, and lower back. Instead, try the Chair Yoga version detailed in the following section.Gate Pose Modifications
Although Gate Pose is categorized as a beginner-friendly pose, you might find a bit of support helpful until you get used to the somewhat tricky body position. Here are a few different ways you can modify Parighasana.
Using Yoga Props
Blanket: place a folded blanket under the knee for extra cushion, or under the foot of the extended leg if you have difficulty pressing the foot into the floor. Block: place a block in front of your straight leg and place your palm on the block, rather than on your leg. This modification is helpful if you are still building up the core strength needed to hold your torso in a side bend position. Wall: practice Gate Pose against a wall for extra stability if you are working on finding your balance. Place the ball of the foot of the extended leg against a wall, sort of like a kickstand.Chair Yoga Version
This gentle Chair Yoga variation of Gate Pose is perfect for pregnant yogis, or those recovering from a knee injury.
Sit towards the front of your chair with both feet firmly planted on the floor. Keep your right foot planted and extend your left leg out to the side. Your toes may face forward (internal rotation) or be angled out (external rotation), whichever is a more comfortable position for your hip. Press down through your left foot and lift your arms overhead as you inhale. With your exhale, bend to your left side and let your left hand rest gently on the outside of your left thigh, without putting much weight on your left leg. Keep both sitting bones connected to the seat of your chair. Keep your right arm reaching up and over, with your right ear next to your bicep. Feel a stretch along the right side of your body, from your hip, up your torso, right arm, all the way through your fingertips. Hold this side body stretch for a few breaths, then return your torso upright and release your arms down. Bring your left leg back so both feet are planted on the floor in front of you. When you are ready, repeat Gate Pose on your other side, straightening your right leg out to the side and bending to your right.Preparatory Poses For Gate Pose
Parighasana requires openness in many areas of the body. Each of these preparatory poses targets a specific area that will be stretched in Gate Pose.
Standing Crescent Pose
This standing side body stretch will start to open up your torso, warm up your oblique abdominal muscles, and mobilize your thoracic spine.
Stand at the top of your yoga mat in Mountain Pose, standing either with your feet together, or separated at a hip width distance. Begin with your arms hanging at your sides, palms facing forward and chest open. Breathe in and reach your arms overhead. Interlace your fingers, leaving your index fingers pointing up. With your exhale, bend to your right side with your arms reaching up and over. Press your left hip out. Engage your oblique core muscles to return to your center with your inhale. On your next exhale, bend to your left side and press your right hip out. Return to your center with your inhale. Flow from side to side a few times, moving with your breath. Finally, return center and release your hands, and lower your arms down by your sides.Downward Facing Dog
Down Dog is a great pose for lengthening the back side of your body, including your spine and your legs, making this a wonderful preparation for Gate Pose.
For a guide on how to properly practice Downward Dog, you can view detailed instructions on our Down Dog pose breakdown.
Bound Angle Pose
One of the main targets of Gate Pose is to actively stretch the inner thighs and groin. You can begin to open up these muscles, along with the glutes and hips, with a passive stretch in Bound Angle Pose.
If you are a beginner to practicing yoga, you can view step-by-step instructions in our Bound Angle Pose guide.
Poses to Follow Up Gate Pose
In most cases, Parighasana is a base pose used to work up to more intermediate or advanced postures that engage or stretch similar muscle groups. Here are a few of our recommendations for poses you can practice after Gate Pose.
Wide Legged Forward Fold
Ready for a more intense hamstring and inner thigh stretch? Try a Standing Wide Legged Forward Fold! Here’s how to do it:
Stand facing the long edge of your yoga mat and separate your feet a considerable distance; each foot should be 12-24 inches past your hip. Plant your feet so they are parallel with the short edges of your yoga mat; ground down through the outer edges of both feet, lifting through your inner arches. Lift your arms up overhead as you inhale and grow tall through the crown of your head. With your exhale, hinge and your waist and bow forward, bringing your hands to the floor or (on top of two blocks placed on the floor just in front of you). Let the top of your head hang towards the floor and relax the back of your neck. Stay in your Wide Legged Forward Fold for several breaths. When you are ready to exit the pose, first bend your knees slightly. Then, slowly roll up to stand upright, stacking one vertebra on top of the next so your head is the last part to lift.Triangle Pose
Triangle Pose engages and lengthens many of the same muscles as Gate Pose, but with both legs straight. This results in a more intense stretch for the side body and legs, and requires more strength from the abdominal obliques in order to hold the pose. If you are comfortable and feel stable in Parighasana, give Triangle Pose a try and notice what similarities you feel between the two postures.
For a Traingle Pose breakdown with detailed instructions, visit our Trikonasana guide!
Wild Thing
After practicing Gate Pose, you’ll feel length in your side body and your spine should be warm. Wild Thing will feel like a natural progression as you continue to stretch your spine and torso in slightly different ways: Wild Thing is a back-bending pose which extends the spine, while lengthening the front side of the body. There are a few different ways to enter Wild Thing, one of them being from Side Plank:
Begin in Side Plank, with your left hand planted directly below your left shoulder. Press the outer edge of your left foot into the floor and stack your right leg on top of your left. Lift your hips, creating one long line with your body. Reach your right arm up towards the sky, directly above your right shoulder. Float your right leg up and bend your right knee. Place your right foot down behind you, keeping your heel lifted. Press into the ball of your right foot and open your chest toward the sky. Begin to arch your back and reach your right arm back over your head, with your palm facing down. Squeeze your glutes and press your hips up toward the sky. Take your gaze towards your right palm. Breathe deeply and feel your rib cage expand with each inhale. After a few breaths, gently lower your hips to the floor and extend both legs in front of you in Staff Pose. When you are ready, try Wild Thing on your other side, beginning in Side Plank with your right hand planted on the floor and left leg stacked on top of your right.Child’s Pose (Counterpose)
The ultimate counterpose for so many yoga postures, Child’s Pose is always a fantastic choice to follow Gate Pose. With Balasana, you’ll neutralize your spine and stretch the muscles of your back that were put to work holding the side bend of Gate Pose. In Child’s Pose, allow your arms to rest and your sides with your palms facing up to let your arms and shoulders relax completely.
If you need a reminder on how to get into Child’s Pose, you can view instructions in our pose guide here.
Common Questions About Gate Pose
Should my toes be pointing forward, or out to the side?
Either alignment of the stretched leg is acceptable in Gate Pose, yet offers a different experience and comes down to personal preference. If your hips are really tight, the externally rotating your leg (so your toes face out) may feel a bit intense. Try the pose both ways, and see what feels best in your body.
I’m very stiff and can’t bend far enough to reach my shin. What should I do?
Firstly, try to remember the intentions of the asana: Gate Pose is meant to stretch the back of the straight leg, and the opposite side body. If you are feeling these sensations, don’t worry so much about what the pose looks like. You can rest your hand on your thigh, or even on a yoga block placed in front of your leg.
When should I practice Gate Pose?
You can use Parighasana to stretch your body after a physically demanding yoga practice, or to warm up for more intense side-bending postures. So, you might include Gate Pose in a yoga sequence at any point it feels appropriate. Even if you don’t have time for a full yoga practice, Parighasana will feel great if you’ve been sitting for an extended period of time.

 FrankLin


