How to Block Scrapers, Hackers & Spammers With Wordfence via @sejournal, @martinibuster
Block plagiarizing scrapers and hackers with these tips for unlocking powerful capabilities within the Wordfence WordPress security plugin The post How to Block Scrapers, Hackers & Spammers With Wordfence appeared first on Search Engine Journal.

Wordfence is a popular WordPress security plugin. Among the features are scanner that monitors for hacked files and a firewall with regularly updated rules that proactively blocks malicious bots.
There’s also a useful feature tucked away in the tool that makes user-configurable firewall rules available that can supercharge your ability to block hackers, scrapers and spammers.
Scrapers are especially troublesome because they copy your content and publish it elsewhere.
Using a tool like Wordfence can help reduce the amount of content that scrapers can plagiarize.
There are many WordPress security plugins and SaaS solutions to choose from that are highly recommended, including Sucuri Security and Cloudflare. Wordfence is one of many security solutions available and it’s up to you to figure out which feels more comfortable within your workflow.
Wordfence and other solutions function fine as a set it and forget it solution.
However, in my experience I have found that the user configurable firewall in Wordfence gives one an opportunity to dial up the bot hammering power and really stick it to the hackers and scrapers.
But before you dial up the firewall it’s important to know how far these firewall rules can be taken and we’ll take a look at that, too.
Wordfence WordPress Security
Wordfence is trusted by over 4 million users for protecting their WordPress sites.
The default Firewall behavior is to block bots that grab too many pages too fast or bots and humans that display activities that signal an intent to hack the site.
The firewall will block the IP address of the rogue bot for a set period of time, after which Wordfence drops the block.
The default settings on the firewall works great.
But sometimes bots still get through and are able to scrape a site or probe it for vulnerabilities by scraping the site slowly.
A common approach by hackers is to set a bot to hit the site quickly and when it gets blocked it will rotate to other IP addresses and user agents, which causes a firewall to start the detection process all over again.
But these bots aren’t always programmed very well which makes it easy to block them more efficiently than with the default Wordfence settings.
Background Information About Wordfence Firewall Rules
It’s possible to accomplish efficient bot blocking with server level tools, multiple plugins and even by the use of an .htaccess file.
But editing an .htaccess file can be tricky because there are strict rules to follow and a mistake in the .htaccess file can cause the entire site to fail.
Using firewall rules is simply an easier way to block bots.
What Can You Block With Wordfence?
Wordfence allows you to create rules to block according to each of the following reasons:
IP Address Range Hostname Browser User Agent ReferrerIP Address Range
IP address means the IP address of the server or ISP that the bot or human is coming from.
Hostname
Hostname means the name of the host. The host isn’t always declared, sometimes the bot/human visitor displays just an IP address.
Browser User Agent
Every site visitor generally tells the server what browser it is using. Browser User Agent means the browser that the visitor says it’s using. A bot can say it’s virtually any browser, which they sometimes do in order to evade detection.
Referrer
This is a page that a bot or human supposedly clicked a link from.
Wordfence Custom Pattern Blocking
The way to block bad bots using any of the above four variables is by adding a custom rule in the Custom Pattern Blocking tool.
Here’s how to reach it.
Step 1
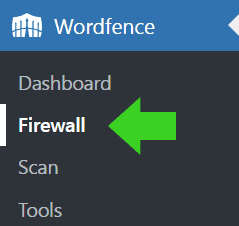
Click the link to the Firewall from the left side admin menu in WordPress
Step 2
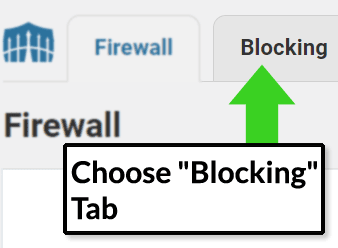
Choose the tab labeled Blocking
Step 3
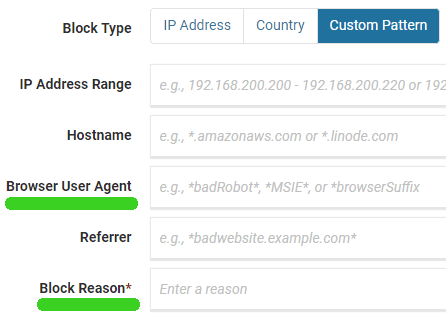
Choose the “Custom Pattern” tab and create a firewall rule in the appropriate field. One of the fields is labeled “Block Reason.” Use that field to add a descriptive phrase like Hostname, User Agent or whatever. It will help you to review all rules you create by being able to sort by what kind of block it is.

Step 4
Step 5
Make your rule by clicking the “Block Visitors Matching This Pattern” button and you’re done.

Wordfence rules can use the asterisk (*) as a wild card.
Should You Block IP Addresses with Wordfence?
Wordfence makes it easy for a publisher to set up firewall rules that efficiently blocks bots.
That’s a blessing but it can also be a curse. For example, permanently blocking thousands of IP addresses using Wordfence firewall is not efficient and probably not a proper use of Wordfence.
Temporarily blocking IP addresses is fine. Permanently blocking IP addresses probably not fine because, as I understand it, going by memory, this can bloat or slow down your WordPress installation.
In general, permanently blocking thousands or even millions of IP addresses is best accomplished with an .htaccess file.
Hostname Blocking with Wordfence
Blocking a hostname with Wordfence can be a way to block hackers, spammers and scrapers. By clicking Wordfence > Tools you can view the Wordfence Live Traffic log.
That shows you bot and human visitors, including bots that were blocked automatically by Wordfence.
Not all site visitors display their hostname. However in some cases they do display their hostname and that makes it easy to block an entire web host.
For example, one site, for whatever reason, attracts DDOS levels of bot traffic from a single host. None of my other sites attracts that much attention from this host, just this one site.
Between March 2020 and December 2021 that one site received over 250,000 attacks and every single one of them was blocked by Wordfence.
Clearly, blocking bots by hostname can be useful if you want to block a cloud host that sends nothing but hackers and scrapers.
However some hosts, like Amazon Web Services (AWS) send both bad bots and good bots. Blocking AWS servers can also inadvertently block good bots.
So it’s important to monitor you’re traffic and be absolutely certain that blocking a hostname will not backfire.
On the other hand, if you have no use for traffic from Russia or China, then it’s easy to block hackers, scrapers and spammers from those two countries by creating a firewall rule using the hostname field.
All you have to do is create a rule that blocks all hostnames that end in .ru and .cn. That will block all Russian and Chinese hostnames that end in .ru and .cn.
This is what you enter into the Hostname field:
*.ru
*.cn
This is not meant to encourage anyone to use Wordfence to block Russian and Chinese bots via the hostname. It’s just an example to show how it’s done.
Block Hackers and Scrapers By User Agent
Many rogue bots use old and out of date browser user agents.
After Russia invaded Ukraine I noticed an increase in hacking bots using the Chrome 90 user agent (UA) from the same group of web hosts. Normally bot traffic is different across the different websites. So this stood out when they all looked the same across all of my sites.
Whenever Wordfence automatically blocked these bots for hitting my site too fast the bots would switch IP address and begin hitting the sites over and over again.
So I decided to block these bots by their Browser User Agent (often referred to as simply, UA).
First I checked the StatCounter website to determine how many users around the world are using Chrome 90. According to the StatCounter statistics, Chrome 90 browser share as of January 2022 stood at 0.09% market share in the USA.
At the time of this writing the Chrome browser is at version 100. Considering that Chrome automatically updates browser versions for the vast majority of users it’s not surprising that the usage of Chrome 90 is virtually nothing, so it’s very unlikely that blocking all visitors using a Chrome 90 browser user agent will not block an actual and legit person visiting your site.
So I determined that it’s safe to block anything that shows up to my site with the Chrome 90 user agent.
However, there are online tools, like GTMetrix and a security server header checker, that use the Chrome 90 user agent.
So if I blocked all versions of Chrome 90 (by using this rule: *Chrome/90.*), I would also block those two online tools.
Another way to do is to look at the specific Chrome 90 variants used by the hackers and the online tools.
GTMetrix and the other tool use this Chrome UA:
Chrome/90.0.4430.212Hackers and scrapers use these Chrome UAs:
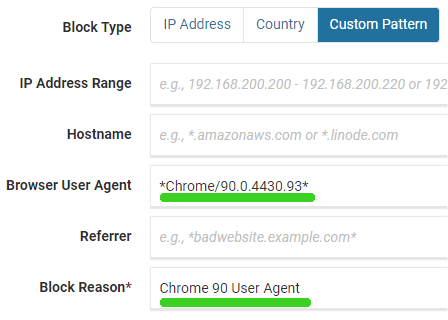
Chrome/90.0.4400.8 Chrome/90.0.4427.0 Chrome/90.0.4430.72 Chrome/90.0.4430.85 Chrome/90.0.4430.86 Chrome/90.0.4430.93So, if you want to allow the online tools to still scan your site but also block the bad bots, this is an example of how to do it:
*Chrome/90.0.4400.8* *Chrome/90.0.4427.0* *Chrome/90.0.4430.72* *Chrome/90.0.4430.85* *Chrome/90.0.4430.86* *Chrome/90.0.4430.93*This is how to block Chrome/90.0.4430.93:
Caveat About Blocking User Agents
Before blocking Chrome 90 I kept checking the Wordfence traffic log (accessible at Wordfence > Tools) in order to be sure that no legit bots, like GTMetrix, are using Chrome 90 was using that user agent.
For example, you might not want to block Chrome 96 because some of Google’s tools use Chrome 96 as a user agent.
Always research whether legitimate bots are using a particular user agent or hostname.
And easy way to research that is by using the Wordfence Traffic Log.
Wordfence Traffic Log
The Wordfence traffic log shows you at a glance all user agents accessing your site in near real-time. The traffic log shows information such as user agent, indicates whether the visitor is a bot or a human, provides the IP address, hostname, the page being accessed and other information that helps determine if a visitor is legit or not.
The way to access the traffic log is by clicking Wordfence > Tools.
Blocking old browser versions is an easy way to block a lot of bad bots. Chrome versions from the 80, 70, 60, 50, 30 and 40 series are particularly numerous on some sites.
Here’s an example of how to block old Chrome UAs that are used by bad bots:
*Chrome/8*.* *Chrome/7*.* *Chrome/6*.* *Chrome/5.0* *Chrome/95.* *Chrome/5*.* *Chrome/3*.* *Chrome/4*.*Again, the above is not an encouragement to block the above bots.
The reason I would use *Chrome/6*.* is because with a single rule I can block the entire Chrome 60 series of user agents, Chrome 60, 61, 63, etc., without having to write all ten user agents.
I can block the entire 60 series with a single rule.
Do not block the ten and up series like this *Chrome/1*.* because that will also block the most current version of Chrome, Chrome 100.
The above is an example of how to block bad bots using the described Chrome user agents.
Bad bots also use old and retired Firefox browser user agents and some even display python-requests/ as a user agent.
Be Careful When Creating Firewall Rules
Always do your research first to determine what bad bots are using on your own sites and make sure that no legitimate bots or site visitors are using those old and retired browser user agents.
The way to do your research is by inspecting your traffic log files or the Wordfence traffic logs to determine which user agents (or hostnames) are from malicious traffic that you don’t want.

 Hollif


