How to create a Facebook group
Starting a Facebook group is a pretty easy process. Here's what you need to know.
Are you interested in cultivating an online community about one of your hobbies? Do you just need a way to organize a family event or book club? If so, you may want to consider creating a Facebook group. Facebook groups can provide a central, online location for gathering and communicating with your friends and family or for meeting new people to discuss your shared interests or plan an event together. It can be a great way to cultivate a sense of community online.
Plus, creating a Facebook group is incredibly easy.
What is the difference between a page and a group on Facebook?
The main difference between a Facebook page and a group comes down to privacy and visibility.
A Facebook page is essentially designed to maximize visibility, and you can't really make them private. That's because they're more for businesses and public figures. Pages are for use cases in which a person, brand, or company wants to be seen and wants to attract as many customers and fans as possible. Usually, anyone can like or follow a page to keep up with the goings on of the brand or person that page represents.
Facebook groups are different. Groups actually offer the option to be made private and/or given limited visibility because not all groups want to attract lots of attention from everyone on Facebook. Some groups are for small, specific interests and some groups may want to limit membership to select people. Groups are more about cultivating community rather than promoting a brand, and sometimes setting privacy limits can help keep those communities safe.
How do I start a Facebook group: on desktop web
Starting a Facebook group is actually a fairly easy process. Here's how to do it on a PC via the desktop website version of Facebook.
Step 1: Open up your desktop web browser, go to Facebook.com, and log in to your account if you're not already logged in.
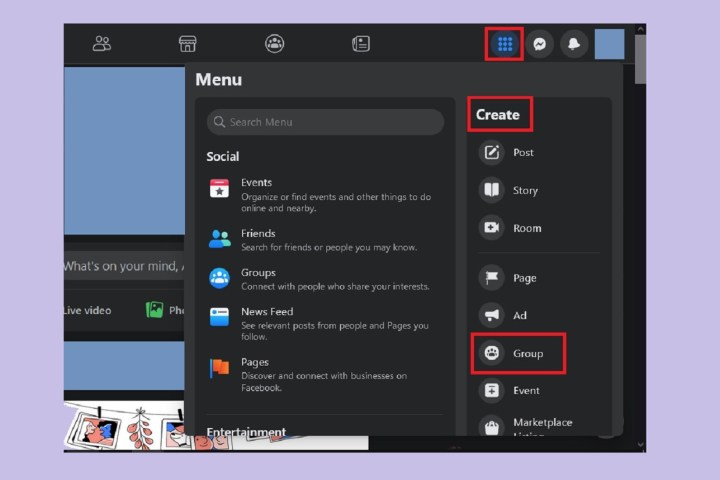
Step 2: Select the Menu icon in the top right. This icon looks like series of nine dots arranged in a square.
Step 3: From the menu that appears, under the Create header, choose Group.
 screenshot
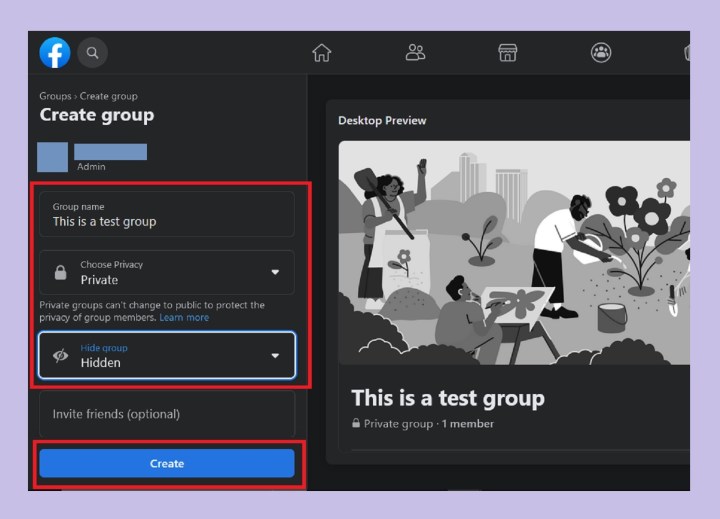
Step 4: On the Create group screen, add your group's name, choose a privacy level, and invite your friends (if you'd like).
For privacy levels, you can choose between Public and Private. Public means anyone on Facebook can view the posts in your group and see who is in your group. Private means that only members of that group can view the posts in it and see who the other members are.
If you choose Private, you'll then have to select the level of visibility of the group: Visible or Hidden. Visible means anyone on Facebook can find this group, and Hidden means only group members can find it.
 screenshot
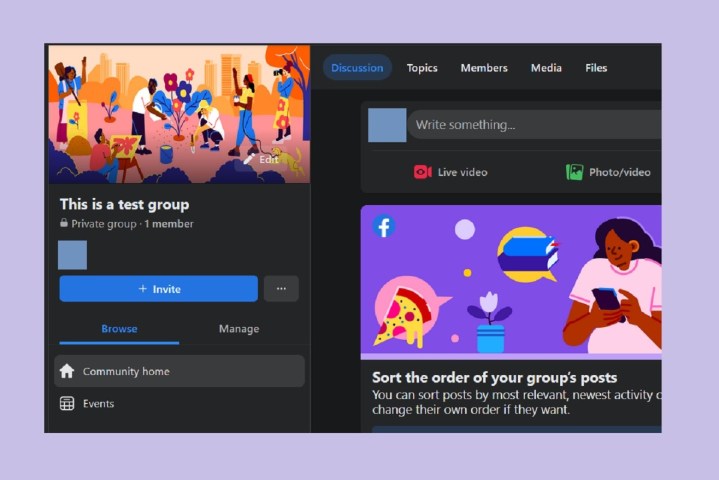
Step 5: Then choose the Create button at the bottom of the Create group screen. That's it! You've now created a Facebook group!
 screenshot
How do I start a Facebook group: on the mobile app
Alternatively, if you'd rather use the Facebook mobile app to create a Facebook group, you can do that too. It's pretty similar to the desktop web method. These instructions should work for both Android and iOS devices. Here are the basics of creating a Facebook group via the mobile app:
Open the Facebook mobile app on your device and then select the Menu icon (three lines) > Groups > Plus sign icon > Create group.
Then, on the Create group screen, you'll add a group name, choose your privacy level, and choose your visibility level if needed. Select the Create group button at the bottom of the screen. At this point, your group will have been created, and you'll be prompted to invite people to join and start setting up your group page.

 Tfoso
Tfoso 


