How to Do Downward-Facing Dog Pose Correctly (Step-by-Step Guide)
Downward-Facing Dog (Adho Mukha Svanasana) One of the most ubiquitous of yoga poses, Downward-Facing Dog (Adho Mukha Svanasana), is one […]
 Hollif

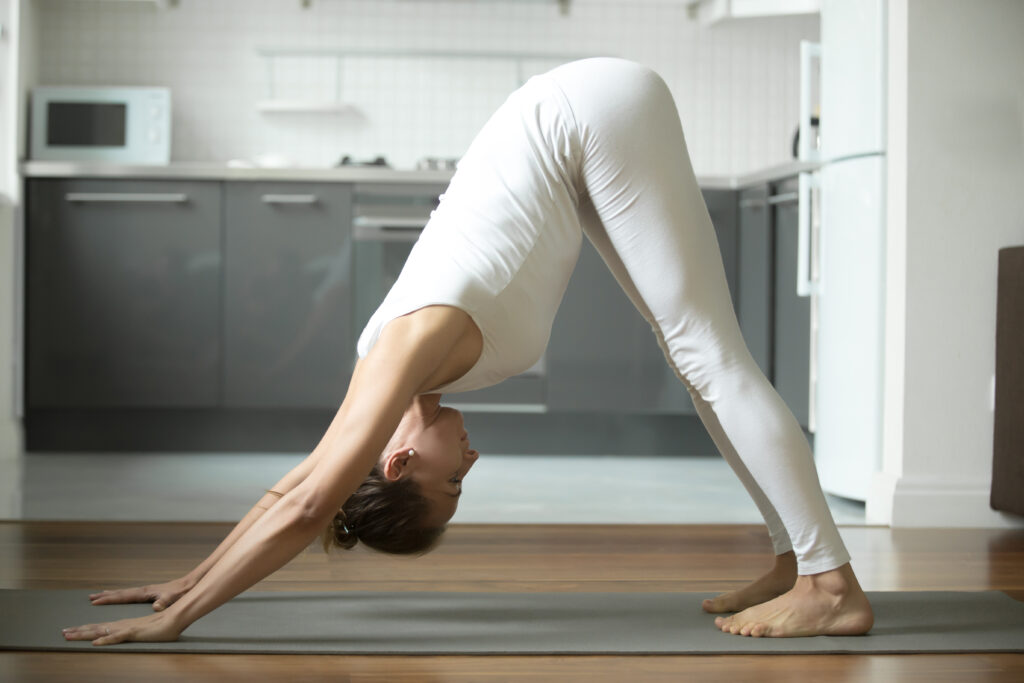 Sporty attractive woman practicing yoga, standing in Downward facing dog exercise, adho mukha svanasana pose, working out, wearing white sportswear, indoor full length, home interior background
Downward-Facing Dog (Adho Mukha Svanasana) One of the most ubiquitous of yoga poses, Downward-Facing Dog (Adho Mukha Svanasana), is one of the most widely recognized yoga poses. It is also a pose and a resting position in a number of yoga sequences, including the Vinyasa and Ashtanga styles. But though the pose is so common, even many beginning to intermediate yogis have issues with getting into it in a way that is beneficial to their bodies. This ultimate guide will break down exactly how to do Downward-Facing Dog pose correctly, ensuring you receive all the benefits while avoiding common injuries.
Benefits of Downward-Facing Dog Pose
Downward-Facing Dog offers numerous physical and mental benefits:
Physical Benefits
Full-body stretch: Elongates the spine, hamstrings, calves, and shoulders Strengthens: Upper body, core, legs, and feet Improves circulation: Inverted position helps blood flow to the brain Enhances flexibility: Particularly in the shoulders, hamstrings, and calves Builds bone density: Weight-bearing exercise for arms and legs Relieves back pain: Decompresses the spine and stretches the back musclesMental Benefits
Relieves stress: Calms the nervous system Boosts energy: Increases oxygen flow to the brain Improves focus: The mild inversion helps clear the mind Promotes mindfulness: Encourages connection with breath and bodyPreparation
Before attempting Downward-Facing Dog, ensure you have:
Proper surface: A non-slip yoga mat on a flat surface Comfortable clothing: Wear clothing that allows free movement Empty stomach: Practice at least 2-3 hours after a heavy meal Warm muscles: Perform after a brief warm-up to prepare the bodyStep-by-Step Instructions
Here’s a simple breakdown of how to do Downward-Facing Dog pose correctly, from tabletop position to full extension.
Starting Position
Begin on your hands and knees in a tabletop position Place your hands shoulder-width apart or slightly wider Position your knees hip-width apart Align your wrists directly under your shoulders and knees under your hips Spread your fingers wide, pressing firmly through each fingertip and the base of each finger Point your middle fingers straight aheadMoving into the Pose
Tuck your toes: Press the balls of your feet into the mat Exhale and lift your knees: Begin to straighten your legs as you lift your knees off the floor Raise your sitting bones: Lift your hips up and back toward the ceiling Engage your core: Draw your belly button toward your spine Straighten your arms: Keep a microbend in the elbows to avoid hyperextension Press the floor away: Push firmly through your hands to create space between your shoulders and ears Lengthen your spine: Create a straight line from your wrists to your hips Work your legs: Begin with slightly bent knees if needed, gradually straightening them as your hamstrings warm up Press your heels down: Work toward bringing your heels to the floor (though they don’t need to touch) Relax your head: Allow your head to hang naturally between your arms, with your ears aligned with your bicepsBreathing and Holding
Breathe deeply: Maintain smooth, even breaths through your nose Hold for 5-8 breaths: For beginners (longer for advanced practitioners) Actively engage: Continue to press your hands down and lift your hips high Find your edge: Balance between effort and easeExiting the Pose
Bend your knees: Return to tabletop position on an exhale Alternative exit: Walk your feet forward to move into a Forward FoldAlignment Cues
Proper alignment is crucial for safety and effectiveness in Downward-Facing Dog. Use these detailed cues to refine your pose:
Hand Positioning
Create a firm foundation with hands shoulder-width apart or slightly wider Spread fingers wide like starfish, with middle fingers pointing straight ahead Press firmly through the base of each finger and fingertip Distribute weight evenly across your hands, avoiding collapse in the wrists Externally rotate your forearms slightly to engage your shouldersArm Alignment
Keep a microbend in the elbows (avoid locking them) Rotate the eyes of your elbows toward each other (slightly internal rotation) Press the floor away actively through your hands Create space between your shoulders and ears Broaden across your upper back and shoulder bladesTorso Engagement
Engage your core by drawing your belly button toward your spine Lengthen through your torso, creating space between ribs and hips Lift your sitting bones high toward the ceiling Keep your spine long and straight, avoiding rounding or excessive arching Rotate your ribcage slightly inward to avoid flaringHip Positioning
Lift your hips high toward the ceiling Keep hips evenly aligned (level across both sides) Rotate your thighbones slightly inward Create an inverted “V” shape with your bodyLeg Alignment
Keep legs hip-width apart Engage your quadriceps by lifting your kneecaps Press through your heels to stretch the backs of your legs Rotate your inner thighs toward the back of your mat Distribute weight evenly across both legsFoot Positioning
Position feet hip-width apart Press firmly through the balls of your feet Work toward lowering your heels toward the mat (they don’t need to touch) Spread your toes for stability Ensure weight is distributed evenly across both feetHead and Neck
Allow your head to hang naturally between your arms Align your ears with your upper arms Relax your neck and facial muscles Gaze toward your navel or between your feetCommon Mistakes to Avoid
Wrist Pain and Improper Hand Placement
Mistake: Collapsing into wrists or distributing weight unevenly Solution: Press firmly through knuckles and fingertips, distributing weight evenly across handsRounded Upper Back
Mistake: Hunching shoulders or collapsing chest Solution: Press actively through arms, broaden across collarbones, and draw shoulder blades down backHiking Shoulders Up to Ears
Mistake: Tensing shoulders near ears, creating neck strain Solution: Create length through arms, actively press floor away, relax shoulders downOverarching Lower Back
Mistake: Excessive sway in lower back, compressing lumbar spine Solution: Engage core muscles, tuck tailbone slightly, and focus on lengthening entire spineHyperextending Elbows or Knees
Mistake: Locking joints, creating strain Solution: Maintain microbend in elbows and knees if neededFeet Too Close Together
Mistake: Placing feet too narrow, creating instability Solution: Position feet hip-width apart for proper foundationForcing Heels to Floor
Mistake: Compromising alignment to get heels down Solution: Prioritize the length of spine and hamstrings; heels will lower naturally with practiceHolding Breath
Mistake: Forgetting to breathe due to concentration Solution: Establish steady Ujjayi breath or deep, even breathingModifications for Different Bodies
For Tight Hamstrings
Bend knees generously Use blocks under hands to elevate floor Practice with heels against a wall for supportFor Wrist Issues
Use yoga wedges or fold your mat under your palms Try dolphin pose (forearms on floor) as an alternative Distribute weight evenly across palms and fingersFor Shoulder Tightness
Widen hand position Keep a pronounced bend in elbows Focus on external rotation of upper armsFor Beginners
Hold for shorter durations (3-5 breaths) Take breaks in Child’s Pose Use wall support (hands on wall, feet stepping back)For Pregnancy
Widen stance for stability Modify as pregnancy progresses Consider alternatives in later trimestersFor Seniors
Use chair support Modify height with props Focus on proper breathingAdvancing Your Practice
Once you’ve mastered the basics of Downward-Facing Dog, consider these progressions:
Extended Holds
Build endurance by holding the pose for 1-2 minutes Focus on deepening the breath Practice “active rest” in the poseThree-Legged Dog Variations
Lift one leg high while maintaining hip alignment Add hip opening by bending knee and rotating hip Practice controlled transitions between variationsFlow Transitions
Move smoothly between Downward Dog and Plank Incorporate into Sun Salutations Practice jumping forward from Downward DogAlignment Refinements
Work on subtle actions like spreading sit bones Focus on creating even weight distribution Fine-tune the relationship between upper and lower bodyWhen to Avoid Downward Dog
While Downward-Facing Dog is generally safe, avoid or modify if you have:
Carpal tunnel syndrome or severe wrist injuries Late-term pregnancy Detached retina or other serious eye conditions High blood pressure or heart conditions (consult doctor) Recent shoulder injury or surgery Severe headache or migraineConclusion
Mastering Downward-Facing Dog requires patience, consistent practice, and attention to alignment details. This foundational pose offers tremendous benefits for your entire body and mind when performed correctly. Remember that yoga is a personal journey—honor your body’s unique needs and limitations as you work with this pose, and enjoy the process of improvement over time.
By following the detailed instructions in this guide on how to do Downward-Facing Dog pose correctly, you’ll develop a strong, stable, and therapeutic Downward-Facing Dog that serves as an excellent foundation for your entire yoga practice.
Disclaimer: While yoga is generally safe for most individuals, consult with a healthcare provider before beginning any new exercise program, especially if you have pre-existing medical conditions.
FAQs
How long should I hold Downward-Facing Dog?
Beginners should aim for 5-8 breaths (approximately 30 seconds). Advanced practitioners can hold for 1-2 minutes or longer during specific practices.
My heels don’t touch the ground. Am I doing it wrong?
No. Heels lifting off the ground is completely normal, especially for beginners or those with tight hamstrings or calves. Focus on creating the inverted V-shape with your body rather than forcing your heels down.
Why do my wrists hurt in Downward Dog?
Wrist pain often occurs from improper weight distribution or wrist weakness. Ensure you’re pressing firmly through your knuckles and fingertips, not collapsing into your wrists. Building wrist strength gradually will help, as will using modifications like wedges or blocks.
Should my feet be together or apart?
For most practitioners, positioning feet hip-width apart provides the best stability and alignment. Feet together is an advanced variation that requires greater core and hip stability.
How do I know if I’m doing it correctly?
You should feel a balance of stretch and strength throughout your body. Your weight should be evenly distributed between arms and legs, your spine should feel long, and your breathing should remain steady. Working with a qualified yoga instructor for feedback is also beneficial.
Can Downward Dog help with back pain?
Yes, when practiced correctly, Downward Dog can help alleviate back pain by decompressing the spine, stretching the back muscles, and strengthening the supportive musculature of the core and upper body.
How frequently should I practice Downward Dog?
Downward Dog can be practiced daily as part of a yoga routine. However, listen to your body and take rest days if you experience unusual pain or fatigue.
References:
Iyengar, B.K.S. (1979). Light on Yoga. Schocken Books. Kaminoff, L., & Matthews, A. (2011). Yoga Anatomy. Human Kinetics.