Ready For A New Hobby? Our Complete Guide To Canning Is Here
Say hello to farm-fresh food, year-round.
 FrankLin

Our editors have independently chosen the products listed on this page. If you purchase something mentioned in this article, we may earn a small commission.
February 25, 2022 — 12:31 PM
Canning, the act and art of preserving food in jars, is a perfect way to extend the season and keep your home stocked with fantastic farm-fresh food, even in winter when there isn’t much in the ground to harvest. I've taught classes and written books about the practical technique, and this is my comprehensive guide to getting started.
What is canning & how does it work?
Food preservation has been around for centuries, and there was a time when preserving food was a life-or-death matter. People had to rely on their own resources and planning to survive the winter, so methods like salting and jarring were essential. These days, these same techniques can help us eat local food all year round.
Canning allows for home cooks to ‘put up’ shelf-stable food during the growing season so they can avoid paying a premium for food that gets shipped into the grocery store from far away. If you are shifting into more mindful living and looking to make choices that take both the environment and your household budget into consideration, then canning food is a great solution for you. And it doesn't have to be intimidating!
Functional Nutrition Training
A cutting-edge nutrition deep dive taught by the world’s foremost health & wellness experts.

There are two ways to create a safe seal on your preserving jars: water-bath canning and pressure canning.
Water-bath canning is when you submerge a filled canning jar in boiling water for a predetermined amount of time. Water-bath canning is recommended for high acid foods like most fruits and any food that is pickled in vinegar. Bacteria that can cause spoilage in foods is killed at 212 degrees Fahrenheit (100 degrees Celsius), the boiling point for water-bath canning. Pressure canners heat jars to much higher temperatures.
I stick to water-bath canning small batches of produce, as it’s the easiest to do at home in a small urban kitchen.
The most important thing about canning is making sure you choose the safest method given your ingredients. Naturally occurring bacteria is inherent when you’re working with fresh foods, and it can spoil a batch of preserves when they’re not canned properly. This isn’t something to be fearful of, but you do need to be thoughtful.
Water bath vs. pressure canning:
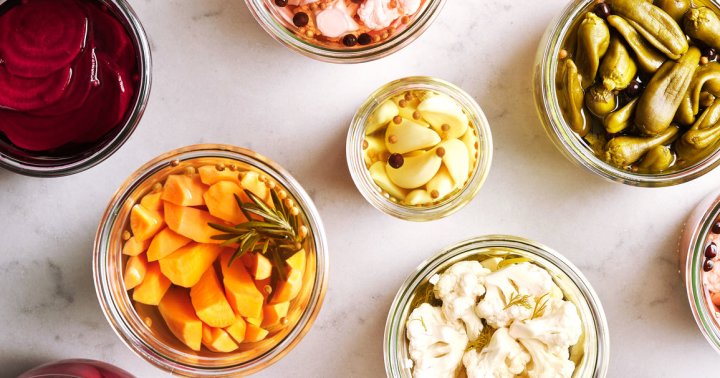
Most common preserves—jams, jellies, and pickles—can be canned in a water bath. The low pH of fruits and vinegar (low pH = high acid) makes them safe to water-bath, as the acid naturally inhibits environments conducive to botulism, a poisonous bacterium. So, if you’re planning on making a fruit jam or pickles, you do not need to worry about botulism.
Low-acid foods (meat, beans, and vegetables without vinegar), however, have a high pH and require that you use a pressure canner. Pressure canners allow for the safe preservation of these foods because they heat them to much higher temperatures (240 degrees Fahrenheit) than boiling water would. This high heat kills all bacteria, including botulism.
General safety guidelines:
Although you should be concerned about spoilage and bacteria, if you follow recipes, and use these common sense rules, you should not have a problem:
What you'll need to get started.
Ready to get started? Here's what you'll need to begin canning at home. You can buy all of these items at most big-box home goods stores, order them online, or see if your local secondhand shop has them in stock.
A traditional canning pot is a three-piece, 20+ quart pot that comes with a metal jar rack and lid. This canning pot is set up specifically for water-bath canning. It is wide, deep, and can hold many jars in one batch. These big pots are great if you plan to can a few times a year, and have a big stovetop.
However, the size of these pots plus the weight of the water means they’re tough to use on electric-coil stovetops. If that's what you're working with, you can simply use a deep stock pot (at least 10-inches deep) padded with a dishtowel.
Canning tongs are specifically crafted to safely lift glass canning jars out of a boiling water bath with ease. They come in many shapes and sizes. Kitchen tongs can also be used in a pinch.
Canning jars commonly come in the following volumes:
4. A pressure canner (if canning low-acid products).
For low-acid products, you'll need a pressure canner instead of the canning pot.
For beginners, water bath canning is the best place to start, due to the relative ease of the process, and the myriad of recipes to choose from. I would recommend starting with the basics and trying a few batches of jam or conserves. Follow recipes using a cookbook or other professional source.
The USDA has recipes on their website, but they tend to be pretty heavy on the sugar. My book, Urban Pantry: Tips & Recipes for a Thrifty, Sustainable & Seasonal Kitchen, also has a chapter on small-batch preserving.
The decision about what to preserve should be influenced by what produce is in season and abundant locally—either in your garden or at the farmer's market. Buying food in bulk at the height of the season is a wonderful way to be inspired. And it may seem obvious, but be sure to choose food that you have actual interest in eating year-round! Personally, I don’t want to pickle everything I see, nor do I want to eat 47 jars of jam in a calendar year.
This is a step-by-step guide to water-bath canning at home. Be sure to set up your jars and workspace beforehand so you can establish a rhythm. Also, be mindful of the water-bath processing times given in each recipe. Time spent in the water bath varies according to the food being processed, so it is important to follow directions closely and work only from tested recipes.
Step one: Clean your jars.
Wash your jars and lids in hot soapy water and set them to dry completely on a rack or on a clean dish towel.
Step 2: Prepare your jars.
Glass jars and lids do not need to be sterilized before use if your foodstuffs will be processed more than 10 minutes in a boiling water bath or pressure canner. If jar-processing time is 10 minutes or less, jars must be sterilized before filling. If you must sterilize your jars, do so by placing jars in a canning pot, filling with water, and bringing water to simmer. Hold jars in water until ready to use.
All canned goods will need headspace to allow for expansion of the food and to create a vacuum in cooling jars. As a general rule, leave one-fourth an inch of headspace on all jams and jellies and half an inch of headspace on all whole fruits. Do not overfill your jars! This only serves to compromise their seal.
When canning whole fruits (like peach segments), release air bubbles in just-filled jars by tapping the jar on the counter or by inserting a clean wooden chopstick or skewer into the jar and gently stirring the fruit. When placing lids and rings on canning jars, do not fully tighten the rings. Instead, secure just until rings have tension and feel snug. Overtightening prevents air from venting out of the jars—a crucial step in canning.
Fill your canning pot or a deep stockpot half full of water and heat to a low boil. Hold the liquid on a very low boil until ready to use.
Place prepared jars of food on the rack in the canner. Do not stack jars on top of one another, as you need to allow for circulation of water for proper sealing.
Lower jars into the canning pot, and add enough water to cover the jar tops by an inch or more. Cover the pot and return to a boil.
Processing times begin once the canning-pot water is brought back up to a boil. This can take as long as 15 minutes, so be sure to keep an eye on your pot and have a timer nearby.
If using a deep stock pot:
Use the same method as above, but line the bottom of your pot with a dish towel and weigh it down with your jars. This helps keep jars from clanging around on the bottom of the pot or tumbling over onto their sides. This form of canning is not endorsed by the USDA, but it is effective, easy, and safe in my experience.
Step 6: Remove the sealed jars.
Using a jar lifter or a set of kitchen tongs, remove jars from the canner when the processing time has elapsed. (Remember, processing times begin once the canning-pot water is brought back up to a boil.) Set jars aside on a folded towel to cool. Make sure you do not press on the tops, which can create an artificial seal.
You'll know when the jars are sealed when you hear the sound of can tops popping. This should happen just after removing them from the water bath.
Once the jars are cool, check the seal by removing the outer ring and lifting the jar by holding only the lid. If it stays intact, you have successfully canned your food.
If the seal is loose or broken, you may reprocess in the water bath within 24 hours. (Be sure to replace the lid and check the jar rim for cracks or nicks and replace if necessary.) Conversely, you can refrigerate the jar immediately and eat it within three weeks.
Once cool, label all successfully sealed jars with date and contents. Store them in a cool dark place, such as a cupboard. Officially, canned goods keep for up to a year, but I have let them go a bit longer with little effect. But remember: If a preserved good ever has a loose seal, gives off any odor, or discolors profusely, err on the side of caution and dispose of it without eating.
There are several concepts in home canning that can feel confusing, or are incorrectly written about on the internet. These top tips should help alleviate the stress for a beginner, and offer some insight as to why recipes are written the way they are and should be followed precisely:
Preserving food while it’s in season is a delicious affair, but it is also a practical, economical, and environmentally aware way to live. Buying food out of season puts pressure on farmers and the earth’s ecosystem, so why not put up a few jars and keep your pantry stocked all year long?