Gentle Yoga Sequence: 9 Gentle Poses Flow for Stretching & Relaxation
When living in a world of high stress, continual movement and striving, it is natural for individuals to gravitate towards slowing down and seeking practical answers to assist them to cope with their contemporary lifestyle. Gentle yoga styles provide...
 Tfoso
Tfoso
When living in a world of high stress, continual movement and striving, it is natural for individuals to gravitate towards slowing down and seeking practical answers to assist them to cope with their contemporary lifestyle.
Gentle yoga styles provide effective methods of stress management, release tension, and calm the nervous system. Doing the poses with almost no force makes yoga a viable option in today’s sedentary environment.
What is a Gentle Yoga Sequence?
Think of a gentle yoga sequence as a flow of poses that start with slow movements and gradually build up the pace by holding poses for longer to get deep stretching. A sequence of gentle yoga styles can be 45 to 60 minutes long comprised of beginner-level poses.
For those seeking relaxation, anxiety reduction, and increased flexibility, gentle yoga sequences are indeed the route to go.
Unlike other styles of yoga, the flow of gentle yoga sequence will not have a vinyasa. It means there wouldn’t be a smooth transition from one pose to another, using breath. Therefore it’s best for beginners who lack flexibility and less strength.
A Gentle Yoga Sequence to Relax and Unwind
We have devised a Gentle Yoga programme that is suitable for everyone.
Take note that each gentle yoga sequence can be modified according to an individual’s needs and physical condition. While we have included time limits for each posture, this is not something that has to be strictly followed. Practice for as long as you want and just do what seems good to you at the moment.
Props such as a yoga strap, yoga blocks, a yoga bolster, or a yoga blanket may be very beneficial in a gentle yoga sequence.
1. Easy Pose (Sukhasana)
Sukhasana, seems to be a straightforward position, yet it is really a cornerstone stance for seated yoga postures.
Take some time to concentrate on your alignment and comprehend that easy pose is more than merely sitting there with your ankles crossed.
To begin this gentle flow, sit comfortably, cross your ankles and come into Sukhasana. There should be no tilting forward or backward of the pelvis in this posture. Root deep into the sit bones and raise through the crown of the head to complete the movement. While the ribcage is being lifted, the navel should be drawn inwards towards the spine. Allow the chin to gently bow or to remain parallel to the ground. You may spend as much time as you like practising.
For those who have previously suffered from a serious knee or back injury, it is recommended that they sit on a folded blanket or use a bolster so that their knees are lower than their hips and the strain is relieved. You might also try leaning against a wall to see if it feels better, or you could attempt leaning a little forward instead.
Using this position as a calmant throughout your practice can help you to decrease anxiousness. It is encouraged to open the knees and to open the ankles by the crisscross seat. Sitting for 5-10 minutes at a time helps to release the hips.
2. Knees to chest pose (Apanasana)
Take a few long breaths and exhale through your lips while lying down, letting out a sigh with each one. Lay on your back and gently draw your knees to your chest while keeping your back straight. Keep your legs apart while letting your tailbone sink toward the floor and relax.
Swing your hips from side to side for a few minutes after you’ve taken a deep breath and relaxed your shoulders.
More than merely a means of calming the body, Apanasana offers a slew of other advantages.
Apanasana is known as a wind-releasing posture because of its ability to remove toxic gas from the body. It aids in the production of bowel movement in the Vata Dosha body, allowing the surplus of Apan Vayu to be released. It strengthens the back muscles by stretching them and increasing their tolerance, allowing them to become stronger.
3. Child’s Pose (Balasana)
With your knees apart and your sitting bones resting toward your heels, take a deep breath and relax. Draw your elbows beside your ears, with your hands in prayer over the nape of your neck, with either your forehead on the floor or a block as support.
Bring yourself up gently when you’re ready, taking as many breaths as necessary.
Because it is a resting stance, child’s pose in gentle yoga sequence adds the benefit of relaxing the body. The controlled breathing assists you in returning to a feeling of tranquilly. The position is beneficial in that it helps to extend and stretch out the spine. It also has the added benefit of gently stretching the ankles, hips, and shoulders. It also helps to alleviate neck and back discomfort by extending the spine.
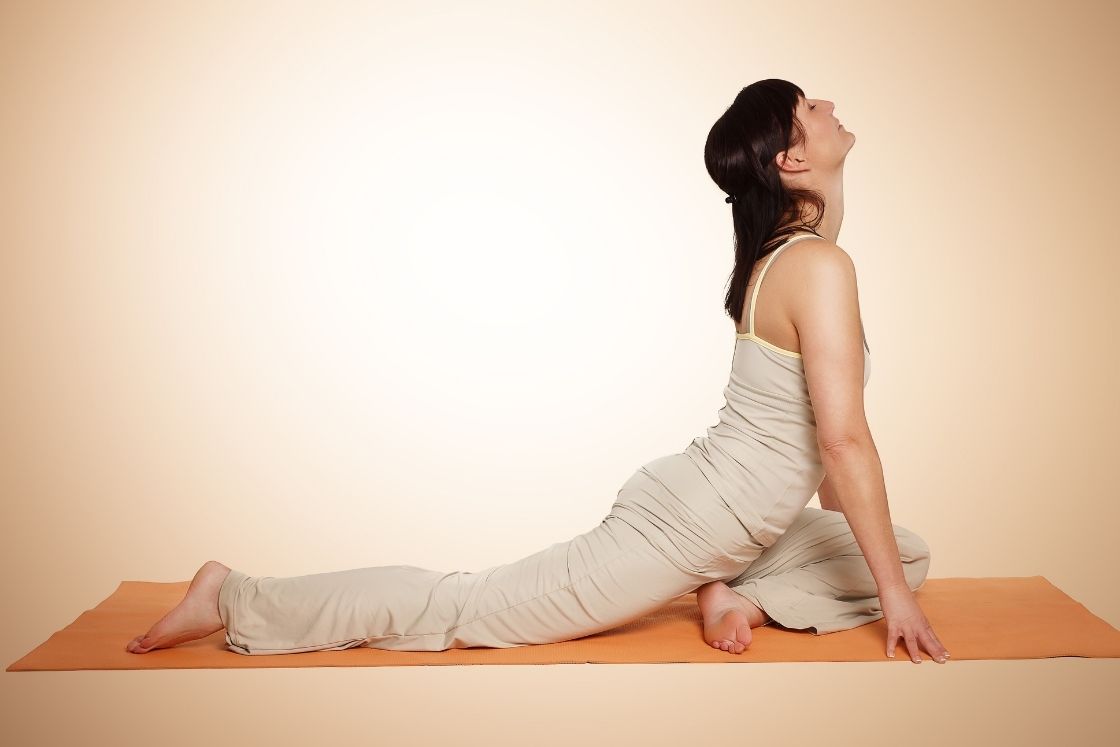
4. Reclining Pigeon pose (Supta Kapotasana)
Exhale after you’ve taken a few deep breaths. Now, while maintaining your knees up, drop both of your feet to the floor gently. Place your left ankle over your right knee and maintain your left knee open to the left while you lay there. Lift your right knee toward your chest while taking a deep inhale into your chest. Take hold of your left arm and wrap it over the middle of your legs; take hold of your right arm and wrap it over the same leg, interlacing your fingers behind your other thigh.
A nice place to begin is with your knees clasped together in front of you, your feet flexed, and your outer hips pushed forward. Relax by taking 10 deep breaths.
Hamstrings and quadriceps are gently stretched in reclining pigeon pose, which is a gentle approach to stretch them. It’s a fantastic hip-opening posture for beginner yogis who experience tension in the hips and legs. It releases any tension that has built up in the lower back muscles, resulting in increased mobility.
Moreover, supta kapotasana is one of the best yoga poses to increase blood flow circulation in the lower body. It engages the legs, hips, and lower back, among other muscles. As a result, it helps to improve blood circulation.
5. Supported Bridge (Setu Bandha Sarvangasana)
While laying on your back, place both feet level on the floor, one under each knee, and press hard into your feet. Then, lift your hips and slip a block or bolster under your tailbone to support your pelvis entirely. Your palms should be pointing upwards, and your shoulders should be lightly folded under.
Inhale and exhale while letting go of all your weight onto the cinder block.
To remove the block, elevate your pelvis and press down with both feet to bring it back up. You may stay here for 2-5 minutes at a time. Take it easy and slowly lower your hips to the ground.
The Bridge Pose helps to strengthen your back muscles and relaxes a fatigued back almost immediately.
Because it stretches the chest, neck, and spine, it helps to open up your lungs and minimise the symptoms of thyroid and asthma disorders. This asana brings peace to the mind and lowers the levels of worry, tension, and depression in the practitioner.
6. Supine spinal twist (Supta Matsyendrasana)
Release your right foot to the floor and exhale while leaving your left ankle where it is. Your left leg should be crossed over the top of your right leg, with your knees pressed together. Make a V with your arms out to the sides and your elbows bent, putting the backs of your hands on the floor to start.
Taking a deep breath in, raise your knees closer to your chest; exhale, lower your knees to the right. Spend 10 deep breaths releasing the top of your left shoulder to the floor with each exhale. Repeat ten times.
A reclining twist is one of the most effective positions for alleviating tension and improving circulation. The twisting action aids in the detoxification and stimulation of the organs located in the thorax. As a result, this position is excellent for re-establishing equilibrium in the body.
7. Mountain pose (Tadasana)
Known as the “Foundation Pose,” Tadasana is the starting point for all standing yoga postures as well as complete inversions like the Handstand and Headstand. It is the posture from which all other standing poses in your practice are descended.
It is preferable to have your feet hip-width apart or together with the bases of your big toes touching each other (depending on your balance). Continue to maintain a straight back and arms at your sides. Raise and widen your toes, then change your weight to obtain the right amount of balance for your posture.Maintain a firm grip on your quadriceps and stretch your tailbone while lifting your kneecaps a little. Make sure to keep your legs as straight as possible while avoiding locking your knees, which may put undue stress on your joints. Pull your shoulder blades together and bring them into alignment with your hips.The top of your head, as well as your chest, should extend towards the ceiling, without pulling your lower ribs to the front of your body. Increase the width of your collarbones and maintain your arms at your sides with your hands facing forwards while you do this. Also called as Anjali Mudra, you may place your hands in the prayer posture in front of your chest with your palms facing each other.Tadasana will engage every muscle in the body if it is performed properly. It helps to improve posture and, when done on a regular basis, may assist to minimise back discomfort. This position helps to strengthen the thighs, knees, ankles, belly, and buttocks by putting pressure on them. It may also be used to relieve sciatica and to lessen the effects of flat feet, among other things.
Stress may be relieved and attention can be improved by practising the position with a steady and smooth breathing pattern.
8. Downward Dog (Adho Mukha Svanasana)
There are several Adho Mukha Svanasana advantages, and if you perform this asana on a daily basis, you will be able to effortlessly do and get all of its advantages.
Adho Mukha Svanasana is a great way to tone your muscles while also working your core. This asana helps to tone the lower abdominal muscles, which helps to remove extra fat in the lower belly region. It strengthens your bones and is also a weight-bearing workout.
Stretching your calves and hamstrings muscles while doing this asana will not only build your legs but will also be beneficial to your spine. This asana is very effective in easing back muscles and avoiding back discomfort. If you have a lot of digestive issues, gas, and acidity, this may be the only yoga posture you need to include in your daily regimen.
9. Savasana (Corpse Pose)
No yoga practise is complete without a Savasana at the closing. Savasana is crucial because it aids in the integration of the practise.
Lie on your back and let your arms fall to the side of your body. The feet may be allowed to relax outward. The whole body may soften, lessening the amount of effort required to contract or activate the muscles. Allow the body and breath to calm and pay attention to the body resting on the mat. Take some time to relax without falling asleep. Rest here for as long as you want. Starting a timer for this part of the yoga practise might be beneficial.
As a meditation practice, Savasana assists the organs in returning to normal functioning after operating in overdrive while exercising, hence promoting recuperation. Meditation provides several physical health advantages, including lower blood pressure, higher immunity, and improved lung function. This stance actively relaxes muscular and skeletal stress.
Savasana is often the last and closing asana in practice, and it is an excellent moment to channel energy inward to heal and refresh the busy mind and body.
Conclusion
Even while a gentle flow yoga sequence is less physically demanding and has more contemplative features than other styles, it is nonetheless beneficial in terms of helping to maintain the body’s ideal health.
A gentle flow can help anyone gain flexibility, recover from injury, stress management and weight management, reduce chronic conditions, and go deeper with the connection of the breath and the body.
Each time one steps onto the yoga mat, gentle flow yoga seems lifetime lasting. It allows you to take care of your body rather than stressing you out by forcing you to do advanced poses or to bathe yourself in perspiration. A gentle yoga sequence that feels proportionate to you will take care of your body, mind, and spirit system.


.jpg&h=630&w=1200&q=100&v=f776164e2b&c=1)