How to Do Bridge Pose in Yoga—Proper Form, Variations, and Common Mistakes
The post How to Do Bridge Pose in Yoga—Proper Form, Variations, and Common Mistakes appeared first on The Yoga Nomads.

As much as 80% of adults experience chronic back pain at some point in their lives. When you need a heart-opening, spine-stretching, stress-relieving moment, Bridge Pose is the perfect treat.
This rejuvenating back bend is beginner-friendly and can help prepare your body for deeper backbends. Bridge Pose (Setu Bandha Sarvangasana) can be practiced with a range of modifications and props to prevent and relieve back pain.
Let’s dig into everything you need to know about safely practicing Bridge Pose at any level of flexibility or experience.
Prefer video? Here’s our complete tutorial on how to safely perform Bridge pose:
Pose Benefits
In a society that spends most of its time hunched over devices or sitting in chairs, Bridge Pose is the antidote to back pain and poor posture. This asana also strengthens and stretches almost every part of the body. The Sanskrit word Setu Bandha Sarvangasana translates to “bridge-lock all-limb pose.” Bridge Pose can help with:
Back pain relief: The most obvious benefit of Bridge Pose is the tension relief in your back. As your spine arches upward, you can experience a soothing spinal opening. However, if you don’t enter the pose properly, you can also hurt your back with hyperextension. This is why proper form is so important. For people with intense back pain, an assisted Bridge is recommended. Back and glute strengthening: The engagement of the entire back body makes Bridge Pose a very active, strength-building asana. As you build strength in the back muscles and glutes, you may also experience reduced back pain symptoms because the body can better support your spine. Mental health: Bridge Pose is a mild inversion that elevates your heart above your head. This shift in blood flow improves stress, fatigue, anxiety, insomnia, and mood. It can even help energize your body and reduce symptoms of mild depression. Improved digestion and core activation: While many of us are focused on our backs, Bridge Pose is also stimulating the abdominal muscles to aid in digestion and build core strength. Hip-opening: As you press your hips upward, this posture stretches and strengthens the hip flexors on the front part of your hip joints. Better posture: Counteract hunchback posture by flexing the spine in the opposite direction and expanding the space between vertebrate. Expanded lung capacity: The chest-opening shape of Bridge Pose is therapeutic for people with asthma and breathing problems because it helps increase lung capacity.Step-by-Step Instructions
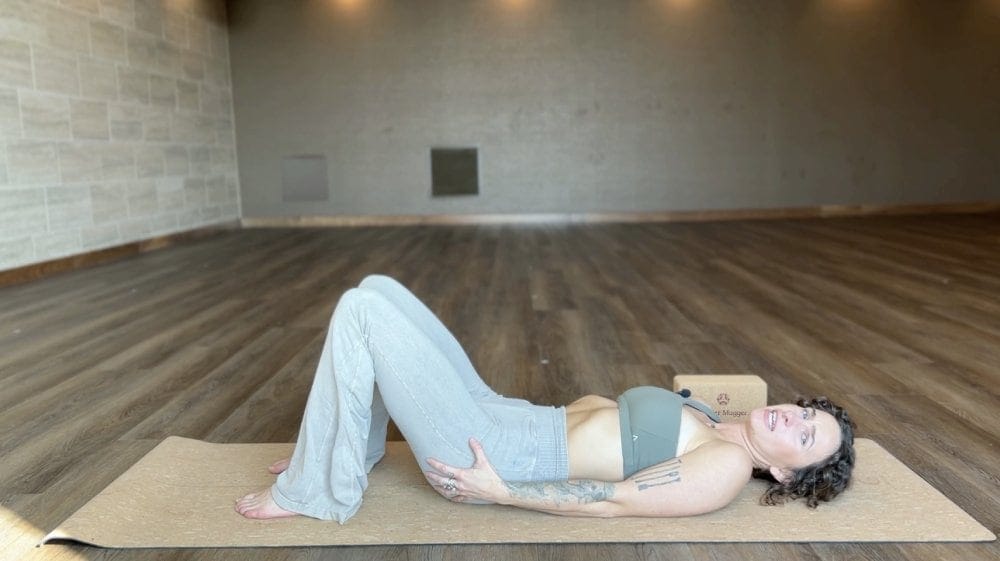
Getting into Bridge Pose is fairly simple, but it requires a special attention to form and alignment. You don’t want to hurt your back while trying to relieve it. Follow these steps to safely enter, hold, and exit the posture;
Begin laying flat on your back with your arms alongside your body and palms flat to the mat. Bend your knees and bring your feet flat on the floor. Scoot the heels as close to your glutes as you can comfortably hold. Your feet should be parallel to each other and hip width apart, facing the front of the mat. Press your palms and feet firmly into the floor. Tuck your chin toward your chest and tilt your pelvis forward and up. On an inhale, lightly squeeze your core, quads, and glutes. On an exhale, slowly lift your hips off the floor. Imagine lifting from your pubic bone rather than your belly button. Avoid forcing or over-arching the back. Your head and neck remain resting on the Earth. Raise your hips until they create a straight line from your knees all the way to your shoulders. If needed, use a prop or modification below. Roll your shoulders under your body so that your shoulder blades kiss beneath your back. If you can, clasp your hands together and interlace your fingers. Hold and breathe, optionally pushing your hips higher toward the sky as you press your feet and hands down. There should be zero tension or pain in your neck or back. If there is, back out of it and further engage the quads. Stay in the position for five full breath cycles. To exit, un-grip your hands and stretch them out alongside you. Slowly roll your spine down one vertebrate at a time until your lower back reaches the ground. Relax your body into Savasana or move into a Wind Relieving Posture by pulling your knees toward your chest.How long should you hold the bridge pose?
Bridge Pose can be held for 30 seconds to 1 minute, or 5 to 10 rounds of breath. It is better to practice a few rounds of this posture for shorter periods rather than holding it for an extended length of time. Be sure that your spine is warmed up before pushing into a deeper backbend.
Tips for Mastering the Pose
Mastering Bridge Pose isn’t only about back flexibility; it’s about achieving the strength and alignment necessary to deepen your backbend. Here are our top tips for leveling up your Bridge:
Tip #1: Tilt the pelvis with this trick
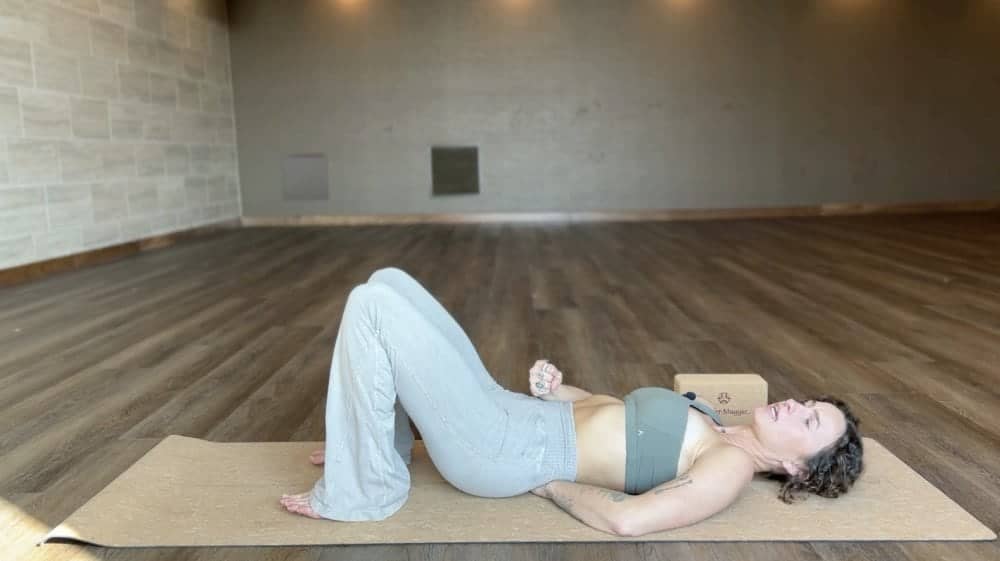
The pelvic tilt of Bridge Pose is commonly misunderstood. How exactly do you move your pubic bone forward and up? How do you ensure that your pelvis is properly tilted to prevent crunching in the spine?
Use this easy hand trick: While you are still laying flat on your back with your knees bent, bring one of your hands beneath your lower back. You will feel space where your spine is lifted from the mat. Now, try to crush that hand by engaging your abs down to your spine and squeezing your glutes.
You should feel your your pubic bone reaching up and your tailbone lowering down as the angle of your pelvis shifts. Then, remove your hand and feel your spine fully flattened onto the mat before you lift into Bridge. This pelvic tilt will prevent you from overarching your spine.
Tip #2: Keep your glutes engaged, but not clenched
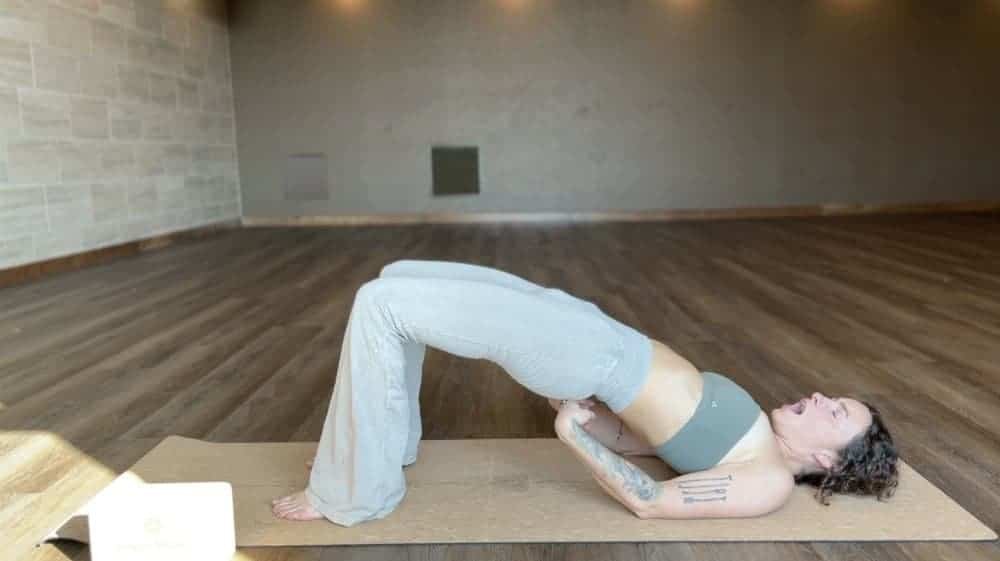
Bridge Pose is secretly a booty-builder. Engagement of the gluteus maximus (the largest muscle in your butt) ensures that your back is protected while your hips lift upward.
Relaxed glutes mean less support in the lower spine and less strengthening in the lower body.
On the flip side, you shouldn’t overly clench your glutes to the point that your lumbar spine kinks up. Maintain moderate, but continuous glute engagement for a happy spine and stronger posture.
You should feel your booty working the entire time you are in Bridge Pose.
Tip #3: Press into the floor

The floor is your main point of leverage to lift the body up. As you lift into Bridge, your fingers should be spread while your palms and knuckles actively press into the mat. At the same time, your feet should be engaged.
Once you reach a comfortable hip position, adjust your grip beneath the body and continue pressing that interlocked fist into the floor. Use your strong arms and hands as leverage to raise or lower the rest of the body.
Tip #4: Tuck the chin and squeeze your shoulder blades
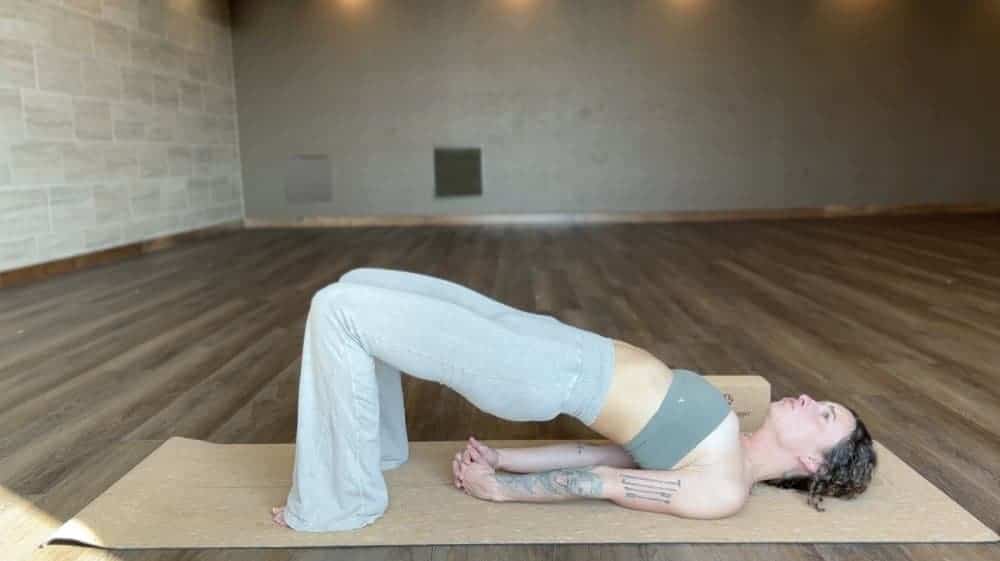
As you focus on the lower body, don’t forget to adjust your neck and shoulders to a comfortable position. When you tuck your chin to look slightly up and forward, it flattens the back of your neck to the mat. Then, you can adjust your shoulders to roll back and down so that the shoulder blades are squeezed together beneath your body.
Common Mistakes
When you don’t have the proper strength and alignment, back flexibility is precarious territory. Avoid these common mistakes so you can help your back rather than hurting it.
Common Mistake #1: Over-squeezing the butt
Glute engagement is key to supporting your low back in Bridge Pose. However, if you tightly clench the butt, it can sharpen the angular bend of the low back and lead to more spinal tension. As your cheeks squeeze together, it pinches your lumbar spine into an uncomfortable angle.
How to Fix It: Imagine flexing your glutes at about 50%. Focus on the outer booty muscles. Loosen the clench so your butt doesn’t feel “sucked in”. If you feel pinching or tension in the lower back, you are probably clenching too tight.
Instead, strengthen throughout the quads, thigh muscles, and hamstrings so that the butt stays neutral while your spine remains straight and elongated.
Common Mistake #2: Knees and feet splayed outwards
Alignment of the feet affects the entire body in a back bend. When your foundation is splayed outward, it can create a ripple-effect of twisting and unnatural contortion in the vertebrate.
How to Fix It: Bring your feet and knees hip width apart so they extend straight forward from the quads. If your toes are pointed out to the side, rotate them forward so the feet are parallel to the sides of the mat. This will also adjust the angle of your knees to make the pose more comfortable.
If desired, you can hold a yoga block between your inner thighs to ensure that the knees stay properly aligned. The light resistance on the block will keep your knees at the proper distance.
Common Mistake #3: Forcing the arch
Like any backbend, Bridge Pose is meant to build muscle before the stretch. If you force an arch, you can kink and compress vertebrate that are supposed to be lengthening.
How to Fix It: Engage before you lift your hips! Don’t flop into a bendy, curvy spine. Instead, imagine a straight line from your knees to your shoulders. Hold and master this position before advancing into a deeper backbend. If needed, use props to let the body relax into a naturally arched position. Remember that the curve of this backbend comes from the middle and upper spine. The lower back should never feel kinked upward.
Common Mistake #4: Lifting the head
Neck injury is a major concern in any back bend, but especially in Bridge Pose. You should not be lifting your head or feeling tightness in the back of your neck.
How to Fix It: Root your head on the floor and tuck your chin so that the back of your neck flattens to the yoga mat.
Common Mistake #5: Forgetting to lift the chest
If you feel compression in the lower back, it may be because your chest is staying too low. Bridge Pose is not only a backbend, but also a heart-opener.
How to Fix It: Imagine your chest and ribs moving upward toward the chin. As you adjust your arms beneath your body and bring your shoulder blades together, lift your chest up and away from the Earth.
Variations
If the traditional Bridge Pose looks feels uncomfortable or painful, you should back out immediately. Instead, opt for one of these variations that are easier on the back:
Restorative Bridge Pose
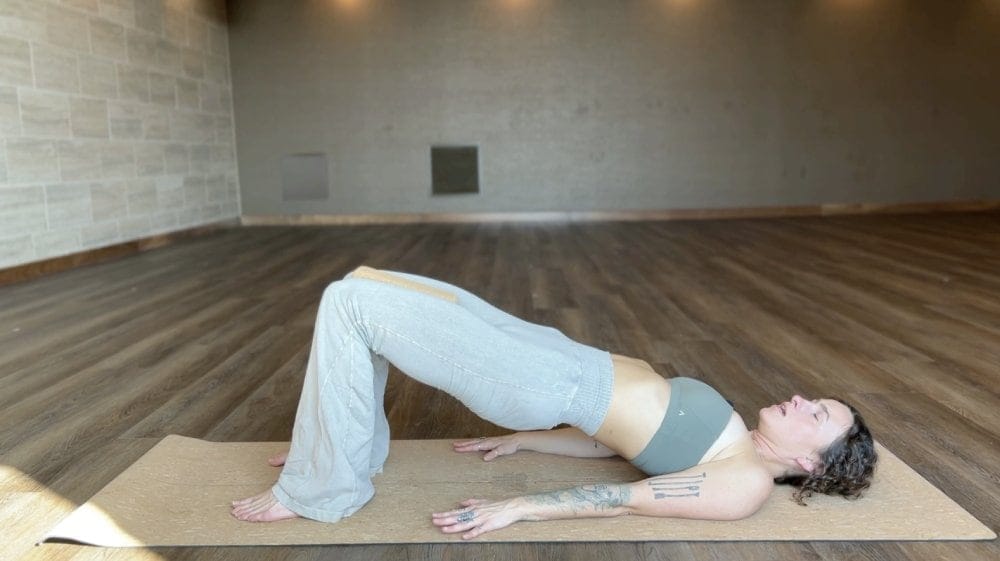
This relaxing version of Bridge Pose allows you to explore a very gentle backbend as you lay back and breathe. This is the best option for anyone with back pain or injuries:
Start laying flat on your back with the knees bent and feet flat to the floor. Press into your shoulders and feet to slightly lift your hips. Bring a bolster under the low back and glutes. Slowly lower your body down onto the bolster until you feel a comfortable, soothing back stretch. Keep your feet and knees pointed forward and chin slightly tucked so that your neck is elongated. You can also straighten out your legs to lay down onto the bolster. Allow your arms to relax out to the sides and hold for as many breaths as you’d like. To release, engage the glutes, lift the hips, and remove the bolster from underneath your body.Block-Supported Bridge Pose
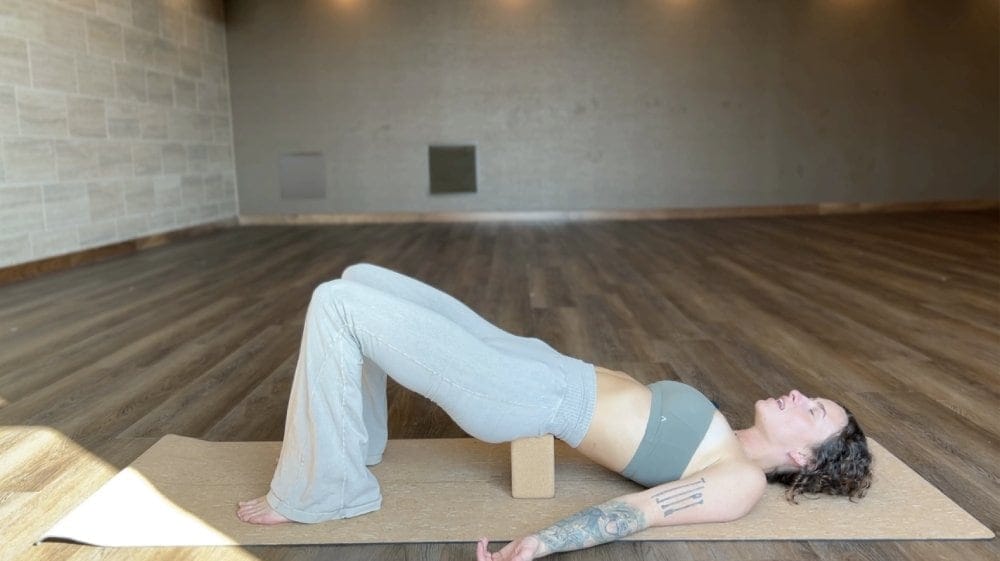
The beginner’s backbend uses a block to ensure that you don’t overextend. It is a mix between an active and restorative pose.
Start laying flat with your knees bent and feet hip-width apart. Arms should be flat to your side. Engage the legs, press into the floor, and slightly lift your hips while your upper body remains on the mat. Your head and neck should be flat to the floor. Keep your hips lifted and place a yoga block directly under your sacrum (the lowest vertebrate before your butt). Relax back down onto the mat and adjust as needed. Maintain slight engagement in your lower body. Turn the block to a shorter or taller orientation depending on your flexibility. Take 5 to 10 deep breaths as you relax into the posture. To release, lift and remove the block. Then, let your spine relax back onto the mat.Hand-Supported Bridge Pose
If you don’t have any props, you can also use your hands to support the spine. Instead of clasping the arms beneath your back, you can roll your shoulders down and place your hands on the lower back. As you balance on your elbows, the hands provide a “shelf” that keeps the spine protected.
Safety and Precautions
Bridge Pose should never be attempted by anyone with a major spine or neck injury. It is not recommended for people with hernias, migraines, back surgery, or loose abdominal muscles.
If you feel any pain or compression, back out of the pose immediately.
Never turn your head side-to-side while in this pose.
Teaching the Pose
Use these cues to safely cue students into Bridge Pose:
Press down through your shoulders and arms to lift the chest upward. Imagine your pelvis tilted forward and up. Imagine your shoulder blades kissing together under your back so that you can roll up onto the balls of your shoulders. Actively press into the feet and engage all the muscle groups in your legs.Preparatory Poses
Warm up the spine, legs, and core with:
Cobra Pose (Bhujangasana) Upward Dog Pose (Urdhva Mukha Svanasana) Low Lunge (Anjaneyasana)Counter Poses
Follow up your Bridge with:
Wind Relieving Pose Child’s Pose (Balasana) Happy Baby (Ananda Balasana) Supine Spinal Twist (Supta Matsyendrasana)Conclusion
Stay safe in Bridge Pose by focusing on form before flexibility. May your spine and spirit be free to flow!
Namaste!

 Hollif


