How to format an SSD to improve performance and protect your data
Here is a quick step-by-step guide on how to format an SSD across all types of Windows devices to ensure that you have a fresh drive to store your data.

Solid-state drives (SSDs) are much faster than traditional hard drives. Thus, they can be used for a longer period of time and can also be repurposed on different systems. However, you should fully format the drive occasionally, especially if you are selling or giving away your SSD. Fully formatting the drive will return its performance close to when it was new and ensure your information never gets into the hands of someone else.
The best part is that the process is quite simple and does not require any experience. You do need to be cautious, though, as formatting your SSD deletes everything that is stored on it. Make sure that you have backed up any important data that you might need in the future and choose the correct SSD to format if you have multiple drives on your system.
Here is a simple guide that can help in formatting the SSD on a Windows PC.
There are a bunch of third-party tools that can help you format a SSD. However, the built-in Windows Disk Management utility is capable of doing the same. It can also be used to create new partitions of your SSD.
How to format a SSD using Disk Management
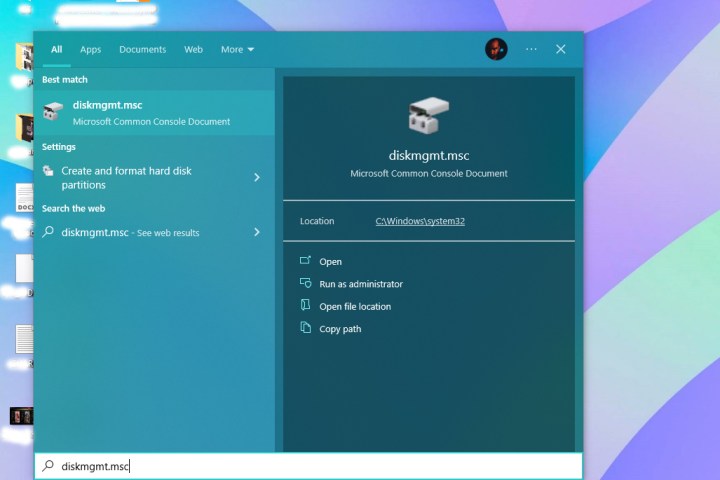
Step 1: Open the Start menu, type diskmgmt.msc, and hit Enter to open the Disk Management utility.

Step 2: From the list of drives, select the SSD that you want to format. Make sure that you select the right SSD, as you will lose all of your data.

Step 3: Once you have identified your SSD, right-click on it and select Format.

Step 4: A new pop-up should open where you must select the File system as NTFS, Allocation unit size as Default, and uncheck the Perform a quick format box. If you wish, you can also rename your SSD by typing the name in front of the Volume label field.

Step 5: Click OK to begin the format process.
Step 6: Windows should now format your SSD.
How to format an SSD using File Explorer
Another simple way to format your SSD is by using the default Windows File Explorer. It works pretty much the same way but with fewer steps.
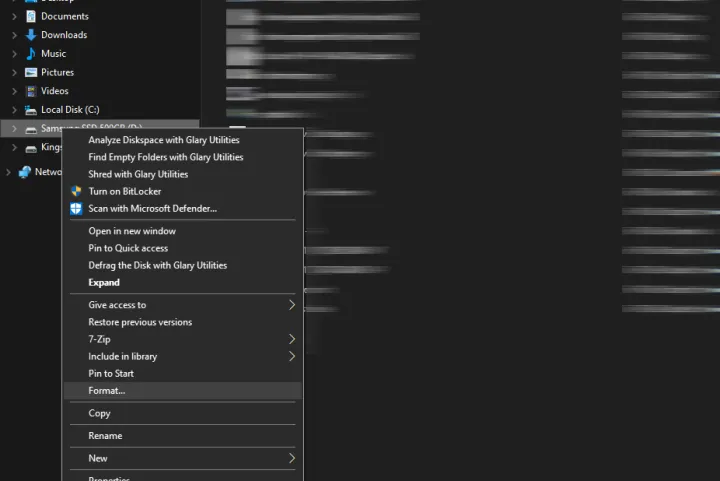
Step 1: Open the File Explorer and search for your SSD from the list of drives and folders on the left.

Step 2: Right-click on the SSD and select the Format option. Make sure you have selected the correct SSD as you don't want to end up losing important files.

Step 3: A new window should open where you need to select the File system as NTFS, Allocation unit size as Default allocation size, and uncheck the Quick format box. You can also rename your SSD by typing the name in front of the Volume label field.

Step 4: Click on the Start button at the bottom to begin the process.
Step 5: Windows should now format your SSD.
How to format an SSD using the zero-fill method
Where standard formatting merely makes your SSD "forget" where all your files are, leaving them still accessible to someone determined enough to find them, zero-filling your drive erases everything to a much higher standard. It completely wipes your storage device by writing zeroes to every bit, thus making it much harder for any sort of data recovery. Here's how you can format an SSD using the zero-fill method.
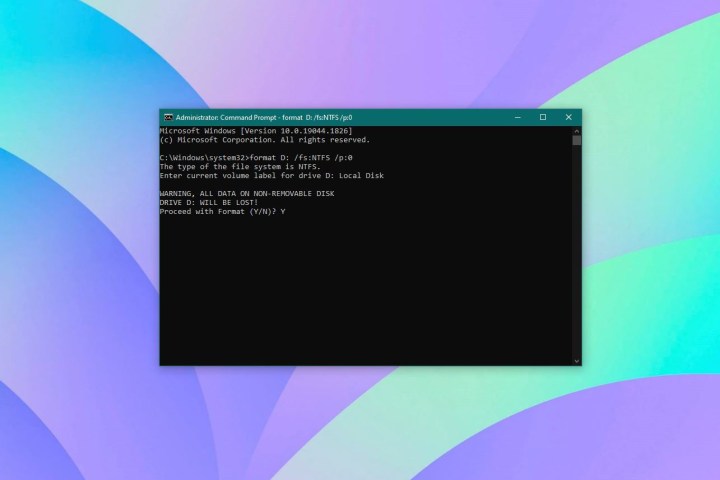
Step 1: Open the Windows Start menu, type CMD, and select the Run as administrator option to open Command Prompt with administrative rights.
Step 2: Once Command Prompt opens, type format Drive Letter /fs:NTFS /p:0. Make sure you double-check and pick the correct SSD to format. In our case, we want to format the D: drive, so we need to type format D: /fs:NTFS /p:0.

Step 3: Next, enter the current volume label or name of the disk drive and hit Enter.
Step 4: A warning message should appear where you need to type Y to confirm your action.
Step 5: Windows should now format your SSD using the zero-fill method. It might take a while depending on the size of the SSD.
Looking to upgrade your SSD after ditching the old one? Here are the best SSDs you can buy in 2022.

 UsenB
UsenB 


