How to Remove Built-Up Corrosion on Your Car's Battery Terminals
It’s not hard to tell when it’s time to clean your car’s exterior and interior, but what about the parts under the hood?Read more...

Photo: Boibin (Shutterstock)
It’s not hard to tell when it’s time to clean your car’s exterior and interior, but what about the parts under the hood?
As it turns out, most car batteries corrode at least a bit over time. This could result not only in various electrical problems for the vehicle, but ultimately, cut the battery’s life short—meaning you’d have to pay for a replacement. To avoid that, here’s how to remove built-up corrosion from your car’s battery terminals.
What is car battery corrosion?
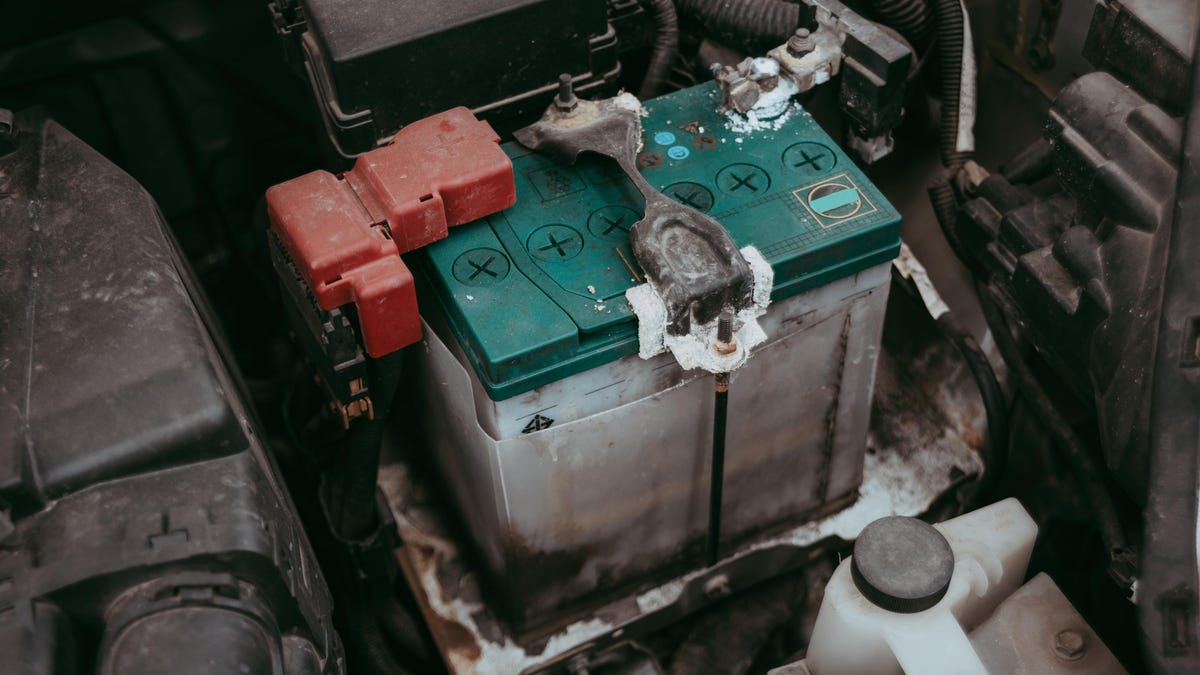
When checking for corrosion on your car’s battery, look for a white, blue, or greenish granular powder that has formed around the terminals, posts, and/or cables.
While there are some specific problems that can accelerate the corrosion process, it’s a normal part of your vehicle’s wear and tear. Here’s what happens, per Continental Batteries:
As your battery runs, the sulfuric acid releases hydrogen gas. The gas then mixes with the air around it. The chemical reaction that takes place as hydrogen gas collides with the air, moisture and salt causing corrosion.
G/O Media may get a commission
Why is it important to clean your car battery terminals?
Your vehicle needs a working battery in order to run, and batteries can be costly, so it’s in your best interest to prolong the life of your battery. Corrosion around the terminals or elsewhere on the battery causes its materials to deteriorate, which shortens its lifespan. It can also disrupt the electrical current in the car, and may end up damaging the electrical and starting systems.
How to remove corrosion on your car’s battery terminals
There are dedicated battery cleaning solutions available at your local auto parts store, but this DIY method will also do the trick:
Put on gloves and protective eyewear before getting started.Remove the connecting cables, starting with the negative (black) cable, followed by the positive (red) cable. Check the cables for damage like fraying, or insulation that is dried, peeling, or cracked. If the cables are damaged, they must be replaced.Optional: Remove the battery from the vehicle and place it in a pan or shallow container. This will not only make it easier to clean, but also will prevent the corrosive material from getting on other parts under the hood. (Some people prefer to clean the battery while it’s still in the car.)Use a firm toothbrush, a wire brush, or a scraper, if necessary, to remove as much of the solid and powdery corrosion as possible, brushing it into the container as you go.Mix a paste of baking soda and warm water to neutralize the battery acid. Apply to the battery—and the terminal ends that connect it to the cables—with a clean rag, wiping any remaining corrosion away as you go. If the rag isn’t cutting it, use the toothbrush.When the corrosion is gone, dampen a new, clean cloth in warm water, and wipe the battery and its terminals down to rinse it. Use a clean (ideally microfiber) cloth to dry the area, wiping away any remaining residue.Place the clean battery back inside your vehicle (if you removed it). Spread a thin layer of petroleum jelly onto the clean battery terminals to help prevent future corrosion. Reattach the cables, this time starting with the positive (red) cable, then the negative (black) cable. Replace the caps on each terminal.Once the battery is corrosion-free, set a reminder in your calendar to check it again in six months and clean it, if necessary. From there, keep looking for and cleaning battery corrosion every six months.

 UsenB
UsenB 


