The Complete Guide to the 26 Bikram Yoga Poses
The post The Complete Guide to the 26 Bikram Yoga Poses appeared first on The Yoga Nomads.
 Kass
Kass
Your legs are shaking, your breath deepening, and sweat is dripping down your face in a 105°F room as you focus every ounce of your effort on another pose.
As your brain seems to scream at you “this is so freaking hard!” and your body stretches and flexes with all its might, the realization eventually comes over you: Bikram yoga was designed to be so dang challenging that it practically blasts to you into the present moment.
As you hold and transition between each of the poses, everything else outside of that room ceases to exist.
“Why would you want to do something that hard in a scorching hot and crazy humid room?” people ask, or “I thought yoga was supposed to be relaxing”. It’s because the experience of such immense challenge is transformative to the body and mind.
Bikram yoga is not for the faint of heart, but it is perfect for those who want to push themselves beyond the realm of their comfort zone into new dimensions of fitness and mental clarity.
If you’re wondering what to expect during a Bikram Yoga class, here is a straightforward guide to the infamous 26 poses that lead to physical and mental breakthroughs.
What is Bikram Yoga?
Founded in the 1970s by Bikram Choudhury, Bikram is the original “hot yoga”. It is performed in a climate-controlled 105°F (40°C) room at 40% humidity.
Bikram yoga consists of a 26 asana-sequence that is repeated exactly the same way in every 90 minute class. Each pose is held for 6 to 60 seconds and typically repeated twice to allow for deeper and fuller expressions of the posture. There are also 2 breathing exercises incorporated into the series.
Each asana builds on the previous one by warming, stretching, flexing, and releasing the body with targeted precision. This specific combination of poses challenges every single muscle group and tendon, moving fresh blood flow to each organ and fiber of the body.
Bikram yoga is a popular means of building muscle tone, losing weight, building cardiovascular endurance, and strengthening the mind-body connection.
Bikram has grown to one of the most popular yoga styles in the world thanks to the unique combination of Eastern and Western philosophies. In the Bikram sequence, Eastern knowledge of yoga poses (asanas), deep breathing (pranayama) and meditation is enmeshed with Western perspectives on anatomy, cardiovascular health, and preventing disease.
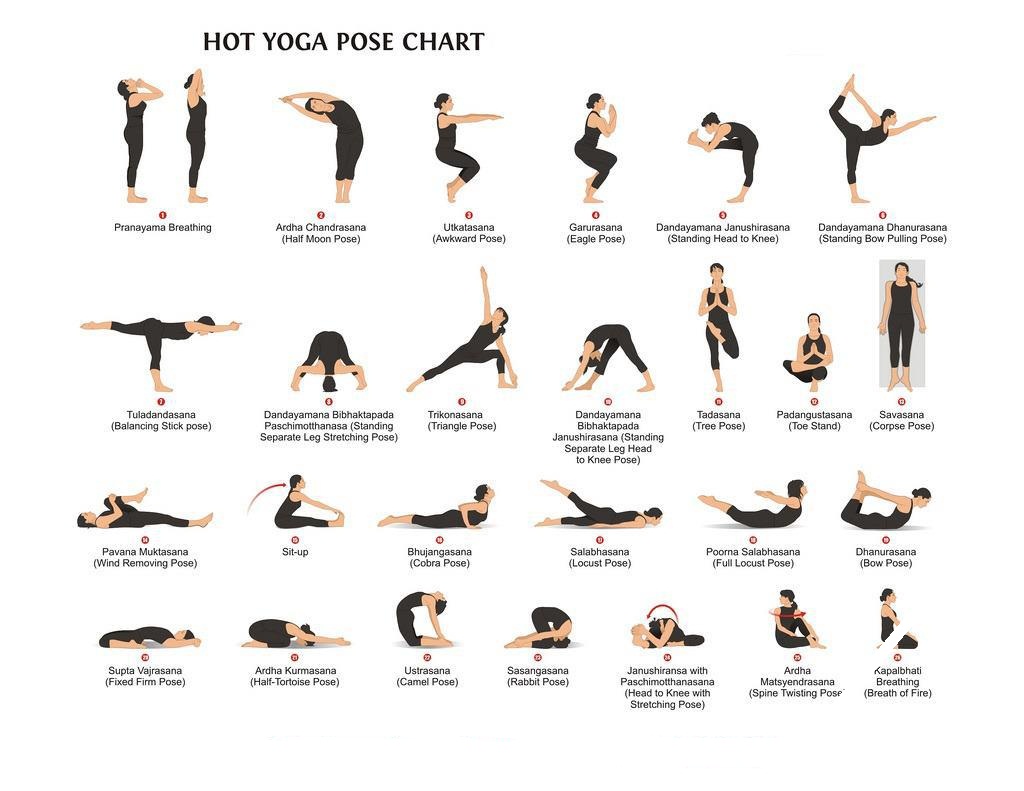
What are the 26 postures of Bikram?
The Bikram sequence leads you through an intentionally designed series of 26 asanas. They include distinct series of standing, balancing, hip-opening, back-strengthening, and deep stretching to facilitate physical and mental transformation.
1. Standing Deep Breathing
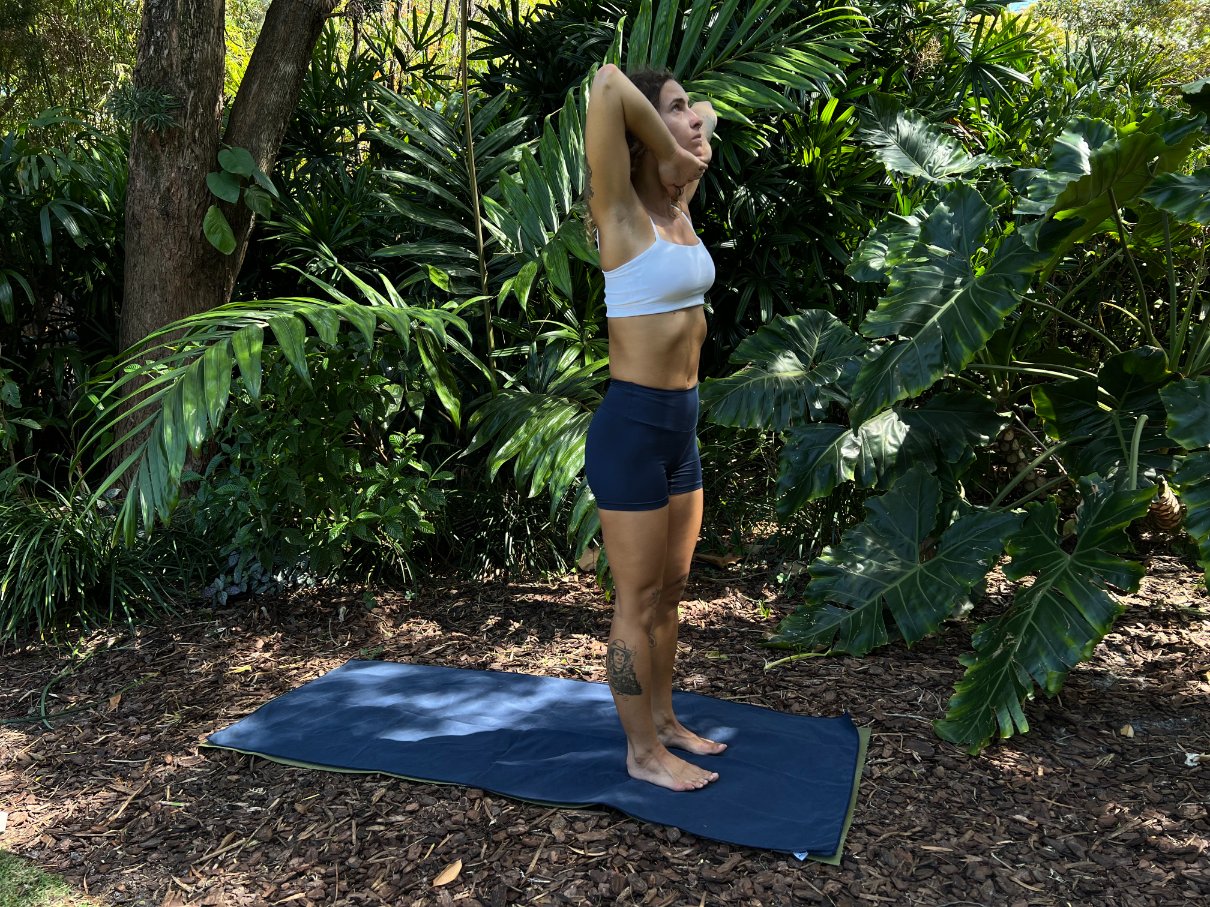
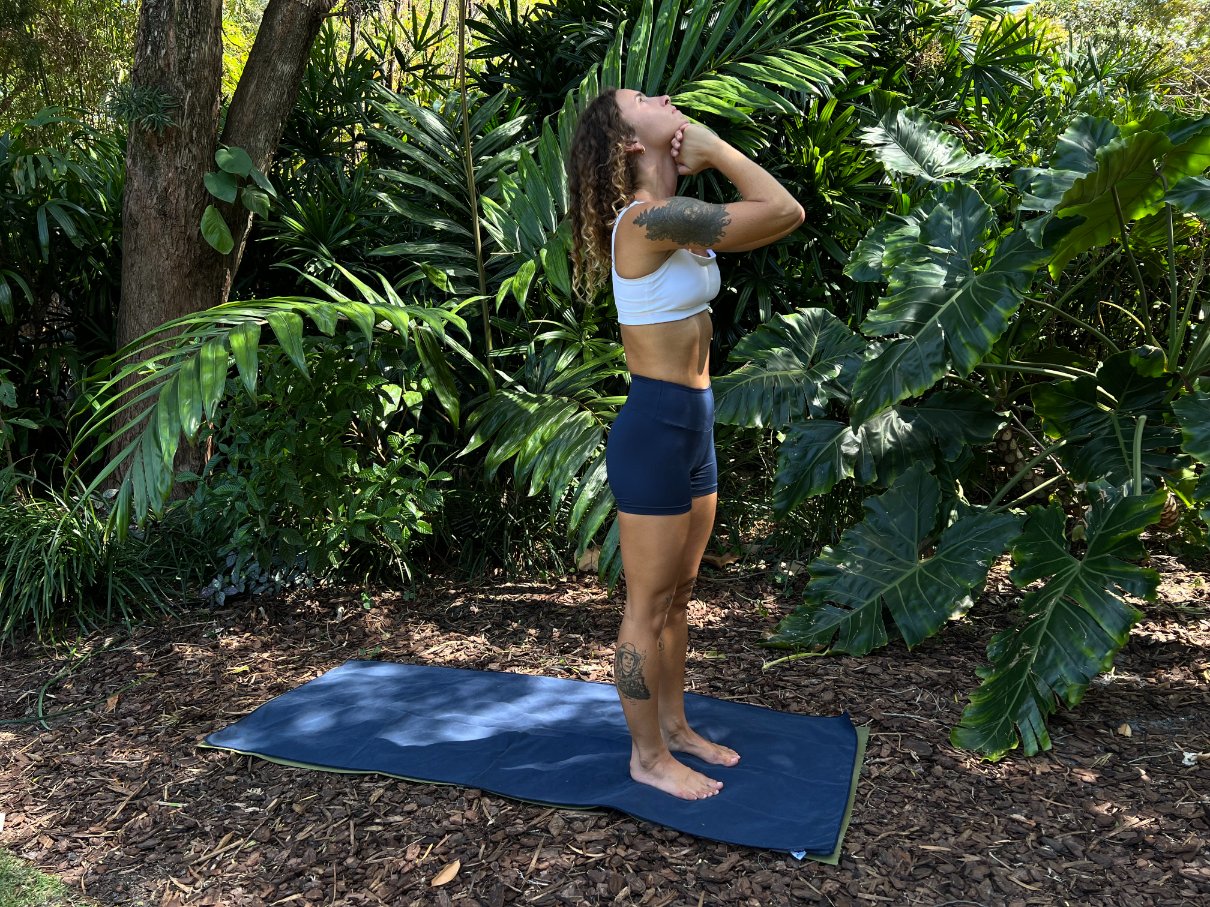
The Bikram sequence begins with a breathing exercise for concentration and grounding in the present moment. Practitioners begin in Mountain Pose (Tadasana) and place their clasped hands at the base of the chin. On a 6 second inhale, you breathe slowly your nose and raise the elbows to the sky. On a 6 second exhale, you blow the breath out through your mouth and bring the elbows together as the head moves backwards.
2. Half Moon/Hands to Feet

Bikram takes a 3-part approach to Half Moon Pose (Ardha Chandrasana) to warm the side body and move into a forward fold.
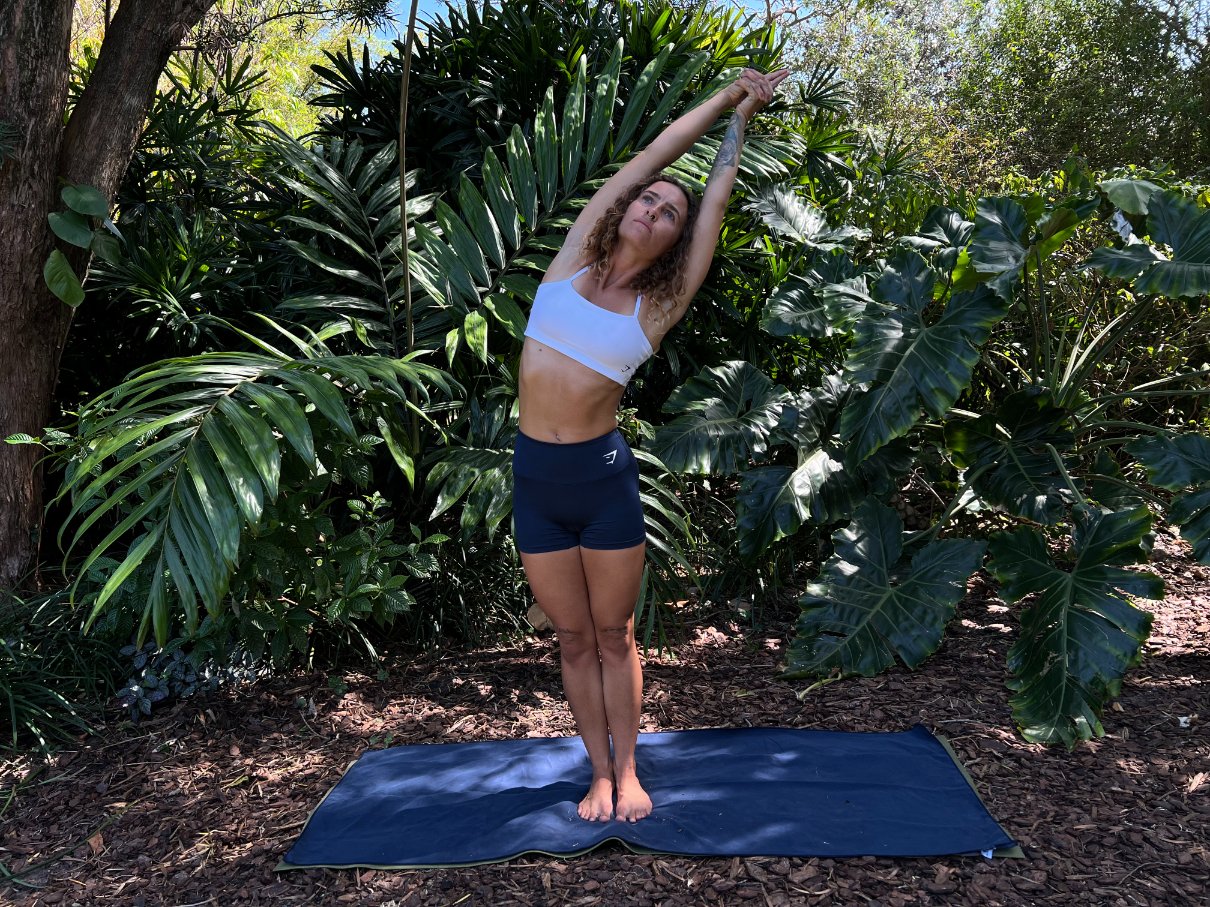
First, practitioners bring their hands together overhead with forefingers pointing upward. On an inhale, you lengthen upwards and slowly begin arching into a half moon pose. Then, you return to center and arch into a “c” shape on the other side. Next is a slight backbend with the glutes and abs fully engaged to support the low back muscles. Lastly, you dive into a deep forward fold to release the spine and stretch the hamstrings.
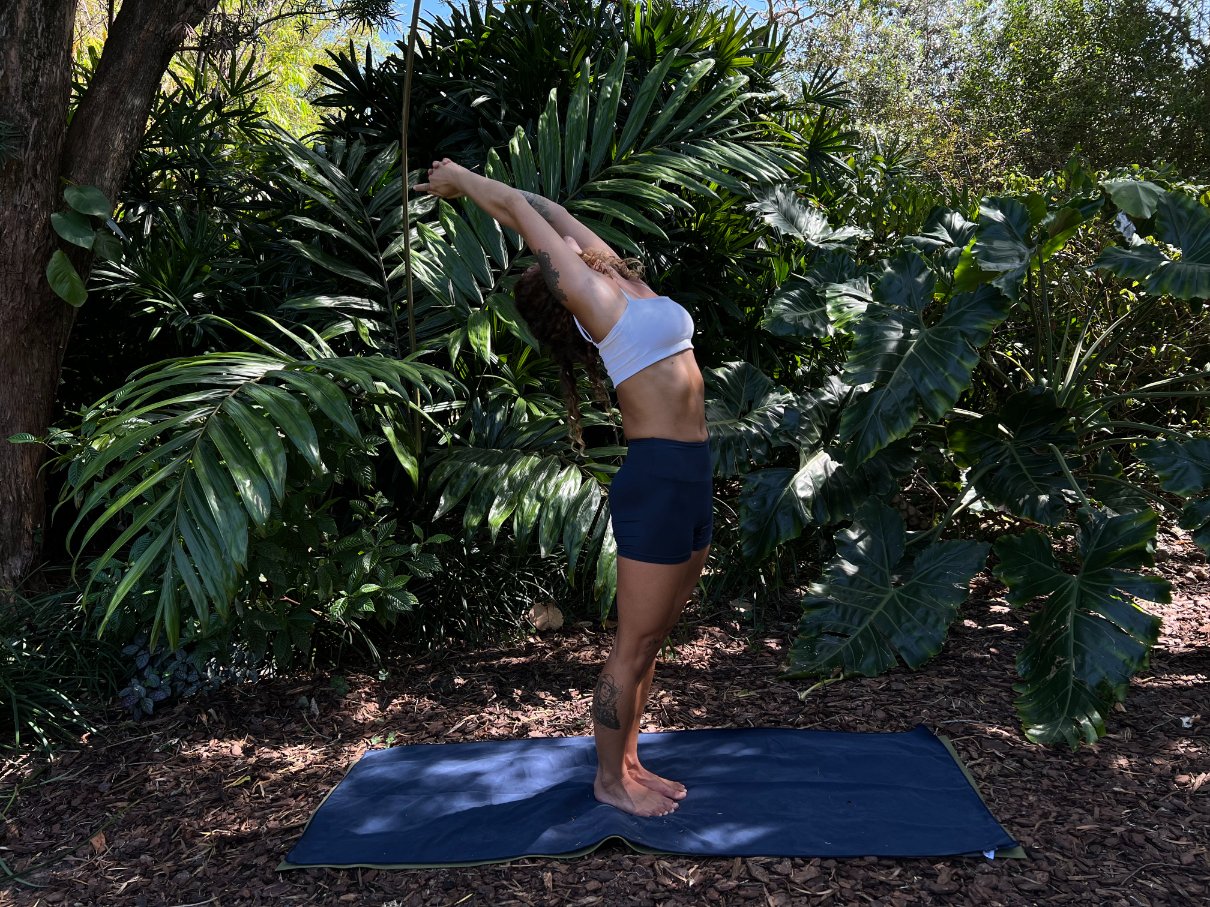
Half moon pose strengthens the oblique abdominal muscles and lower spine to alleviate back pain. It also helps open your chest and shoulders while stimulating the digestive system.
3. Awkward Pose

Also known as Utkatasana, Awkward Pose is another 3 part series of postures to build stamina and begin revving up the body for the rest of the sequence.
Begin in a classic Chair Pose with feet flat and the arms outstretched forward with palms down. Next, transition to the tippy-toes while straightening the spine, engaging your core, and tightly activating the thighs.
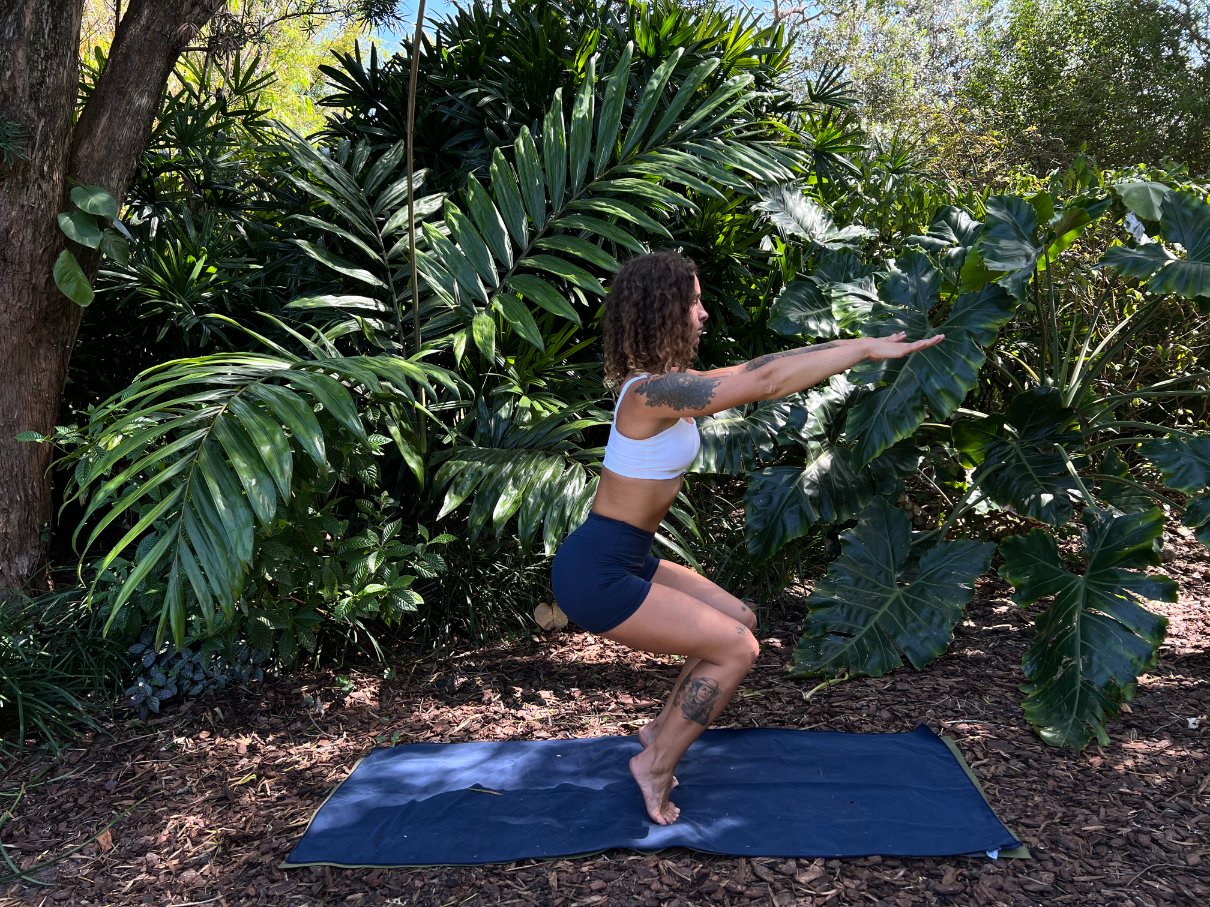
Lastly, bending the knees deeper and coming down to a partially seated position atop the heels helps to challenge and strengthen the spine, ankles, feet, calves, shins, and abdominal wall. Holding this pose is -well, awkward- but extremely rewarding for activating all of your muscles in preparation for deeper stretching and movement.

4. Eagle Pose
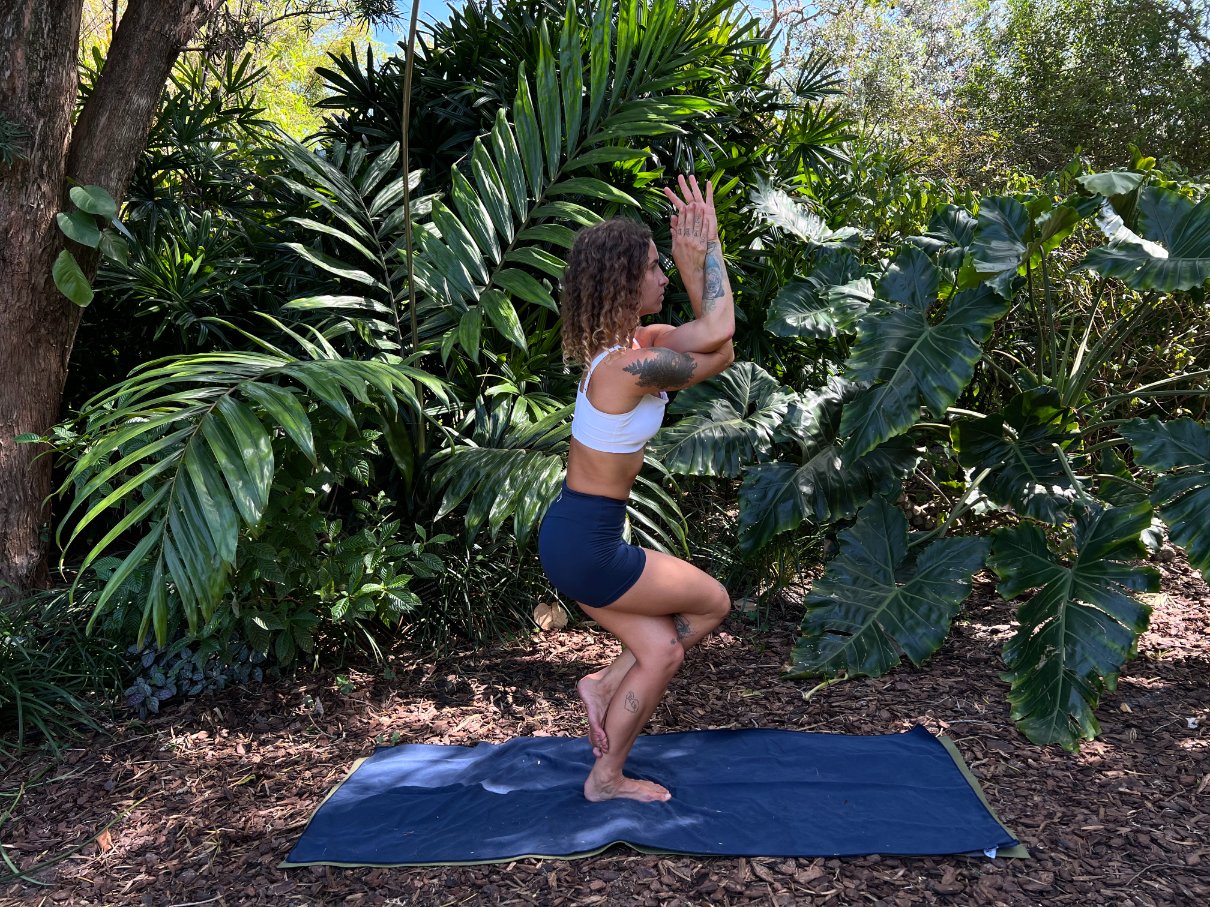
After working the complete lower body in Awkward Pose, Eagle (Garudasana) is a natural transition to stretch out the shoulders and chest while twisting the lower body. As the first single-foot pose of the Bikram sequence, Eagle helps with balance and coordination.
The process of compressing and contorting the body also squeezes your lymph nodes, promoting lymphatic drainage and boosting the immune system. Be sure to maintain a lifted posture with your back arched slightly backwards, core engaged, and limbs squeezing tightly together.
5. Standing Head-to-Knee Pose
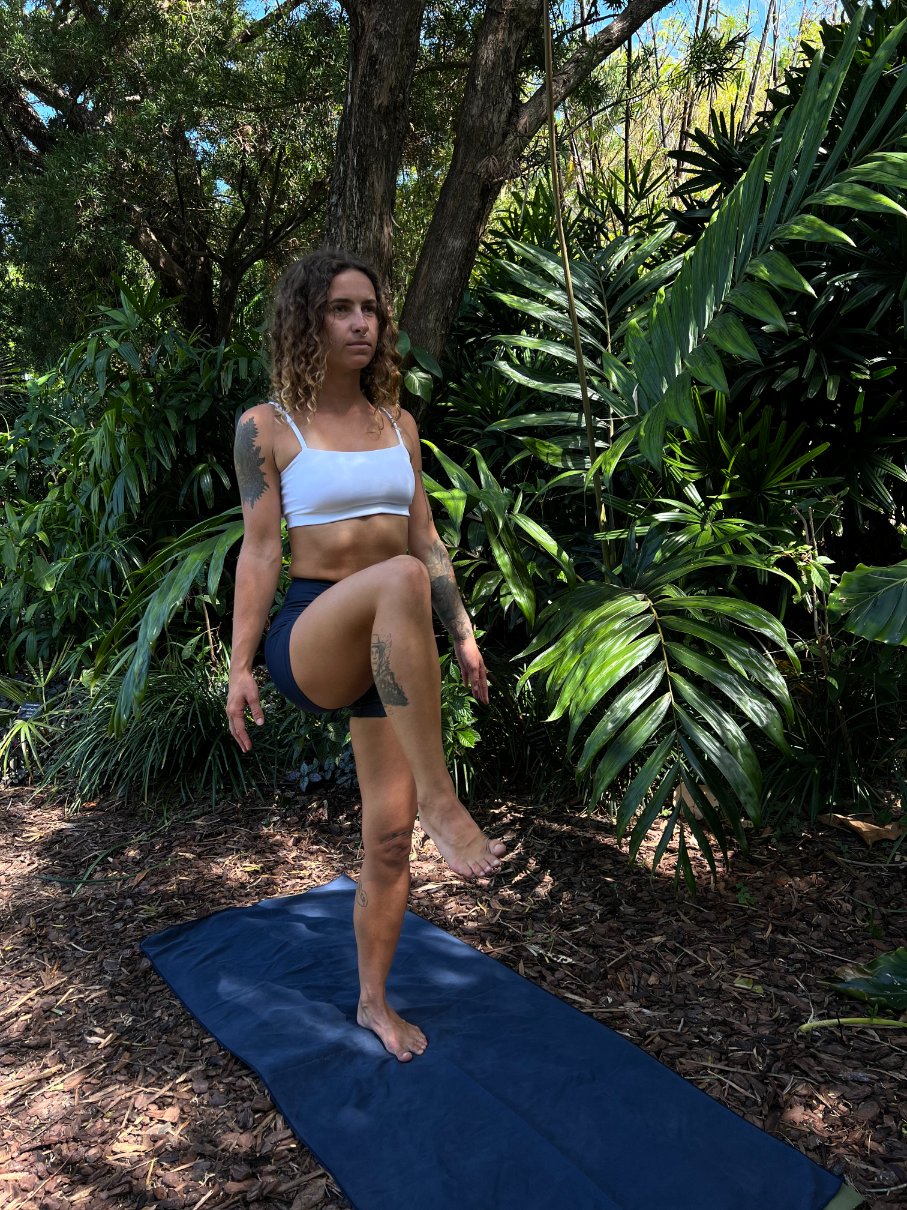
The journey between the 4 phases of this posture is undoubtedly challenging yet rewarding. Each stage builds upon the last. Dandayamana-Janushirasana works the internal abdominal organs while seeking to deepen the arc of the spine and pulling the forehead toward the knee.
The pose begins with shifting the weight to one foot, bending the knee at a 90° angle, exhaling to arch the back over the knee and reaching for the foot. Then, you slowly extend your foot until your leg is as straight as possible. The final (and arguably most difficult) portion of the pose is shifting your forward gaze down toward the knee. Standing Head to Knee is an intense test of focus, balance, and hamstring extension.
6. Standing Bow Pose
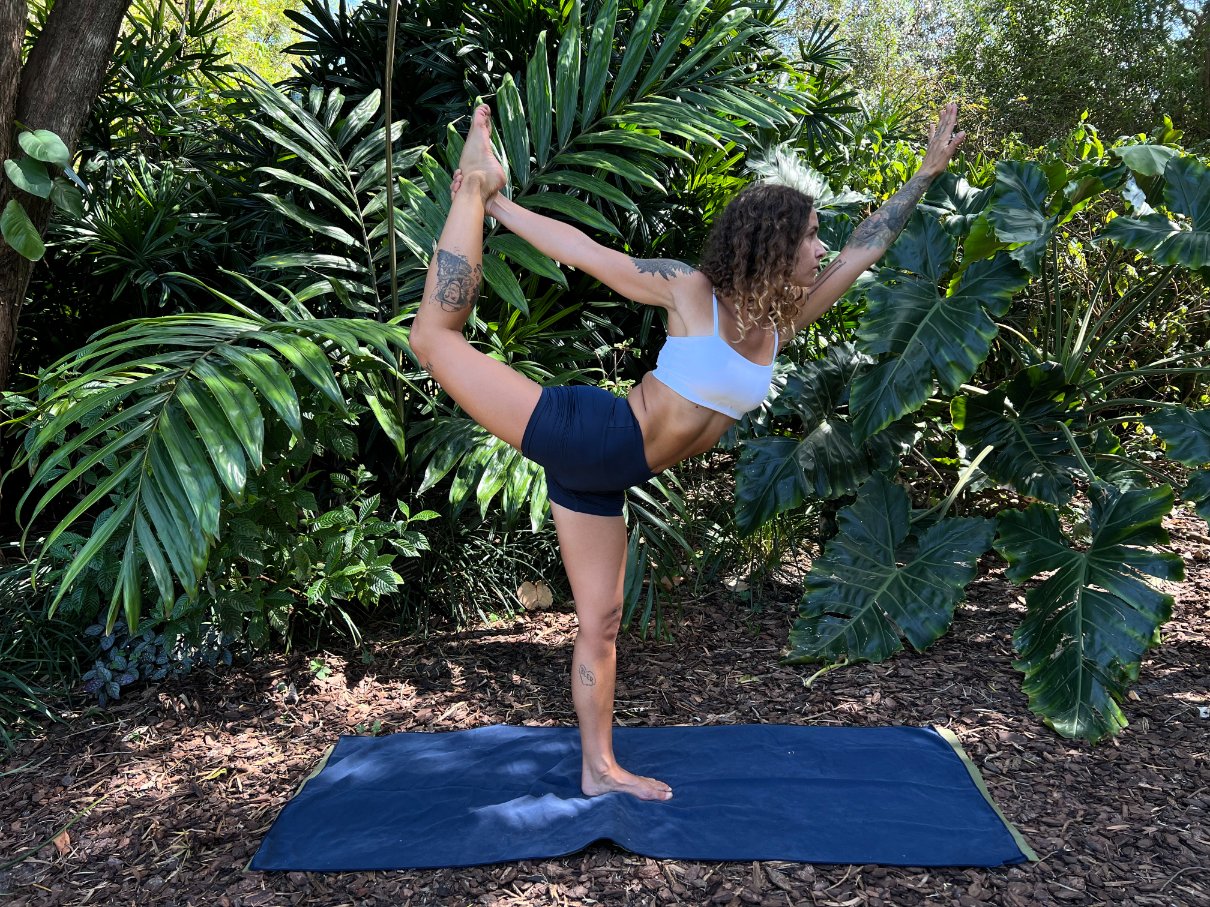
To continue the balancing part of the Bikram sequence, Standing Bow Pose (Dandayamana-Dhanurasana) uses reaching and pulling to create resistance within the body that ultimately balances out the opposing directions.
Beginning in a standing one-legged position, you grasp the inside of your ankle and kick forward and back with the foot as you simultaneously reach forward with your opposite hand. The resistance in each direction opens your shoulders, hips, and thighs while pumping up the blood circulation to your heart. Standing Bow Pose is a backbend, hip opener, and thigh stretching pose all in one.
7. Balancing Stick Pose

To end the balancing sequence, we aim to rev the heart rate up even higher during a short duration pose that seeks complete symmetry and alignment.
First, you reach upward with the hands clasped and forefingers to the sky. With a deep inhale, step forward onto one foot, engage the core, tighten the leg muscles, and bring the body into a parallel “T-shaped” position. The hips and shoulders remain perpendicular to the floor.
Balancing Stick is excellent for cardiovascular health because it challenge the heart muscle as you simultaneously practice slow deep breathing. Similar to Standing Bow, Balancing Stick requires stretching the fingers and toes in opposite directions to create resistance and balance that strengthens the joints.
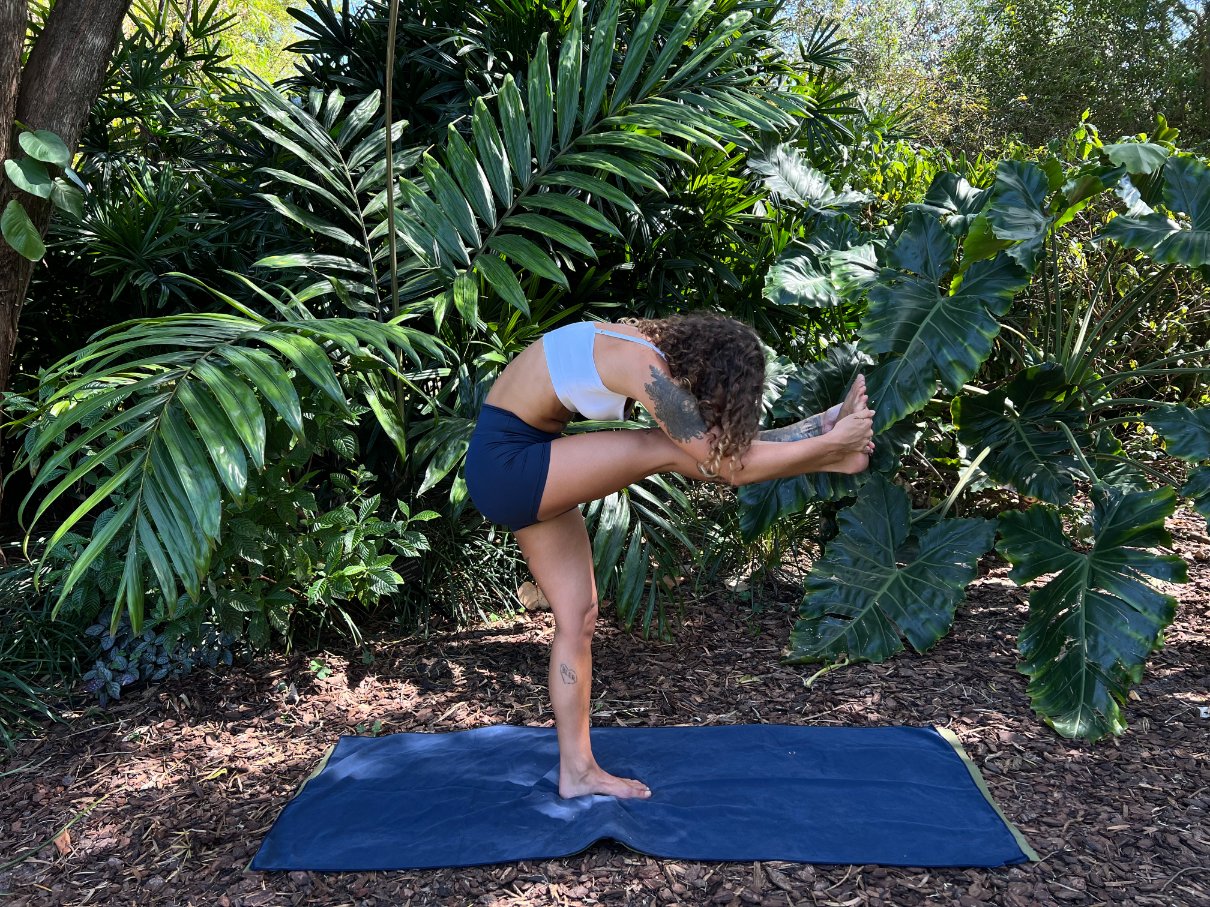
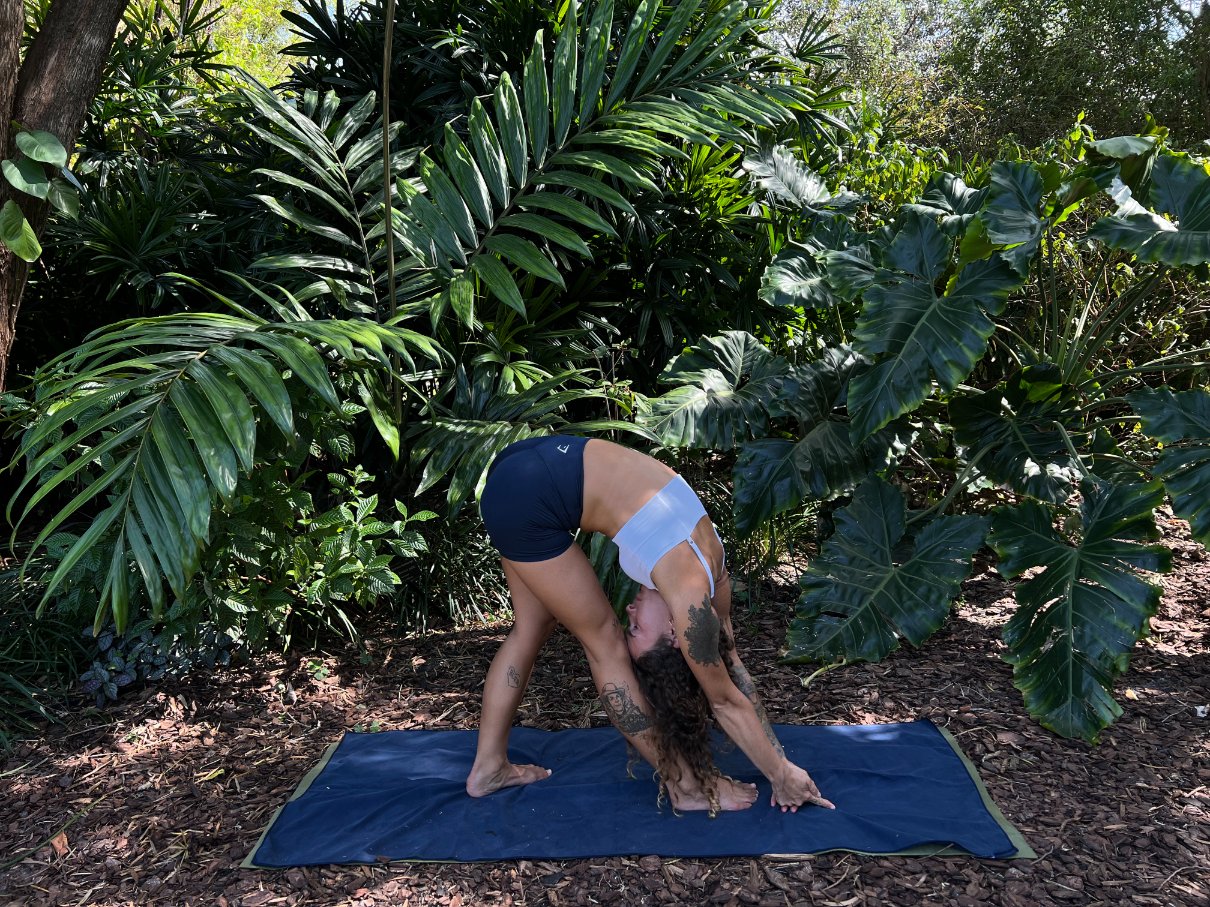
8. Standing Separate Leg Stretching Pose

By this point in the sequence, Bikram practitioners are drenched in sweat as they try to slow their heart rate with deep slow breaths. The next part of the sequence moves into opening the hip joints with a wide-legged stretching series that includes some inversions to lower the heart rate and calm the mind.
Standing Separate Leg Stretching Pose (also known by the wildly long Sanksrit name: Dandayamana-Bibhaktapada-Paschimotthanasana) opens the spine and shifts the blood flow to the brain. With the legs wide apart in an upside down “V”, the hands clasp onto the outside of the feet as you dangle your head and neck toward the ground. This posture has been shown to improve your mood and even help with depression.
9. Triangle Pose
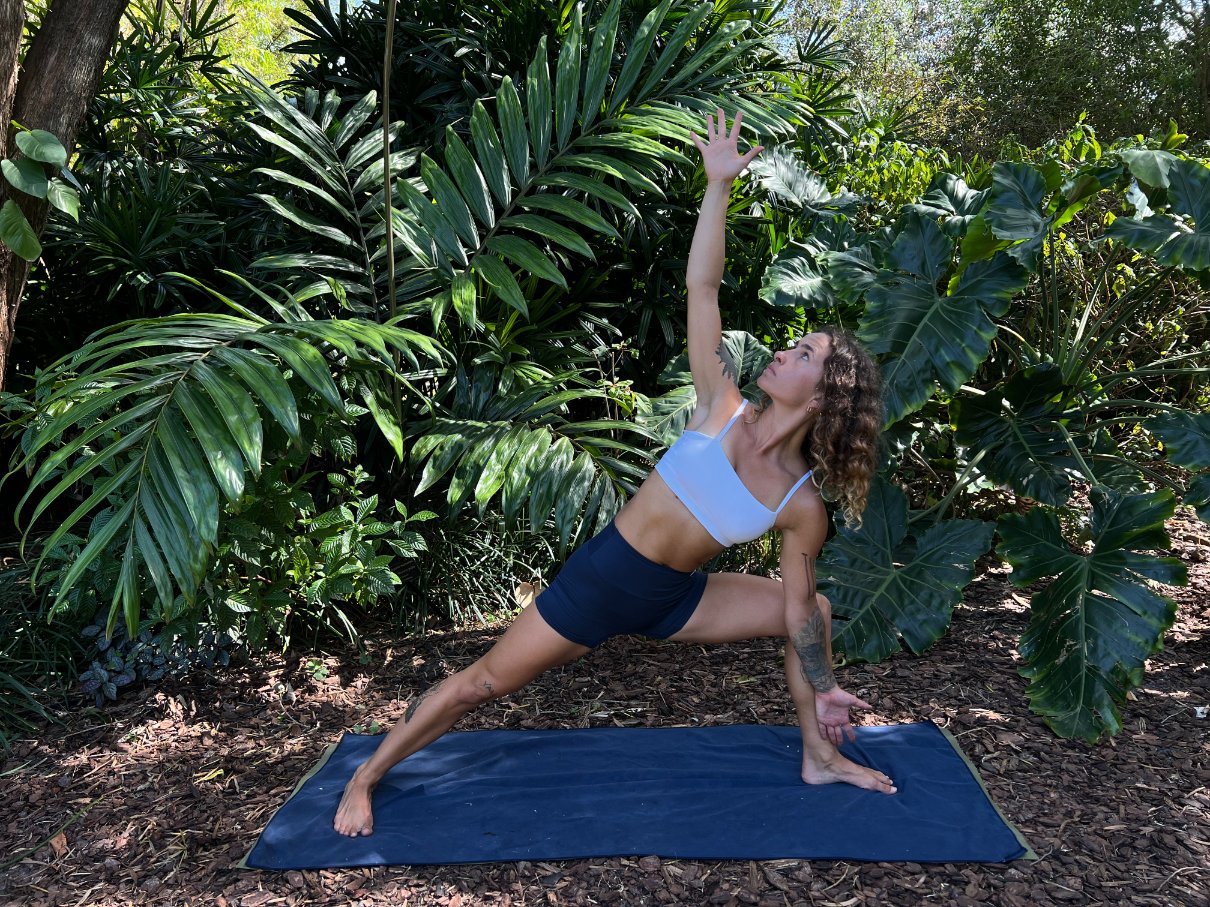
Like Standing Separate Leg Stretching, Triangle Pose is incredibly beneficial for hip mobility. It also opens your shoulders and heart with a light spinal twist. This form of Trikonasana challenges the abdominal muscles as well by requiring you to hold your body in an upright position above the front bent leg.
Unlike other forms of Triangle Pose, the Bikram triangle does not include resting your hand on the bent knee or the floor. Instead, you use your obliques to stay in place as you press the elbow against the knee to further open your hip.
10. Standing Separate Leg Head to Knee
With another tongue-twisting Sanskrit name (Dandayamana-Bibhaktapada-Janushirasana), Standing Separate Leg Head to Knee Pose aids digestion by compressing the stomach as you round over the front leg.
The back of the spine arcs and stretches open with the intentional chin tuck toward the chest. This slight pressure on your throat is known to stimulate the thyroid and parathyroid glands for better immune health. Lastly, Standing Separate Leg Head to Knee deeply stretches the hamstrings as you shift your front hip in line with the other and use resistance to create alignment.
11. Tree Pose
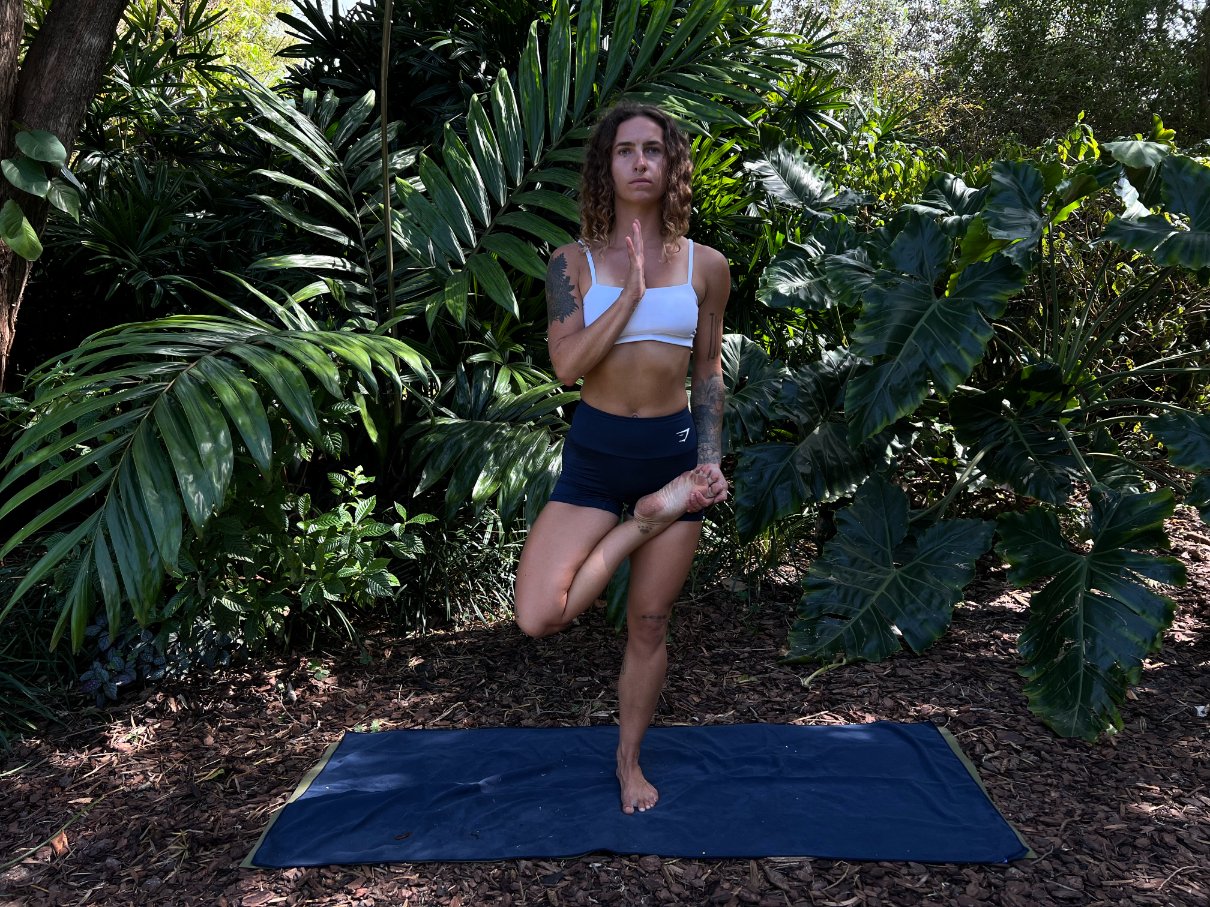
To take your balance to the next level, Tree Pose (Vrikshasana) once again shifts your weight into one standing leg and opens up the hip joints while externally rotating the elevated foot.
Tree Pose improves posture and hip flexibility while realigning the body in the second-to-last standing position. It also stimulates the tendons and ligaments in your foot as you seek to maintain proper weight distribution and stability in the standing leg.
12. Toe Stand
Rounding off the standing series is Toe Stand (Padangustasana). Once you have mastered Tree Pose by keeping your heel higher than your hip and holding your balance with a stable standing leg, you are ready to try Toe Stand. This pose requires intense focus to keep the spine straight and foot engaged.
Begin lifting your standing foot onto the tip-toes and slowly lowering the tail bone down toward the floor. The full expression of this pose has your standing leg completely bent and your hips in a low, deep-seated position completely balanced on your toe. Toe Stand dramatically strengthens the upper thighs, ankles, and core.
13. Dead Body Pose
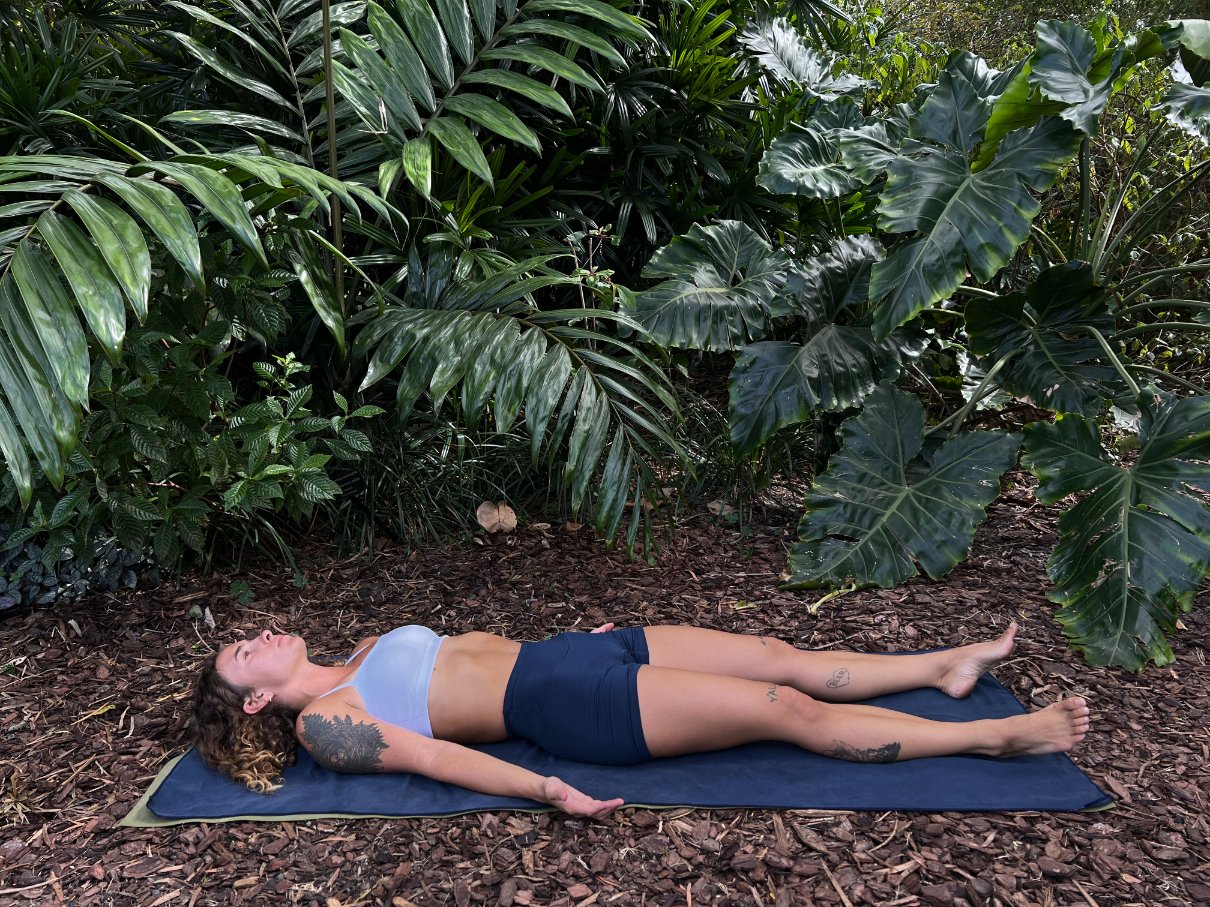
At last, the floor series! This Savasana (Dead Body Pose or Corpse Pose) is a welcome resting position for transitioning out of the super hard balancing sequence. While it may seem like you’re just laying down on your back, Dead Body Pose is actually a subtly active posture that seeks to call special attention to slowing your breathing, opening blood flow, and grounding in the present moment.
It may be tempting to drift off for a moment, but it’s recommended that you keep your eyes opened and focused on your bodily sensations.
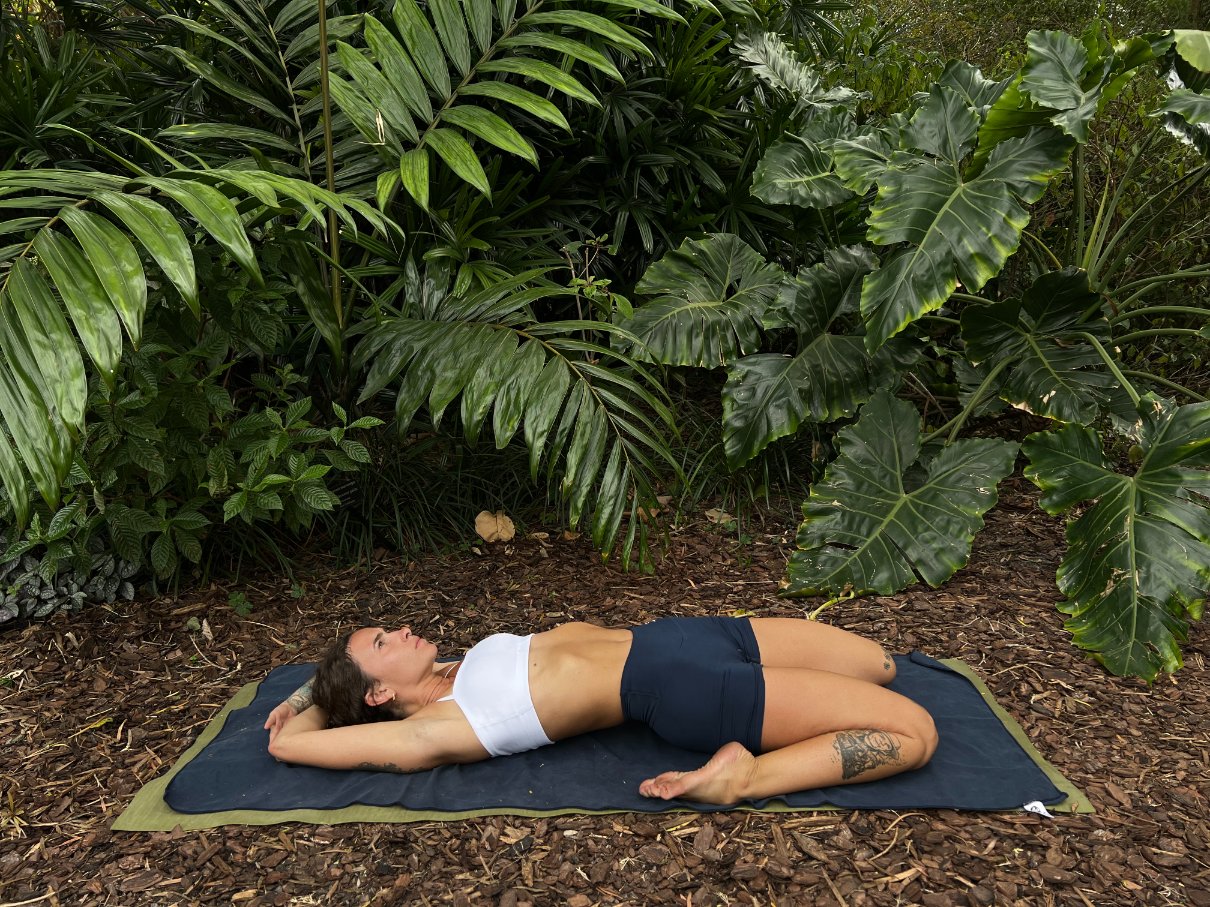
14. Wind Removing Position
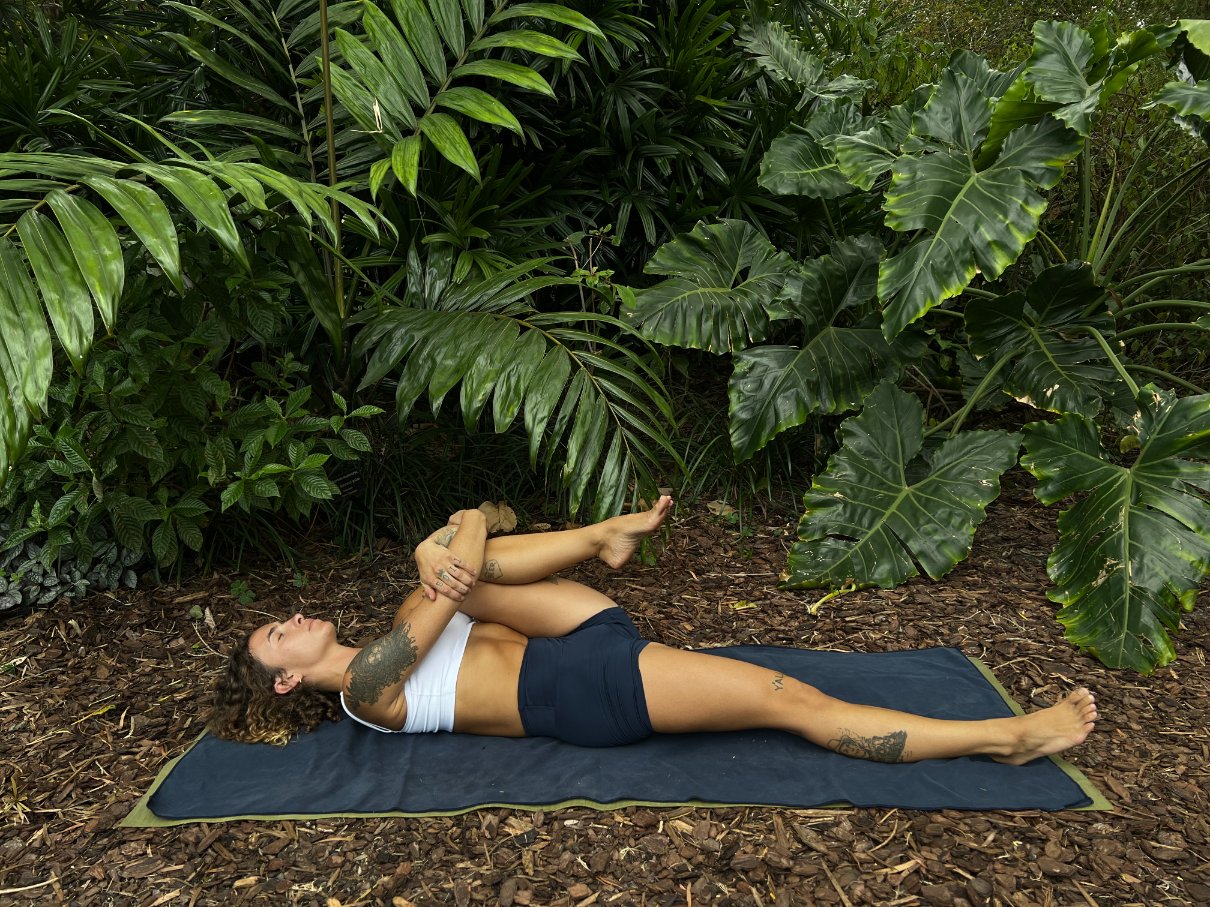
To continue calming the nervous system and stimulating your digestive system, Wind Removing Pose (Pavanamuktasana) bends the hips forward and supplies fresh blood to the hip joints. You get a nice lower-back stretch and another opportunity to slow your heart rate.
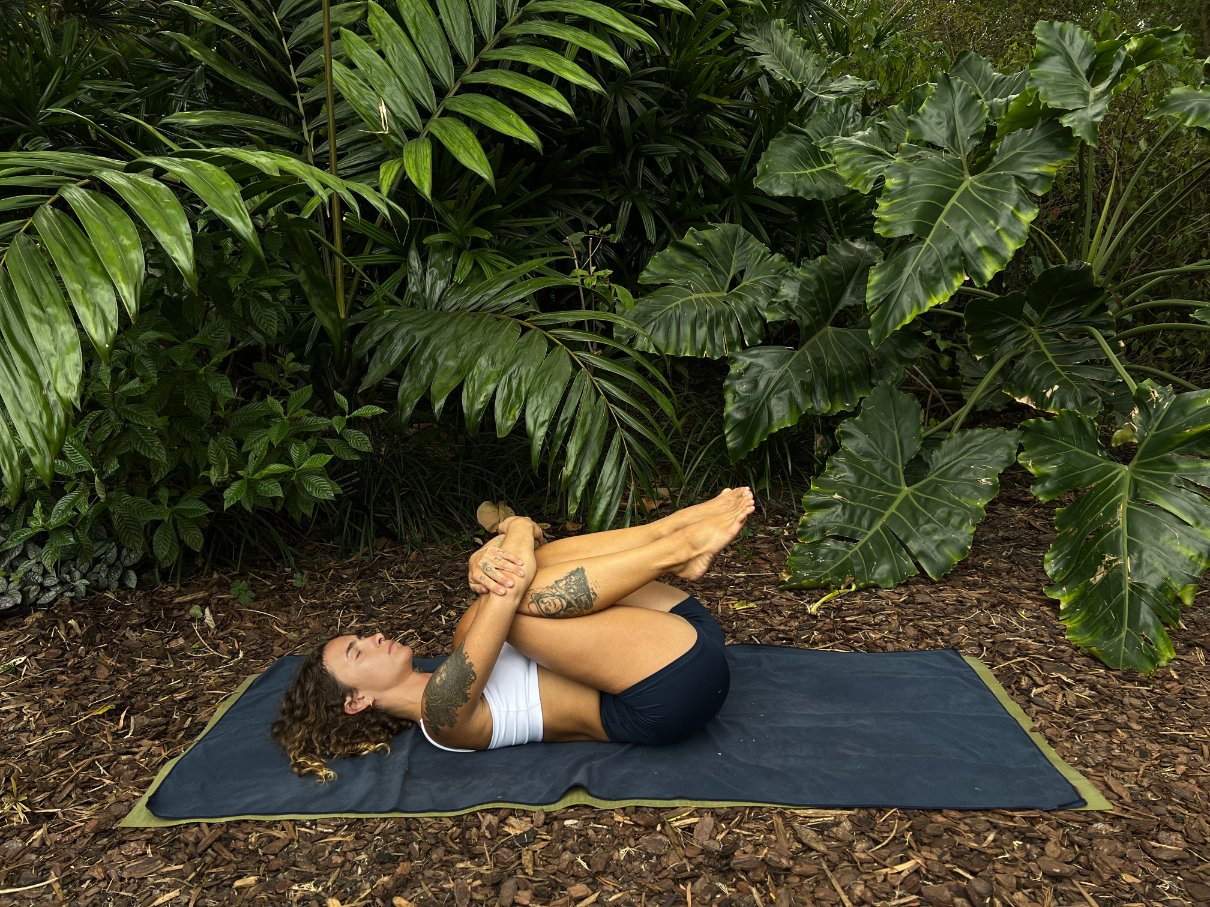
Begin with bending the right knee and hugging it to your chest with the left leg extended. Next, switch legs and then hug both thighs toward your chest to add pressure to the abdomen as you push your low back toward the ground.
15. Sit-Up


The sit-up transition posture signifies the move into the prone posture series of laying on your stomach. Sit-ups are repeated 13 times throughout this series and involve a specific type of sharp double exhalation through the mouth as you pull yourself up from a supine position, suck in your core, and round yourself over the front legs in a forward fold.
16. Cobra Pose
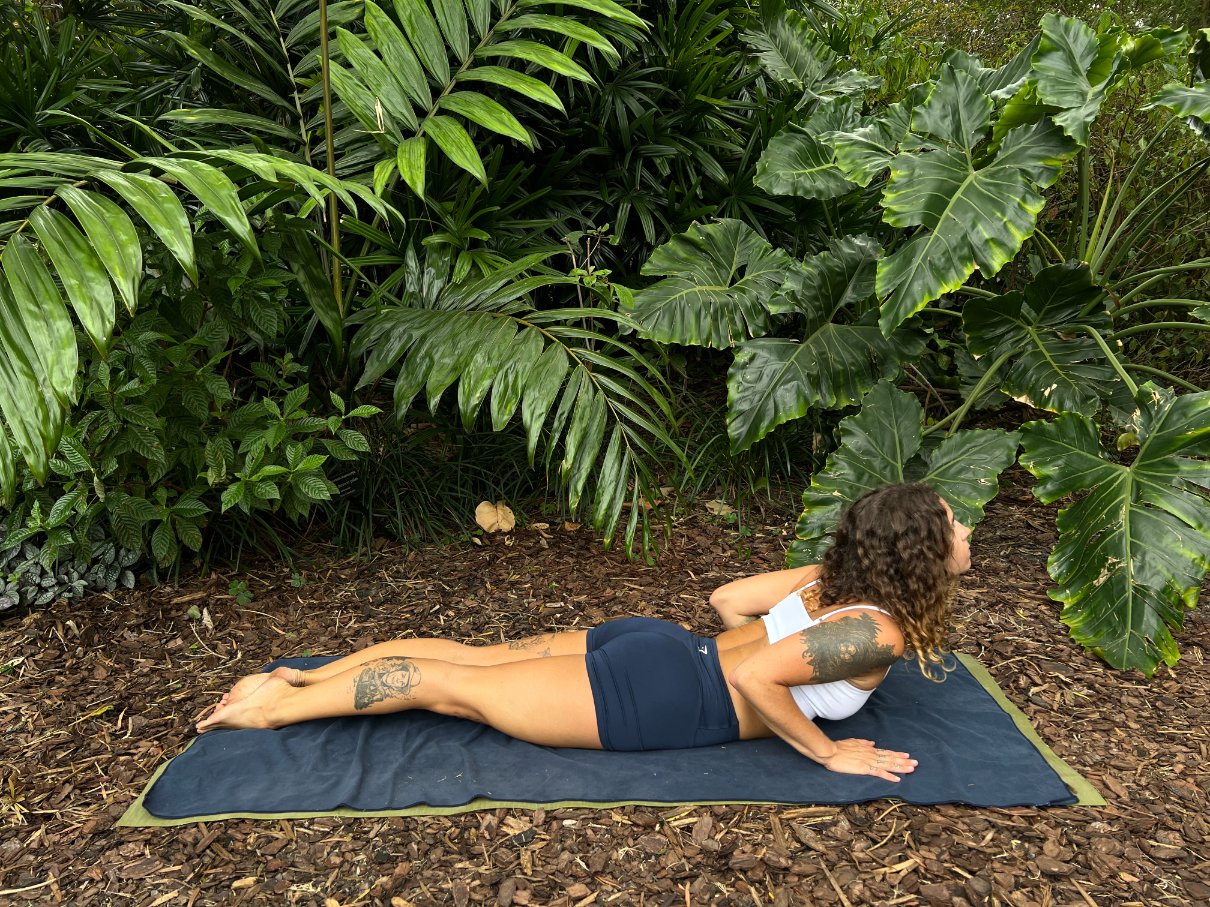
Moving into the prone posture series, Cobra Pose (Bhujangasana) strengthens the back muscles by compressing your lower spine, squeezing the kidneys, and slightly lifting the upper body. It’s important to keep your legs engaged, knees locked, and glutes contracted during this pose to prevent injury to the low back.
Cobra pose promotes proper kidney function and improves menstrual disorders.
17. Locust Pose
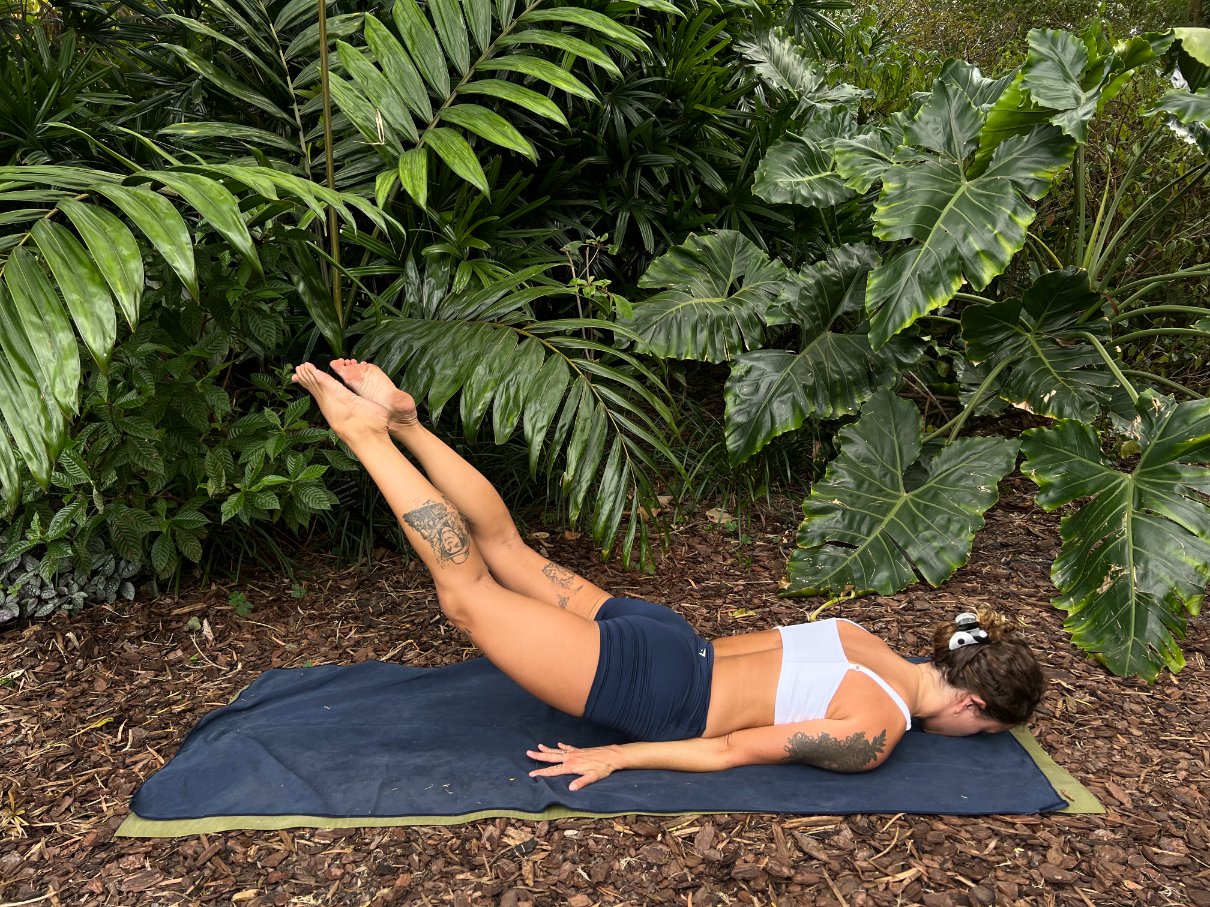
Locust Pose (Salabhasana) is one of the most misunderstood postures in the Bikram sequence because it requires intense pushing against the floor with your arms, chest, and mouth while simultaneously lifting the legs up behind you.
Begin facing the ground, and one side at a time, arrange the arms in a “volleyball” position beneath your abdomen with fingertips pointing backwards. Your hips should balance on the top of your wrists. Move the mouth to the floor and as you exhale, contract every part of your body to lift the legs and hips up off the floor.
Locust Pose is extremely beneficial for stimulating the joints in your hands, wrists, and elbows while strengthening the upper arms and lower legs.
18. Full Locust Pose

Poorna Salabhasana is Full Locust Pose, which involves removing the arms from under the body to fully lift with only the strength of your middle spine. Nearly every muscle in your body is straight and contracted to stimulate flying like a bird into the air as you balance only on your lower stomach and hips.
19. Bow Pose
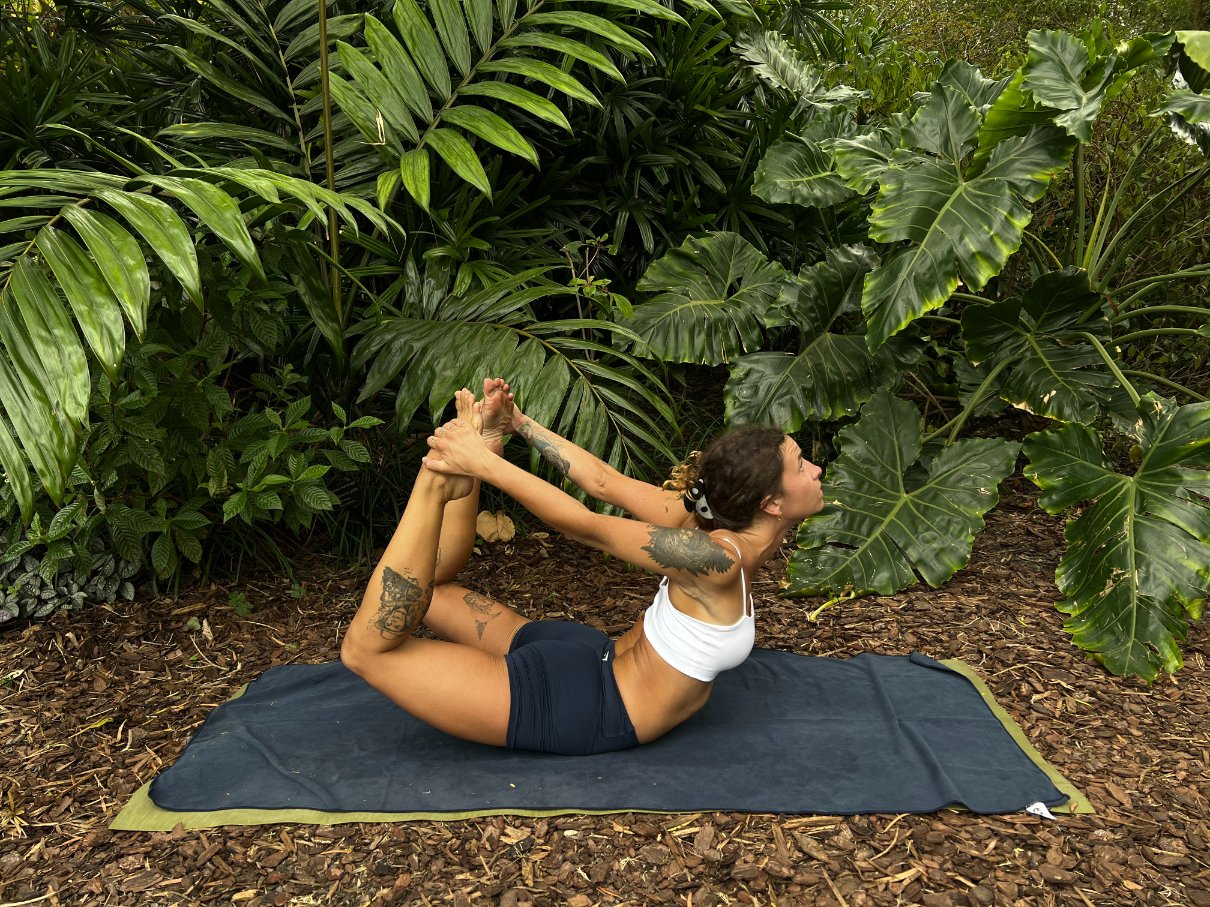
Bow Pose aids digestion, deeply opens the back, and stretches the front of your body. It is very beneficial for your spinal nerves and muscles, however you must be careful not to over-arch or compress into the low back region.
Bow Pulling Pose (Dhanurasana) uses resistance to pull the upper body and kick the lower body upward simultaneously, once again balancing on your hips and lower belly as you reach up toward the sky.
20. Fixed Firm Pose
Supta Vajrasana, or Fixed Firm Pose, is harder than it looks because it requires intense knee flexibility, hip opening, and a stretching of the diaphragm.
Begin in a seated position atop the knees, spreading your feet out to the side. Slowly bend backwards onto the elbows and then onto the shoulders with the arms clasped above your head. It’s important to move the knees as far out as necessary to avoid strain in the knee joints. It takes a lot of time to reach the full expression of this pose, so be patient and easy on yourself.
21. Half Tortoise Pose
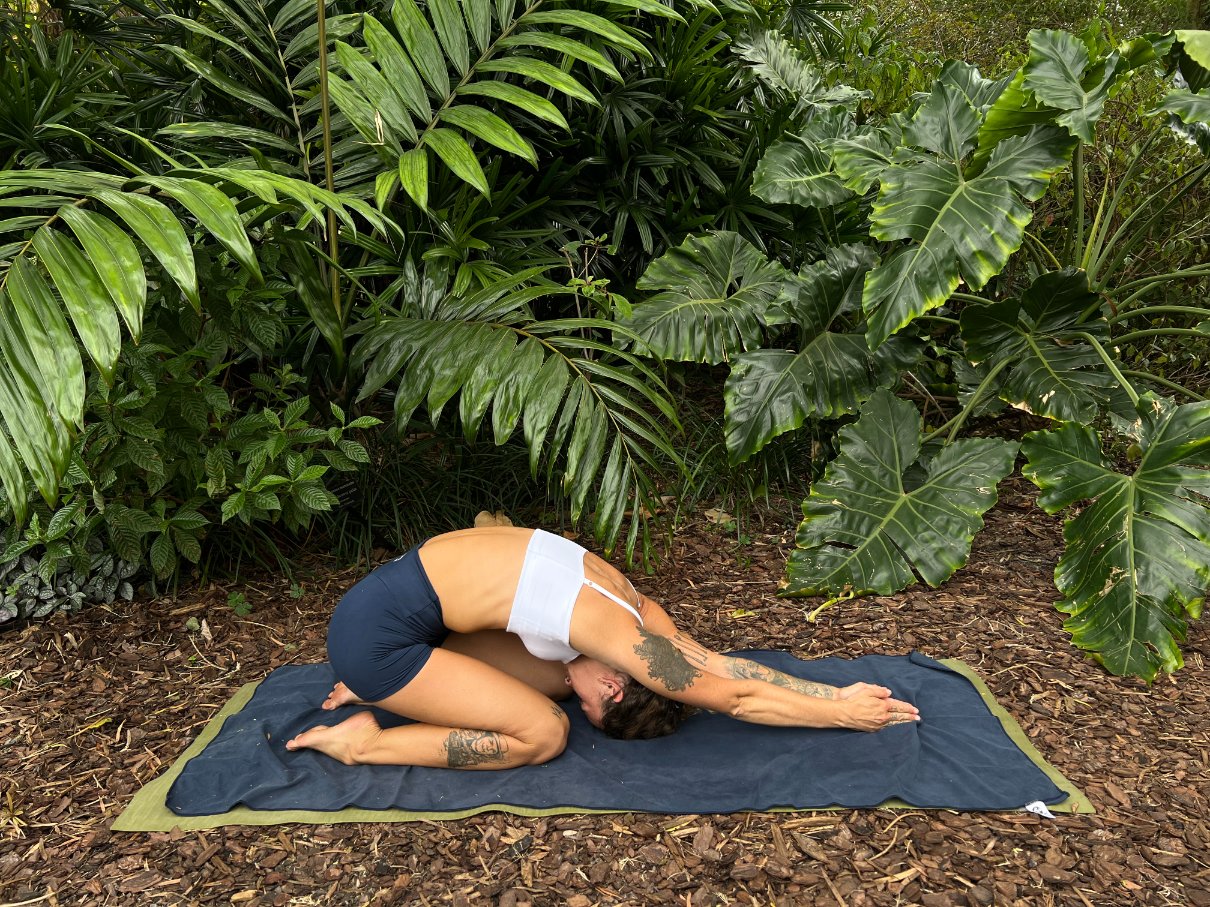
Similar to an active Child’s Pose, Half Tortoise Pose maintains a constant stretching of the arms as the outsides of the palms press into the floor. You also keep your spine lengthened and engaged as you squeeze your legs and feet together.
Slightly lowering your head below the heart moves fresh oxygenated blood into your brain, further slowing your heart rate and aiding in anxiety, sleep disorders, and jet lag.
22. Camel Pose
Camel Pose, or Ustrasana, is the final ultra-deep backbend of a Bikram class. This is the only posture that bends the entire spine and neck into a full arch as the hips push forward and up.
Keep in mind that Camel Pose can be extremely challenging and even dangerous for anyone with spinal injuries. It can cause feelings of dizziness and slight nausea. Be sure to go easy on yourself and work to create space and strength between your vertebrates before attempting the full expression.
23. Rabbit Pose
To counteract the intense back opening of Camel Pose, Rabbit Pose relieves tension in the spine as you round and compress forward. This delightful forward curve involves placing the top of the head on the floor and forehead to your knees to round the back upward and massages the abdominal organs. Rabbit Pose also stimulates the immune and lymphatic systems.
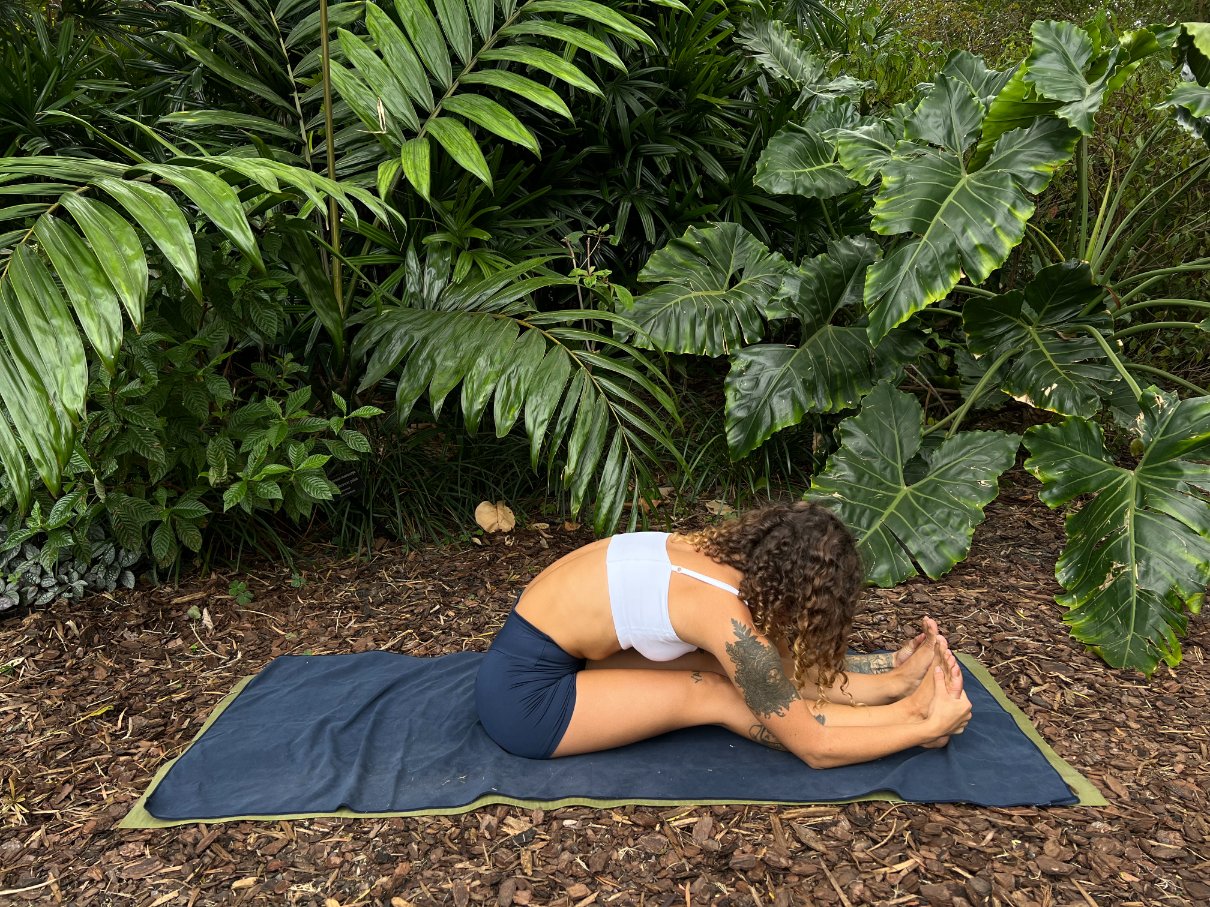
24. Head to Knee Stretching Pose
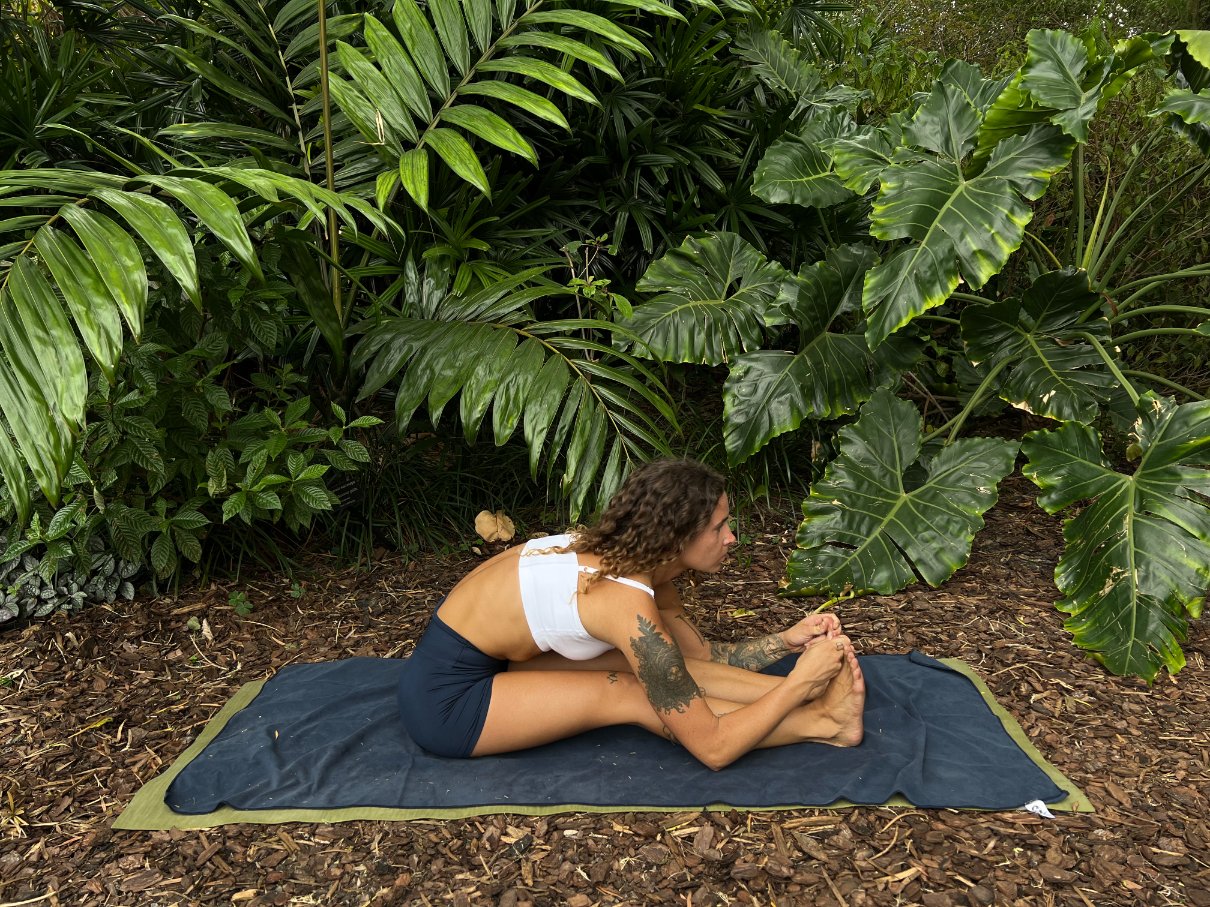
Janushirasana and Paschimotthanasana are simple forward folding stretches that continue the forward rounding compression of Rabbit Pose while fully lengthening the hamstrings. The ultimate goal of these postures is to stretch the spine and legs as straight as possible.
25. Spine Twisting Pose
As the final back-wringing pose, Spine Twisting Pose relieves all the spinal nerves of any remaining stress or pressure. By stretching upward and twisting simultaneously, you can use your hip to open the back and massage your internal abdominal organs.
As long as you maintain a lengthened upright position with proper alignment, spine twisting relieves lower back pain and opens the sciatic nerves for a lovely chiropractic adjustment.
26. Blowing in Firm Pose
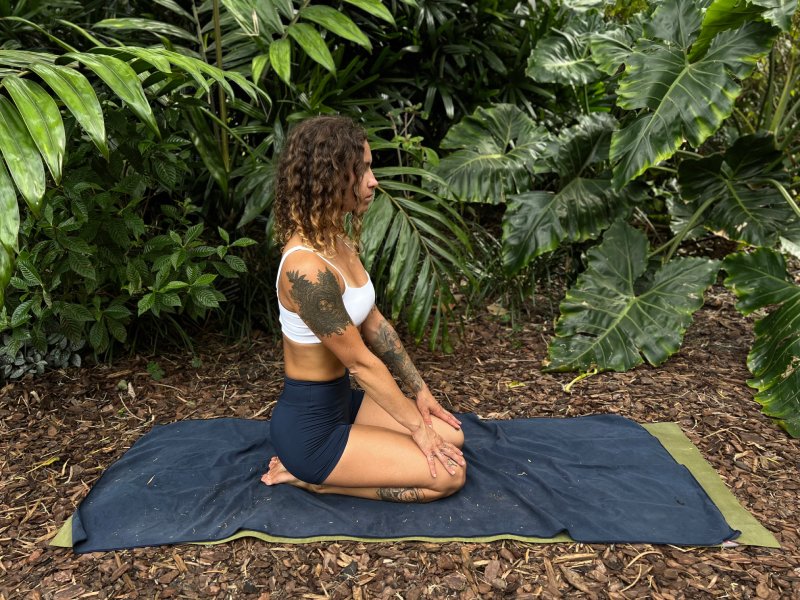
At last, Kapalabati breathing is the signature final pranayamic exercise of Bikram. This cleansing breath allows you to complete the detoxification process and blow out any final tension you’ve been holding onto.
Sit up straight and tall atop your heels. Take a deep inhale, and then sharply blow out over and over as you snap your belly inward. This breathwork is simultaneously stimulating and relaxing to round off all your hard work during the 90 minute sequence.
27. Final Dead Body Pose
Technically the 27th pose, you finally get to revisit Savasana at the end of the Bikram practice. This time you can close your eyes and let yourself fully release.
Typically held for at least 2 minutes, you can stay in this resting phase for as long as you’d like to help your body calm down and return to homeostasis. This is the most vital part of your practice because it brings you back to the present moment and allows for complete integration of everything your body and mind learned through the focus and challenge of the sequence. This is the perfect moment to thank yourself for showing up and trying your best.
Namaste!
FAQs
Can you do Bikram yoga without heat?
Bikram Yoga is designed to be performed in a 105°F heated room that mimics the intense summer temperatures of southern India. The heat and humidity work together to help detoxify the body, promote intense sweating, and deeply open the muscles and tendons for extreme stretching and pain relief.
What yoga has only fixed 26 postures?
Bikram Yoga is a form of hot yoga that follows the same fixed 26 poses during every 90 minute class. Repeating these postures over and over again allows for muscle memory and deeper progressions into specific asanas.