Homemade Feta Is Better Than What You Can Get at the Store
Here’s the downer about fresh cheese: It has a shelf life. Sure, you can extend that shelf life in the freezer, but those icicles don’t do our curdy friends any favors. You can have a brief romance with a...
Here’s the downer about fresh cheese: It has a shelf life. Sure, you can extend that shelf life in the freezer, but those icicles don’t do our curdy friends any favors. You can have a brief romance with a brie (about a week or two), and a gruyere can offer you a committed month of intense adoration, but for the most part, our time with cheese is oh-so-short. Then you’re left with only a memory, as you gaze at the spot your cheese once held in the cheese drawer.
That is why feta is fantastic. It’s in it for the long haul, through salads, stuffed olives, and pilafs. You can eat it on its own, without garnering any weird looks. Bake it, and it’s a main course.
Making feta is fairly involved, but a great way to familiarize yourself with cheese molds. While you can make feta with any milk, it’s traditionally made with sheep’s milk. Sheep’s milk is super high in fat, remains snow white when processed, and is a real pain in the ass to find. The upside is it’s the only milk you can work with after freezing, so when you find it, bank it. (To find your own sheep’s milk, check out local farms and ask around. Facebook is spectacular for this.)
Feta (adapted from Gavin Weber’s recipe)
Ingredients:
1 gallon sheep’s milk, not ultra-pasteurized (pasteurized, VAT-pasteurized, or raw is OK)⅛ teaspoon rennet, dissolved in ¼ cup distilled water⅛ teaspoon calcium chloride, dissolved in ¼ cup distilled water, plus 1 additional teaspoon of calcium chloride1/8 teaspoon mesophilic culture2 quarts of boiled, cooled water250 grams of salt1 tablespoon white wine vinegarEquipment (Check out our buying guide for equipment recommendations):
6-quart or larger stockpotMeasuring spoonsThermometer4 medium-sized square basket moldsCheeseclothCutting boardStainless steel colanderTwo quart-sized, empty bottles, such as leftover milk containersSet up your space
As with all things cheese, cleanliness is next to curdliness. Make sure the pot, the counter, all the utensils you’ll need and use—from the measuring spoons to the thermometer—the faucet, and sink are all freshly clean and sanitized with either white vinegar or a sanitizing solution. Keep your spray bottle of vinegar and clean towels nearby.
Once you start, you don’t want to wash dishes or anything else in the kitchen, as it can contaminate your cheese from the droplets. If you have ferments going, you’ll want to cover them or relocate them so they don’t contaminate your cheese. We’re looking for a sterile environment.
Heat the milk
This is a low-temperature recipe, so you don’t need to use a double boiler. Add all the milk to a stainless steel pot with your thermometer attached to it, and bring it up to 86℉ over medium-low heat while stirring.
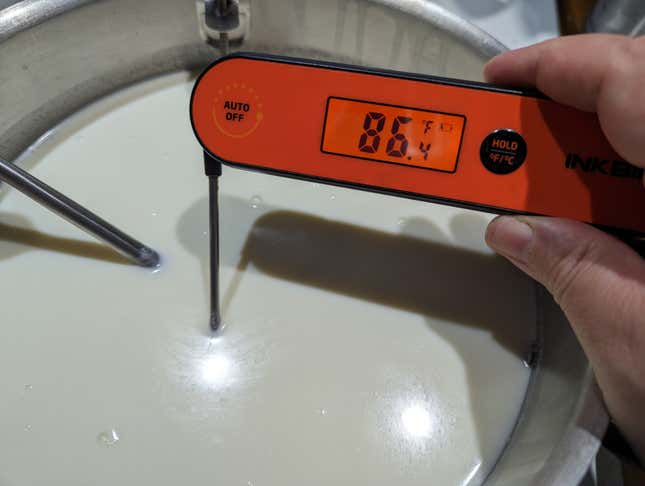
Photo: Amanda Blum
Once it hits 86℉, remove the pot from the heat and turn the heat off. Add your mesophilic culture by sprinkling it on top of the milk, then put the lid back on the pot and walk away for five minutes, so the culture has time to rehydrate.
Once you return, stir the culture in the milk for at least a full minute, using a crazy-eight pattern. Check the temperature, and make sure it’s still within a few degrees of 86℉. Once it is, put the lid back on and let the milk ripen for a full hour.
How to stir in the culture
When you return, take the lid off, stir the milk in the pot until you get a nice vortex going, then add ⅛ teaspoon of calcium chloride dissolved in ¼ cup distilled water. Stir for a full minute, then add the rennet solution to the milk and stir for another minute, but no more. Bring the milk to a still, then cover it again for a full hour.
Cut the curd
Sheep’s milk is wonderful when it sets; it’s like a firm tofu. Check for a clean break. Your knife should cut through the curd cleanly, with the curd keeping its (new) edge and shape after you pull your knife away. If you have a clean break, proceed. If you do not, put the lid back on and wait another ten minutes and re-test.
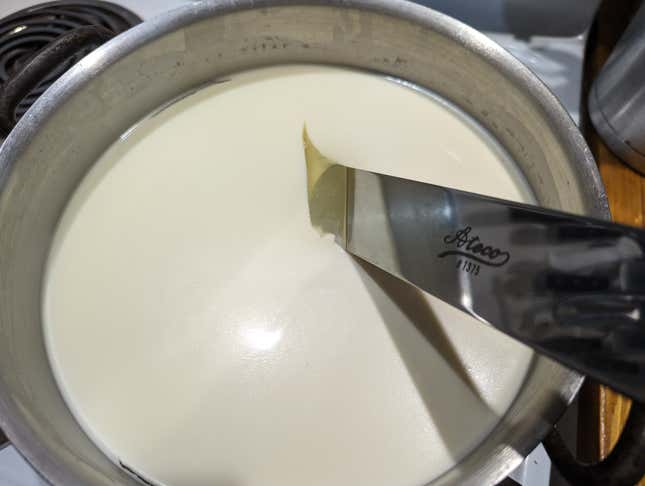
This is what a clean break looks like. I use the spatula to cut into the curd, and look for some resistance, so when I pull the wall of curd away, it holds its shape and the cut remains. Photo: Amanda Blum
Once you have that clean break, you need to cut the curds into ½-inch cubes. To do this, you’ll need to cut rows from the top straight down, every ½ inch, creating rows of cuts in one direction, then rotate the pot to create a new set of lines running perpendicular to the first set. From the top, it will look like a grid, and you’ll have long columns of curd running from top to bottom.
Now you need to make angled cuts, to cut those columns into smaller curds. Holding the knife at a 45-degree angle, start cutting the curds across again. Now rotate the pot 90 degrees and do it again. Do this four times total, so you’ve made cuts from all angles, making sure your knife is going all the way through and touching metal on the other side. This should result in a pot full of curds that are about 1/2-inch in size, and all the columns will be gone.
Use your slotted spoon to lift up the curds and check that they’re fairly uniform, and didn’t miss any. If you did, just cut them as you find them with your cheese knife. Then cover the pot and let the curds heal for five minutes.
Stirring the curds and whey
When you return, you’ll notice the whey is now floating on top, and the curds have sunk. Gently stir the curds for the next 25 minutes. Don’t stir in mere circular motions; take your slotted spoon and start at the bottom of the pot, lifting the curds towards the top of the whey. Repeat this motion over and over. This process will help the whey separate, and will break up the curds a bit more. By the end of 25 minutes, they’ll be much smaller. Let the curds settle for another five minutes before draining.
Drain the curds
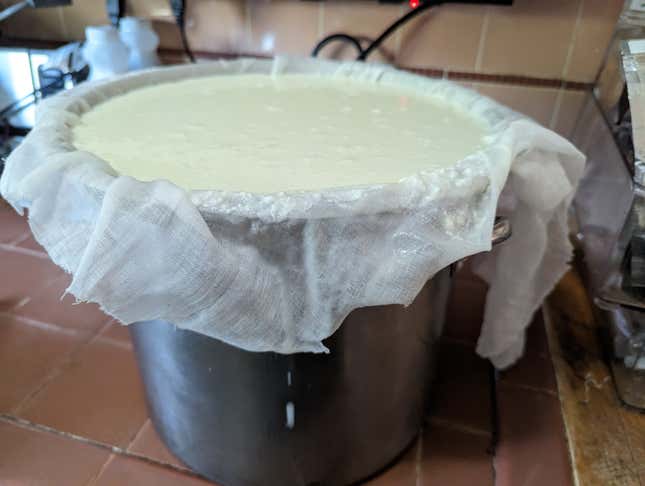
Photo: Amanda Blum
Line your colander with cheesecloth and set it on top of a pot to collect the whey. While you won’t use it in this recipe, sheep’s milk whey is great for making ricotta.
Softly and slowly pour the curds into the cheesecloth, and allow them to drain for at least 30 minutes. It may take longer for the whey to fully drain out, but you’re looking for a porridge-like consistency.
Into the mold
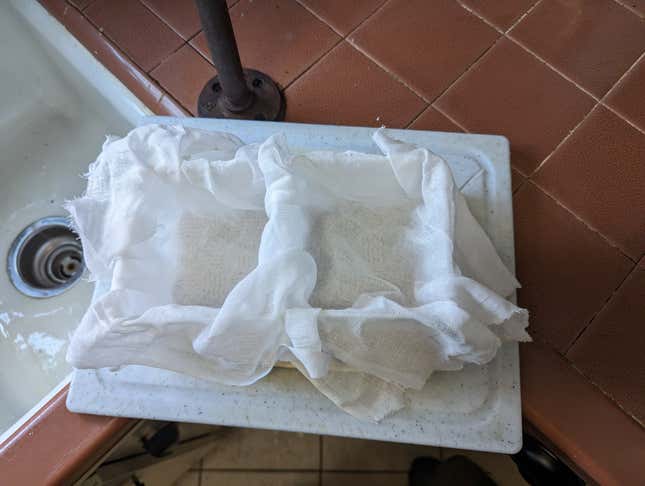
Photo: Amanda Blum
It’s time to set up your molds. Set your cutting board next to your sink, with the corner hanging over the basin. Place the bamboo board on top of that, followed by two of the molds on top of the bamboo. Lay a piece of cheesecloth across both molds, so the extra hangs off the sides of the baskets.
Draining curds and placing in baskets
Place a matchbook or something similar under the side of the cutting board that’s farthest from the sink. It should raise that side just enough so the whey drains into the sink.
Start scooping the curds out of the cheesecloth, scraping the cheesecloth as needed, and place them in the molds. It’s alright if you run out of room, wait a minute or two, and the curds will deflate, making room for more curds. The whey should already be draining out of the molds and into the sink.
Once all the curds are in the molds, fold the cheesecloth over the top of the curds, and place the extra baskets on top of the curds. You’re going to use the baskets as followers. Take your bottles, fill them with water, and ensure the outside of the bottles are sanitized. Place them in the baskets. You’re using the bottles as light weights; you’re looking for a few pounds of pressure.
Putting weights on the cheese
Flip ‘em
Let those sit for two hours to drain, then it’s time to flip. This feels more intimidating than it deserves. These cheeses will be fragile, but solid. Remove the bottles from the basket followers. Gently pull the cheese out using the cheesecloth as a sling. Pull the cheesecloth away, and using your (very clean) hands, carefully place the cheeses back into the molds, upside down. Give them a little nudge with your hand to get them in there good. Put the cheesecloth back on top, followed by the basket followers and milk bottles, and give it another two hours.
It’s time to brine
Sheep’s milk and the salt are responsible for feta’s iconic, sharp, and funky flavor. The salt comes from a brine. To make it, boil the water and salt, allow it to cool, and add the vinegar and 1 teaspoon of calcium chloride.
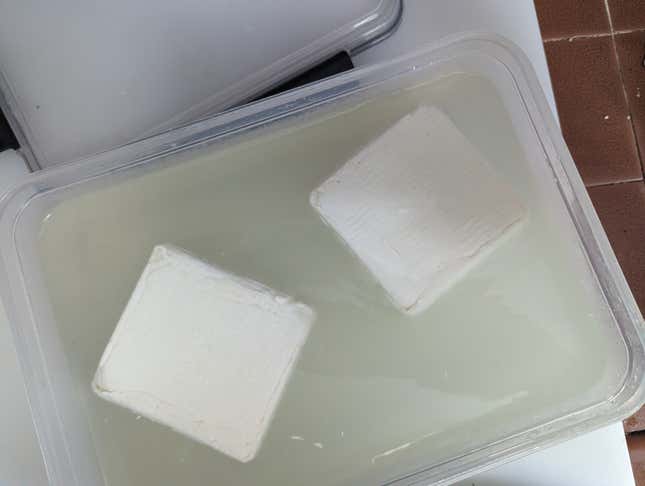
Photo: Amanda Blum
Once your feta is ready to come out of the molds, which should be right about now, it’s time for it to go into a Tupperware full of brine. Carefully remove the cheeses from their molds, and gently place them in the brine. Cover the Tupperware and place it someplace safe, on a table away from pets or curious friends. Let it sit for three or four days, at room temperature, flipping once a day, always with clean hands. At the end of day four, it’s finally time to be re-united with your feta. It’s edible, preservable, and can hang out for four months in your fridge—but I’ve never made it the full quarter-year.

 Fransebas


