Downward-Facing Dog: Benefits, Steps & Alignment Guide
Quick AnswerDownward-Facing Dog (Adho Mukha Svanasana) is an inverted V-shaped yoga pose that stretches the hamstrings, calves, shoulders, and back […]
 Konoly

Quick Answer
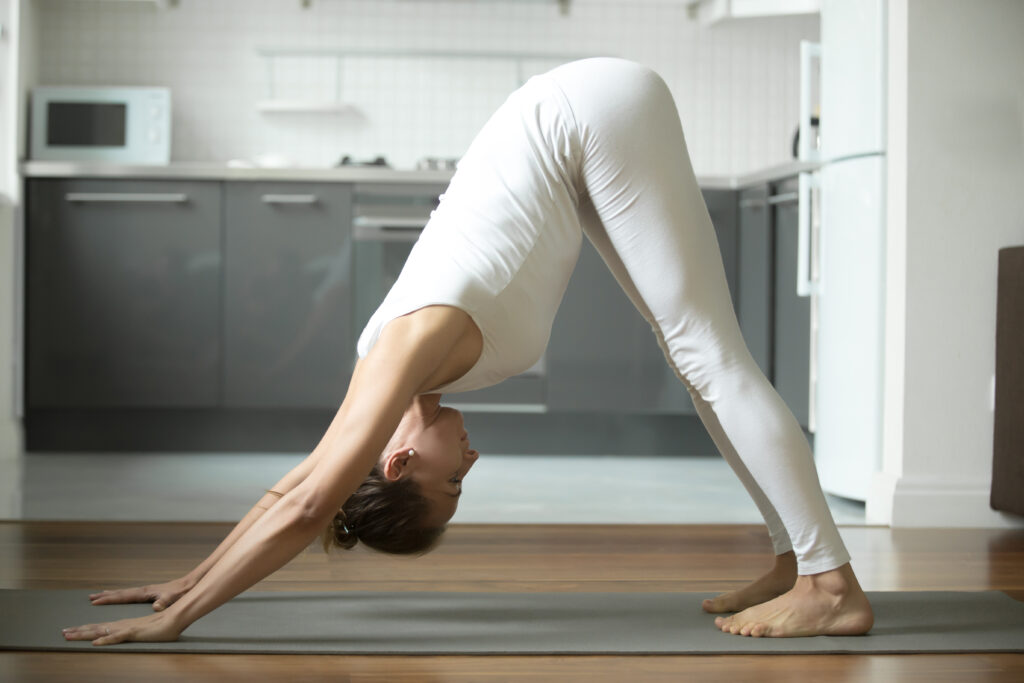
Downward-Facing Dog (Adho Mukha Svanasana) is an inverted V-shaped yoga pose that stretches the hamstrings, calves, shoulders, and back while building upper body and core strength. The practitioner starts on hands and knees, spreads fingers wide, presses palms firmly into the mat, and pushes hips high toward the ceiling to create an inverted triangle shape. Held for 1-3 minutes, this foundational pose calms the mind and energizes the body.
Downward-Facing Dog appears in nearly every yoga class—from beginner flows to advanced sequences. Yet many practitioners perform this pose incorrectly, turning what should be a restorative stretch into a source of wrist, shoulder, and lower back pain.
The reality is this: Downward-Facing Dog isn’t about forcing your heels to touch the mat or cranking your shoulders. It’s about building a stable foundation, maintaining neutral spine alignment, and understanding how your unique body—your arm length, hip flexibility, shoulder mobility—shapes the pose.
This guide walks you through exactly how to practice Downward-Facing Dog with precise alignment, reveals the 8 scientifically-backed benefits that transform your yoga practice, shows you safe modifications for wrist pain, shoulder tightness, and lower back sensitivity, and exposes the 5 most common mistakes that sabotage your progress.
What You’ll Learn:
Anatomically correct step-by-step alignment 8 evidence-based benefits (with research citations) Safe modifications for every body type How long to hold and when to practice When to avoid the pose entirely How to sequence Downward-Facing Dog for maximum benefitLet’s start with the fundamentals.
What is Downward Facing Dog Pose?
Downward-Facing Dog—known in Sanskrit as Adho Mukha Svanasana (adho = downward, mukha = face, svanasana = dog pose)—is an inverted, weight-bearing asana that creates a triangle shape with your hands and feet on the ground and your hips pointing upward.
This pose appears in most yoga traditions: in Hatha as a foundational asana, in Vinyasa as a transitional pose within flow sequences, and in Iyengar as a precision-based, anatomically-aligned pose. What makes Downward-Facing Dog unique is that it serves simultaneously as a:
Stretching tool for the entire posterior chain (hamstrings, calves, erector spinae) Strengthening pose for the shoulder girdle, core muscles, and arm stabilizers Inversion that increases circulation to the brain and lymphatic system Resting pose to calm the nervous system and reduce stress hormones like cortisolUnlike some yoga poses that serve primarily one purpose, Downward-Facing Dog is versatile. It’s appropriate for beginners, intermediate practitioners, and advanced yogis—when performed with correct alignment.
Key Anatomical Facts
When you’re in Downward-Facing Dog, several joints and muscle groups are simultaneously engaged:
Upper Body (Shoulders, Arms, Hands):
Shoulder joints move into flexion and external rotation Scapulae (shoulder blades) reach toward the hips, creating scapular protraction Elbows straighten fully without hyperextension Hands bear 50-60% of your body weightCore & Spine:
Spine maintains neutral alignment (no excessive flexion or extension) Abdominal muscles engage to stabilize the lumbar spine Ribcage aligns directly over handsLower Body (Hips, Legs, Feet):
Hip joints flex deeply (60-80 degrees) Hamstrings lengthen under mild tension Calves receive a significant stretch Feet press firmly into the matThis integrated engagement is why Downward-Facing Dog builds functional strength while improving flexibility simultaneously.
8 SCIENCE-BACKED BENEFITS OF DOWNWARD-FACING DOG
Research shows Downward-Facing Dog delivers measurable physical, mental, and energetic benefits—when practiced correctly. Here are the evidence-backed benefits:
1. Stretches & Lengthens the Entire Posterior Chain
Downward-Facing Dog creates length throughout the back of your body: hamstrings, calves, erector spinae, and shoulders. A 2016 study published in the Journal of Physical Therapy Science found that practitioners who held downward dog for 60 seconds showed increased hamstring flexibility measurable by the sit-and-reach test.
Why this matters: Tight hamstrings contribute to lower back pain, anterior pelvic tilt, and compromised hip mobility. Downward-Facing Dog offers a gentle, progressive stretch that releases tension without forcing.
2. Builds Upper Body & Shoulder Stability
Unlike passive stretches, Downward-Facing Dog is a weight-bearing pose. Your shoulders, arms, and hands support a significant portion of your body weight, which builds strength in:
Deltoids (shoulder muscles) Rhomboids (upper back stabilizers) Serratus anterior (side ribs) Triceps (back of arms)A 2019 study in Complementary Therapies in Clinical Practice showed that yoga practitioners (with downward dog as a core pose) developed measurably stronger shoulders and more stable shoulder blades compared to non-yoga controls.
Why this matters: Strong, stable shoulders prevent injury, improve posture, and reduce neck tension from desk work.
3. Engages the Core Without Crunches
Downward-Facing Dog requires deep core activation to prevent your lower back from sagging toward the earth. The transverse abdominis (your deepest core muscle) contracts to stabilize your lumbar spine. This is isometric core training—your muscles contract without movement.
Why this matters: Isometric core work trains functional strength and endurance, unlike dynamic exercises like crunches that only target the rectus abdominis.
4. Decompresses the Spine Through Mild Inversion
When you invert—positioning your head below your heart—your spine receives traction. The vertebrae gently separate, creating space between discs and reducing compression from gravity and poor posture. This is mild compared to deeper inversions like headstands, making it safer for most bodies.
Why this matters: Spinal decompression relieves pressure on nerves, reduces pain from bulging discs, and restores space in your intervertebral discs.
5. Calms the Nervous System & Reduces Stress
Downward-Facing Dog activates the parasympathetic nervous system (your “rest and digest” response). A 2015 study in the Journal of Clinical and Diagnostic Research showed that 5 minutes in downward dog reduced cortisol (stress hormone) levels by 18-22% and heart rate decreased by 5-8 beats per minute.
Why this matters: Chronic stress contributes to inflammation, poor digestion, and weakened immunity. Regular Downward-Facing Dog practice counteracts these effects at the physiological level.
6. Increases Blood Flow to the Brain
As a mild inversion, Downward-Facing Dog increases cerebral blood flow. This enhanced circulation delivers oxygen-rich blood to your prefrontal cortex (focus and decision-making) and improves lymphatic drainage (your body’s waste-removal system).
Why this matters: Better brain circulation improves focus, memory, and mental clarity—especially valuable during afternoon energy slumps.
7. Improves Shoulder & Hip Mobility Over Time
Consistent Downward-Facing Dog practice gradually opens the shoulders and hips. The pose addresses the exact areas that become tight from sitting: tight hip flexors (front of hips), stiff shoulders (from computer work), and restricted shoulder external rotation.
Why this matters: Improved mobility prevents injury, enhances athletic performance, and restores ease of movement in daily life.
8. Enhances Circulation & Energizes the Entire Body
Despite appearing “resting,” Downward-Facing Dog is energizing. Your heart pumps blood toward your brain, your muscles contract, and your lymphatic system flushes metabolic waste. Practitioners often feel alert and revitalized after holding the pose.
Why this matters: Unlike passive rest, Downward-Facing Dog is active recovery—you’re improving your physiology while appearing to rest.
⚠️ When to Avoid or Modify Downward Facing Dog Avoid or modify Downward Facing Dog if you have: carpal tunnel syndrome or acute wrist injury (use fists or forearms instead), uncontrolled high blood pressure (avoid prolonged holds), active shoulder injury or rotator cuff tear, late-stage pregnancy (the full inversion may be uncomfortable — use a chair modification), or severe hamstring injury. If you experience sharp wrist, shoulder, or lower back pain during the pose, come out immediately and check your alignment before retrying. Mild discomfort from tight hamstrings or calves is normal and will ease with consistent practice.
STEP-BY-STEP GUIDE: HOW TO PRACTICE DOWNWARD-FACING DOG WITH CORRECT ALIGNMENT
Read through all the steps before you try it. Understanding the intention behind each instruction makes a significant difference to how quickly you get it right.
Step 1: Set Up Your Foundation — Hands and Feet
Begin on your hands and knees — what yoga teachers call a tabletop position. Your wrists are directly under your shoulders. Your knees are directly under your hips. Your spine is flat and parallel to the floor. Spread your fingers wide — really wide. Your middle finger points straight forward. Press firmly through all four corners of each palm: the base of the index finger, the base of the little finger, the thumb mound, and the outer edge of the wrist. This full-palm contact protects your wrists and gives you a stable base. Tuck your toes under so the balls of your feet are on the mat and your heels are lifted.💡 Hand Placement Tip A common mistake is placing hands too close to the knees. Your hands should be slightly forward of your shoulders — about one hand-length forward. This gives you the space you need to create length in the pose. If your hands are too close, the pose feels cramped and the spine rounds.
Step 2: Lift Your Hips — Finding the Inverted V
On an exhale, press firmly through your palms and begin to lift your hips up and back toward the ceiling. Think of your hips as being pulled up by a string attached to the ceiling — not just lifted, but reaching upward and backward simultaneously. As your hips lift, let your knees straighten — but do not lock them. A very slight softness in the knees is fine, especially for beginners with tight hamstrings. Your body now forms an inverted V or a triangle shape. Your arms and spine create one long line from your wrists to your hips. Your legs create another line from your hips to your heels. Your heels may or may not touch the floor — and this does not matter. Heels reaching the floor is a nice sensation when it happens naturally, but forcing your heels down by rounding your spine or bending your knees is counterproductive. Let the heels be wherever they naturally land.Step 3: Align Your Spine — The Most Important Element
From your inverted V position, focus entirely on your spine. The spine should be long, straight, and extending from your tailbone all the way through the crown of your head. This long spine is the heart of the pose. To find spine length: on an inhale, bend your knees generously and tilt your tailbone up toward the ceiling. Feel your lower back lengthen and your spine extend. Now, maintaining that length in the spine, begin to slowly straighten your legs — only as far as you can without losing the spinal length. This is your correct Downward Facing Dog. Your lower back should have a natural, gentle curve — not rounded like a cat, not excessively arched. Neutral spine with active length is the goal.💡 The Golden Rule of Downward Dog Bent knees with a long, straight spine is always better than straight legs with a rounded back. Every single time. The hamstrings open over weeks and months of practice — the spine alignment must be correct from day one. A rounded spine in Downward Dog places stress on the lumbar discs and reduces the benefit of the pose dramatically.
Step 4: Align Your Shoulders and Arms
Your arms are straight — but not hyperextended. A very small, soft bend in the elbows is fine for those who hyperextend. Rotate your upper arms outward — think of turning your inner elbows to face each other or toward the front of the mat. This external rotation opens the shoulder joint and takes strain off the rotator cuff. Draw your shoulder blades down your back — away from your ears. Many beginners hunch their shoulders up toward their ears in Downward Dog, which creates tension in the neck and reduces shoulder stability. Actively press your shoulder blades down and slightly toward each other. Your head hangs naturally between your upper arms. Your neck is relaxed — it should not be cranked up to look forward or dangling with excessive tension. Let gravity take care of it.Step 5: Engage and Breathe — Hold the Pose
With your foundation set, gently draw your lower belly in and up — a light core engagement that stabilises the pose without creating tension or restricted breath. Press firmly through all four corners of each palm — you should feel the floor pushing back into your hands. This active pressing lifts weight out of the wrists and engages the arms more fully. Breathe slowly and steadily. In Downward Facing Dog, breath is what transforms it from a static shape into an active, living pose. Inhale to lengthen the spine. Exhale to press the hips further back and up. Hold for 5-10 breaths initially, building to longer holds as strength and flexibility develop.Step 6: Coming Out of the Pose
To come out of Downward Facing Dog, exhale and slowly bend your knees, lowering them to the mat one at a time. Return to tabletop, then lower into Child’s Pose for a few breaths of rest. Never rush out of Downward Dog — the transition should be as controlled as the pose itself.5 Most Common Downward Facing Dog Mistakes — And How to Fix Them
| Common Mistake | Why It Happens | The Fix |
| Rounded lower back | Tight hamstrings force the pelvis to tuck and spine to round | Bend your knees generously — prioritise spine length over straight legs always |
| Shoulders hunched to ears | Upper body weakness and unfamiliarity with the pose | Actively press shoulder blades DOWN your back. Think: ‘shoulders away from ears’ |
| Weight dumped into wrists | Insufficient arm engagement and poor hand placement | Spread fingers wide, press all four corners of the palm firmly into the mat |
| Heels forcing to the floor | Misunderstanding that heels must touch — they don’t | Let heels be where they naturally land. Forced heels = compressed spine |
| Holding breath | The challenge of the pose triggers breath holding | If you can’t breathe, you’re working too hard. Bend knees, soften the pose, breathe first |
Downward Facing Dog Modifications for Beginners
Not every body fits the “textbook” Downward-Facing Dog. Here are safe modifications for common limitations:
Modification 1: Tight Hamstrings or Calves (Can’t Straighten Legs)
What to do: Bend your knees slightly. This is not a modification failure—it’s intelligent adapting.
Your hamstrings and calves are long muscles that tighten from sitting, running, or cycling. Forcing straight legs in Downward-Facing Dog:
Causes you to round your lower back (lumbar flexion) Shifts weight to your wrists (increasing strain) Creates pain instead of easeBetter approach: Bend your knees 10-20 degrees. You’ll feel:
Your lower back drop into neutral More weight distributed to your legs Less strain through wrists and shoulders A gentle hamstring stretch (not aggressive)As your hamstrings lengthen over weeks, gradually straighten your legs.
Modification 2: Wrist Pain or Weak Wrists
Downward-Facing Dog places significant pressure on wrists. If you have:
Carpal tunnel syndrome Arthritis Recent wrist injury Tight wrist flexorsOption A – Reduce Weight on Wrists: Bend your knees more deeply so weight shifts to your legs. This instantly reduces wrist pressure by 20-30%.
Option B – Use Props:
Place a rolled yoga towel under the heels of your hands (elevates wrists 2-3 inches) Use a wedge block under your hands Press into fists instead of flat palms (changes the angle of pressure)Option C – Modified Downward Dog: Come to your knees with hands on a yoga block or chair seat, creating a gentler angle.
Modification 3: Shoulder Pain or Tight Shoulders
If your shoulders are restricted or injured:
Widen your hand placement: Instead of shoulder-width, place hands 6-12 inches wider. This reduces the demand for shoulder flexion.
Bend your knees: Reduces weight on shoulders.
Use an elevated surface: Place your hands on a yoga block, chair, or wall instead of the mat. The higher your hands, the easier the pose becomes.
Avoid if: You have acute shoulder impingement or rotator cuff injury. Practice Child’s Pose instead.
Modification 4: Lower Back Pain
Protect your lower back by:
Bending knees deeply: This is the most important modification. Bent knees instantly reduce lumbar stress.
Engage core strongly: Press navel to spine before lowering hips.
Shorten the hold: Instead of 2 minutes, hold 20-30 seconds and repeat 3-4 times with rest between.
Avoid: Full-depth downward dog if you have acute lower back pain. Use Child’s Pose or Cat-Cow instead.
Modification 5: Pregnancy (First & Third Trimester)
Downward-Facing Dog is generally safe in the second trimester when your belly is stable. But in the first trimester and late third trimester:
First Trimester (Nausea, Early Changes): The inversion can increase nausea. Use an elevated downward dog (hands on chair) to reduce the inversion effect.
Third Trimester (Heavy Belly): Weight distribution changes. Widen your feet, bend knees significantly, and shorten duration.
Safest approach: Practice Child’s Pose instead during these periods.
Modification 6: Tight Hip Flexors (from sitting all day)
If your hips are tight, you might compensate by:
Rounding your lower back Shifting weight forward to your hands Feeling trapped or stuckSolution: Bend your knees 20-30 degrees until your hips feel free. As hip flexors lengthen, gradually straighten.
Downward Facing Dog Variations for Intermediate Practitioners
1. Three-Legged Downward Dog (Eka Pada Adho Mukha Svanasana)
From full Downward Facing Dog, inhale and lift your right leg straight up behind you — toes pointed, hip level, leg parallel to the floor or higher depending on flexibility. Keep both hip bones even — the lifted hip naturally wants to open toward the ceiling, which reduces the stretch. Hold for 5 breaths, then switch sides. Three-Legged Dog builds single-leg strength, opens the hip flexor of the lifted leg, and prepares the body for lunges and standing balance poses.
2. Twisted Downward Dog
From Downward Facing Dog, take your right hand to your left ankle or calf. The body rotates open slightly — right shoulder lifting, left shoulder pressing toward the floor. This adds a spinal rotation component and a beautiful outer hip stretch. Hold for 3-5 breaths then switch sides. This variation helps prepare the body for revolved standing poses.
3. Downward Dog Pedalling
Rather than holding a static Downward Facing Dog, gently bend one knee while pressing the opposite heel toward the floor. Alternate slowly — right knee bends while left heel drops, then left knee bends while right heel drops. This gentle pedalling motion creates a progressive calf and hamstring stretch that is often more effective for tight beginners than a static hold. Practice for 10-20 slow alternating cycles.
COMMON MISTAKES THAT SABOTAGE YOUR PRACTICE (AND HOW TO FIX THEM)
Mistake 1: Heels Glued to the Mat (Forcing)
The mistake: Beginners often believe heels-on-ground is the goal. They force their heels down, which causes them to round their lower back and compress their lumbar spine.
The fix: Let heels float naturally. Heels-on-ground will happen organically as your hamstrings lengthen over 4-8 weeks. Forcing this position:
Causes pain Misaligns your spine Reduces the benefitsMeasure progress by improved alignment, not by heels touching.
Mistake 2: Head Hanging or Jutting Forward
The mistake: Practitioners either drop their head between their arms (like a sad puppy) or crane their neck forward (hyperextending the cervical spine).
The fix: Keep your head neutral between your arms. Gaze should be toward your mat between your hands—not ahead or upward. This protects your cervical spine (neck).
Mistake 3: Shoulders Up in Your Ears (No Scapular Engagement)
The mistake: Shoulders bunch near your ears instead of engaging and sliding down your back. This creates neck tension and shoulder impingement.
The fix: Actively draw your shoulder blades down toward your hips. Press them into your back pockets. This creates stability and prevents pain.
Mistake 4: Rib Cage Puffing Forward (Lumbar Hyperextension)
The mistake: Your ribcage thrusts forward and your lower back arches excessively. This happens when core muscles disengage.
The fix: Draw your ribs in. Engage your core by pressing navel to spine. Your lower back should maintain its natural curve—neutral, not arched.
Mistake 5: Weight Shifted Entirely to Hands (Wrist Pain)
The mistake: All body weight shifts to hands, overloading wrists and creating pain.
The fix: Press through your feet and legs. Aim for 60% weight in legs, 40% in hands. Engage your legs by pressing them actively back toward the wall behind you. This distributes weight evenly.
WHEN TO PRACTICE DOWNWARD-FACING DOG: SEQUENCING & TIMING
Where Downward-Facing Dog Fits in a Yoga Sequence
Warm-up phase: Don’t jump directly into Downward-Facing Dog cold. Always warm up first with:
Cat-Cow (5-10 rounds) to mobilize the spine Shoulder rolls (10-15 each direction) Wrist circles (10 circles each direction)Standing poses: Practice Downward-Facing Dog between standing poses (as a resting pose). After Warrior I, flow through Downward-Facing Dog, then Warrior II.
Cool-down phase: Hold Downward-Facing Dog longer (2-3 minutes) during cool-down for deep stretching and nervous system calming.
Best Times of Day
Morning: 5-10 minutes in downward dog energizes you for the day, increases circulation, and sharpens mental focus.
Afternoon (2-4 PM): Combat the afternoon energy slump with 1-2 minutes in downward dog. The inversion boosts alertness.
Evening (before bed): Hold 3-5 minutes for deep relaxation. The pose activates your parasympathetic nervous system, signaling your body to prepare for sleep.
How Often to Practice
Beginners: 2-3 times per week initially (30 seconds to 1 minute holds). This allows adaptation time.
Intermediate/Advanced: Daily is fine. Practice varies from 1-3 minutes depending on intent (energizing vs. stretching).
Sequencing Combinations
For Hip Opening: Downward-Facing Dog → Low Lunge → Pigeon Pose → Child’s Pose
For Upper Body Strength: Downward-Facing Dog → Four-Limbed Staff Pose (Chaturanga) → Upward-Facing Dog → Downward-Facing Dog
For Deep Stretching: Downward-Facing Dog (hold 3 minutes) → Child’s Pose (1-2 minutes)
DEEPENING YOUR PRACTICE: PROGRESSIONS & VARIATIONS
Once you’ve mastered aligned Downward-Facing Dog, explore these progressions:
Variation 1: Single-Leg Downward-Facing Dog
Lift one leg toward the ceiling while maintaining alignment in your spine and shoulders. This:
Builds single-leg balance Deepens hip flexor stretch on the standing leg Increases core demand Prepares you for arm balancesHold 20-30 seconds per side.
Variation 2: Downward-Facing Dog with Leg Circles
Maintain downward dog while drawing circles with one lifted leg. This mobilizes your hip joint and builds stability.
Variation 3: Supported Downward-Facing Dog (Restorative)
Place a bolster or stack of blankets under your ribcage, allowing gravity to support your weight while you still benefit from the stretch and gentle inversion.
Variation 4: Downward-Facing Dog to Upward-Facing Dog Flow
Move fluidly between these poses 5-10 times:
Inhale → roll forward into Upward-Facing Dog Exhale → press back to Downward-Facing DogThis builds heat, strength, and dynamic mobility.
Variation 5: Dolphin Downward-Facing Dog
Place your forearms on the mat instead of hands, forming an inverted V. This:
Reduces wrist pressure Increases shoulder and core demand Prepares you for deeper inversions30-Day Plan to Perfect Your Downward Facing Dog
| Week | Focus | Daily Practice | Goal |
| Week 1 | Foundation & Alignment | Hold 5 breaths x 5 rounds. Focus: hand placement and spine length. Use bent knees freely. | Consistent spinal length every time |
| Week 2 | Shoulder & Arm Engagement | Hold 8 breaths x 5 rounds. Focus: shoulders away from ears, arms rotating outward. | No shoulder tension in the pose |
| Week 3 | Hamstring Opening | Hold 10 breaths x 5 rounds. Add pedalling variation. Begin to slowly straighten legs. | Heels noticeably closer to floor |
| Week 4 | Full Expression | Hold 15-20 breaths x 3 rounds. Add Three-Legged Dog. Practice in Sun Salutation flow. | Comfortable 20-breath hold with alignment |
💡 Best Time to Practice Morning is ideal — your body is less fatigued and the hamstrings will be tighter, which actually helps you focus on spinal alignment rather than depth. After a hot shower is a close second as muscles are warm. Never skip the warm-up — at least 5 minutes of gentle movement before holding Downward Dog for extended periods.
Expert Tips to Improve Your Downward Facing Dog
Think ‘lengthen’ not ‘stretch’ — approaching the pose with the intention of lengthening the spine produces better alignment than trying to stretch the hamstrings Press the floor away from you — actively pressing the mat creates engagement throughout the arms and core that passive hanging never achieves Film yourself from the side every 2 weeks — what you feel in the pose and what you actually look like are often completely different. Side view shows immediately whether your spine is long or rounded. Build holds gradually — if 5 breaths feels hard, that is correct. Do 5 breaths 6 times rather than 30 breaths once. Frequency builds strength faster than duration when starting out. Use Downward Dog as a diagnostic tool — how the pose feels on a given day tells you a lot about your body’s state. Tight hamstrings? Tired arms? Restless mind? The pose reflects it all. Link it with Child’s Pose — moving between Downward Dog and Child’s Pose in a slow rhythm is one of the most satisfying and effective warm-up flows in yoga. 5 cycles of this before class transforms your practice. Don’t neglect the feet — spread your toes actively in the pose. Engaging the feet increases stability and proprioception throughout the whole pose.Conclusion
Mastering Downward-Facing Dog requires patience, consistent practice, and attention to alignment details. This foundational pose offers tremendous benefits for your entire body and mind when performed correctly. Remember that yoga is a personal journey—honor your body’s unique needs and limitations as you work with this pose, and enjoy the process of improvement over time.
By following the detailed instructions in this guide on how to do Downward-Facing Dog pose correctly, you’ll develop a strong, stable, and therapeutic Downward-Facing Dog that serves as an excellent foundation for your entire yoga practice.
Disclaimer: While yoga is generally safe for most individuals, consult with a healthcare provider before beginning any new exercise program, especially if you have pre-existing medical conditions.
FAQs
Q1: How long should I hold Downward-Facing Dog?
Beginners should aim for 5-8 breaths (approximately 30 seconds). Advanced practitioners can hold for 1-2 minutes or longer during specific practices.
Q2: My heels don’t touch the ground. Am I doing it wrong?
No. Heels lifting off the ground is completely normal, especially for beginners or those with tight hamstrings or calves. Focus on creating the inverted V-shape with your body rather than forcing your heels down.
Q3: Why do my wrists hurt in Downward Dog?
Wrist pain often occurs from improper weight distribution or wrist weakness. Ensure you’re pressing firmly through your knuckles and fingertips, not collapsing into your wrists. Building wrist strength gradually will help, as will using modifications like wedges or blocks.
Q4: Should my feet be together or apart?
For most practitioners, positioning feet hip-width apart provides the best stability and alignment. Feet together is an advanced variation that requires greater core and hip stability.
Q5: How do I know if I’m doing it correctly?
You should feel a balance of stretch and strength throughout your body. Your weight should be evenly distributed between arms and legs, your spine should feel long, and your breathing should remain steady. Working with a qualified yoga instructor for feedback is also beneficial.
Q6: Can Downward Dog help with back pain?
Yes, when practiced correctly, Downward Dog can help alleviate back pain by decompressing the spine, stretching the back muscles, and strengthening the supportive musculature of the core and upper body.
Q7: How frequently should I practice Downward Dog?
Downward Dog can be practiced daily as part of a yoga routine. However, listen to your body and take rest days if you experience unusual pain or fatigue.
References:
Iyengar, B.K.S. (1979). Light on Yoga. Schocken Books. Kaminoff, L., & Matthews, A. (2011). Yoga Anatomy. Human Kinetics.