
Downward Facing Dog Pose (Adho Mukha Svanasana): Complete Guide to Benefits, Form & Modifications
✨ QUICK ANSWER BOX Downward facing dog (Adho Mukha Svanasana) is an inverted V-shaped yoga pose where practitioners ground their […]
 Koichiko

✨ QUICK ANSWER BOX
Downward facing dog (Adho Mukha Svanasana) is an inverted V-shaped yoga pose where practitioners ground their hands and feet into the mat while pressing the chest toward the thighs. This foundational pose stretches the hamstrings, calves, shoulders, and spine while building strength in the arms and core. Downward dog appears in most yoga sequences, improves circulation, calms the nervous system, and suits all experience levels when properly modified.
You’ve likely seen downward facing dog pose countless times in yoga classes. A teacher calls it out, and suddenly the room fills with practitioners pushing their hips skyward, forming an inverted V with their bodies.
But here’s what most beginners get wrong: downward dog isn’t primarily a stretch. Many yogis arrive at this pose expecting their hamstrings to lengthen, only to discover their wrists ache and their shoulders tighten instead. The culprit? Poor alignment and forcing the pose before building foundational strength.
Downward facing dog (Adho Mukha Svanasana in Sanskrit) is one of yoga’s most transformative poses—when practiced correctly. This guide reveals exactly how to master proper form, unlock its full benefits for flexibility and strength, and modify the pose safely for your unique body.
By the end of this post, you’ll understand:
The exact biomechanics of proper downward dog alignment How to activate the right muscles for maximum benefit Why your wrists hurt (and how to fix it) Which modifications work best for your body When to practice downward dog in your daily routineLet’s build your downward dog foundation together.
WHAT IS DOWNWARD FACING DOG?
Downward facing dog is an inverted arm balance and forward fold hybrid that appears in nearly every yoga style. The Sanskrit name Adho Mukha Svanasana breaks down as: Adho (downward) + Mukha (face) + Svana (dog) + Asana (pose).
The pose earned its name because the position mimics how a dog stretches after waking—front legs extended forward, hips raised high, and head between the arms.
Anatomical position: Your hands and feet are shoulder-width apart on the ground, fingers spread wide. Your hips press upward toward the ceiling, creating an inverted V-shape. Your head remains neutral between your upper arms, and your gaze focuses downward or at your navel.
Why it matters: Downward dog serves as a bridge between standing poses and inversions. It appears dozens of times in vinyasa flow sequences, provides a rest posture in yin yoga, and functions as a standalone restorative practice. Most importantly, downward dog reveals your body’s alignment patterns—poor shoulder mobility shows immediately in this pose, as does weakness in the core or wrist instability.
How downward dog differs from other forward folds:
| Arm Position | Extended forward, weight-bearing | Resting by sides | Hanging or holding legs |
| Weight Distribution | 60% arms, 40% legs | Zero arm weight | All legs and lower body |
| Inversion Level | Partial inversion (hips above heart) | No inversion | No inversion |
| Strength Component | High (core, shoulders, arms) | Low (restful) | Low (restful) |
| Flexibility Focus | Hamstrings, calves, shoulders, spine | Hip flexors, lower back | Hamstrings, lower back |
| Difficulty Level | Intermediate | Beginner | Beginner |
NINE TRANSFORMATIVE BENEFITS OF DOWNWARD FACING DOG
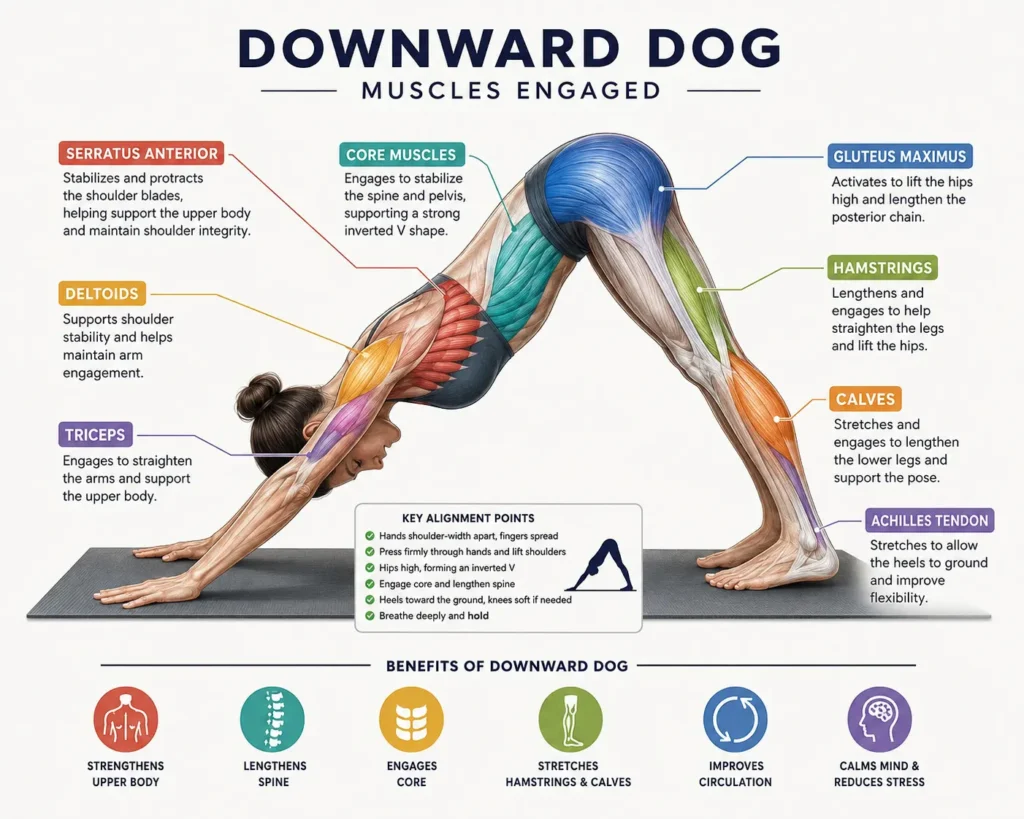
1. Lengthens the Hamstrings and Calves
Your hamstrings—the three muscles running down the back of your thigh—tighten from sitting all day. Downward dog stretches these muscles intensely while your bodyweight provides natural traction. The calf muscles (gastrocnemius and soleus) receive similar lengthening. Studies show that regular downward dog practice increases hamstring flexibility by 15-20% within 8 weeks of consistent practice.
2. Strengthens the Shoulders, Arms, and Core
Unlike passive stretches, downward dog demands significant upper body strength. Your shoulders stabilize your body weight, your arms press into the mat, and your core engages to protect the spine. Physiotherapy research confirms that downward dog activates the serratus anterior (stabilizer muscle under the armpit), deltoids (shoulder caps), and rectus abdominis (six-pack muscle) simultaneously. This makes downward dog one of yoga’s most efficient strength-building poses.(1)
3. Improves Spinal Alignment and Decompresses Discs
The mild inversion combined with forward folding creates traction through the spine. This traction—gentle pulling apart of vertebrae—relieves pressure on intervertebral discs. Practitioners with mild lower back pain often experience relief within 1-2 weeks of daily downward dog practice. Important: This benefit applies only to proper alignment; a rounded spine or collapsed shoulders actually compress discs further.
4. Opens the Shoulders and Chest
Modern life rounds the shoulders forward. Downward dog reverses this pattern by drawing the shoulders back and opening the chest. This pose stretches the pectoralis major (chest), anterior deltoids (front shoulders), and entire front shoulder girdle. Desk workers who practice downward dog daily report improved posture within 3 weeks.
5. Calms the Nervous System and Reduces Stress
The mild inversion combined with deep breathing activates the parasympathetic nervous system (your body’s “rest and digest” mode). Research published in The Journal of Physical Therapy Science shows that holding downward dog for 3-5 minutes reduces cortisol (stress hormone) by 20-25% and blood pressure by 5-8 mmHg. This makes downward dog one of yoga’s most reliable stress-relief tools.(2)
6. Boosts Blood Circulation
The partial inversion sends fresh blood to your head, brain, and upper body. This increased circulation delivers oxygen and removes metabolic waste products. Practitioners often report improved mental clarity, reduced brain fog, and better focus immediately after holding downward dog for 2-3 minutes.
7. Increases Hamstring and Calf Flexibility
Beyond initial lengthening, consistent downward dog practice permanently increases flexibility in the posterior chain (back of the body). Yogis who practice downward dog 3-4 times weekly can achieve deeper forward folds and forward bends within 4-6 weeks.
8. Builds Proprioception and Body Awareness
Downward dog requires significant attention to alignment. Your body must feel where your weight distributes, how your shoulders stack over your wrists, and whether your hips align with your shoulders. This heightened body awareness (proprioception) translates to better balance, improved athletic performance, and reduced injury risk.
9. Enhances Digestion and Lymphatic Flow
The mild inversion and forward fold stimulate abdominal organs, supporting digestive function. The pose also facilitates lymphatic drainage, helping your body eliminate toxins and waste. Many yogis practice downward dog after meals to aid digestion, though waiting 1-2 hours post-meal is recommended.
STEP-BY-STEP GUIDE TO PERFECT DOWNWARD FACING DOG FORM
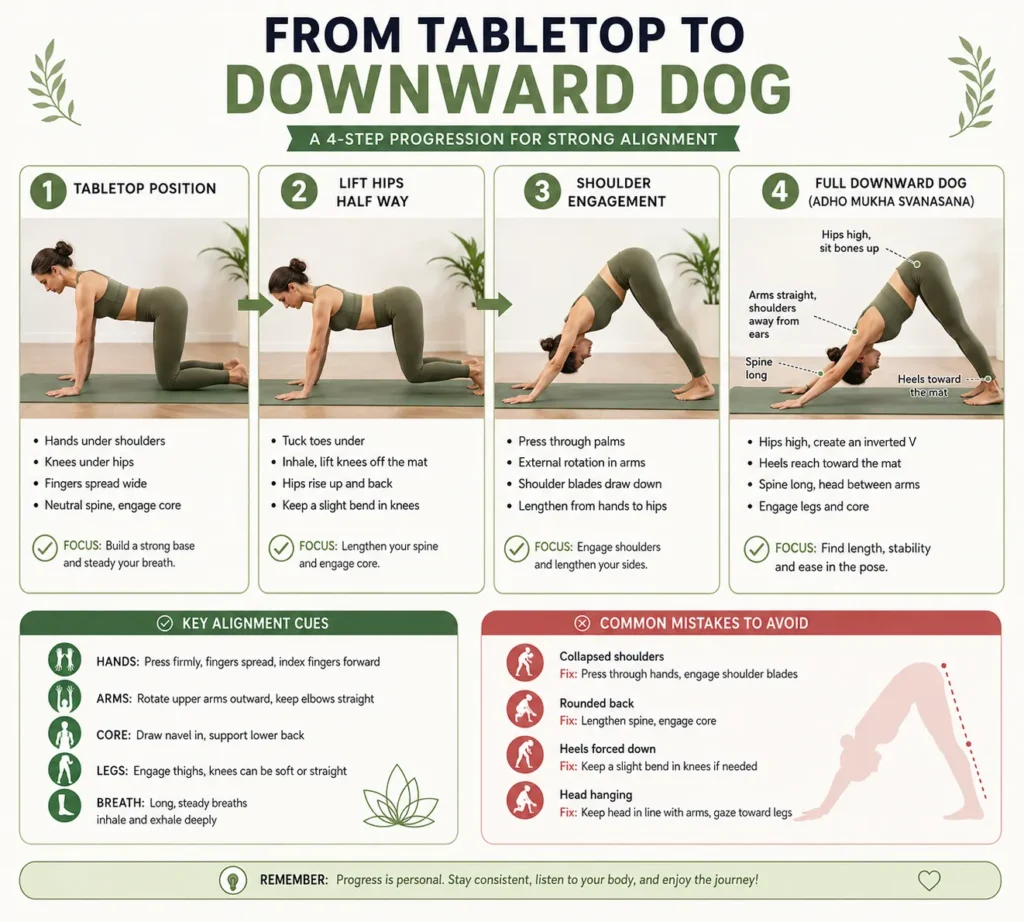
Follow these eight detailed steps to build a strong, aligned downward dog foundation:
STEP 1: Begin in Tabletop Position
Start on your hands and knees on a yoga mat or carpet. Your wrists should sit directly under your shoulders, and your knees should sit directly under your hips. Spread your fingers wide—this distributes pressure across your palm and reduces wrist strain. Point your middle fingers forward. Your knees should be hip-width apart, not touching.
Why this matters: Many practitioners rush into downward dog from standing without establishing this foundation. Tabletop ensures your alignment is correct before inverting.
STEP 2: Press Your Palms Firmly Into the Mat
Spread all ten fingers wide. Press the mounds of your palms (the fleshy area below your fingers) and the outer edges of your hands into the mat. Your fingers should feel light—not bearing weight—to prevent wrist strain. Imagine creating suction between your hands and the mat.
Common mistake: Allowing your fingers to collapse or bunch together. Wide-spread fingers distribute weight evenly and reduce stress on the wrist joint.
STEP 3: Inhale and Prepare
Take a full breath in through your nose. Feel your spine lengthen and your chest expand. Your shoulders should sit over your wrists, your hips over your knees.
STEP 4: Exhale and Lift Your Hips
As you exhale, press your palms down firmly and lift your hips toward the ceiling. Your hips should rise until your body forms an inverted V-shape. Move slowly—never use momentum to force the pose.
Alignment checkpoint: Your shoulders should stack directly over your wrists. Your hips should stack directly over your knees (or slightly forward if flexibility allows).
STEP 5: Align Your Head and Neck
Let your head hang naturally between your upper arms. Your gaze should focus downward toward your navel or slightly forward (never back—this strains the neck). Your ears should align between your upper arms. Avoid looking forward; this compresses the spine and strains the neck.
Why this matters: Improper head position is one of the most common mistakes. Your head weighs 10-12 pounds; hanging it forward increases strain exponentially.
STEP 6: Engage Your Core and Spread Your Shoulders
Draw your belly button toward your spine to engage your core. Simultaneously, spread your shoulder blades away from your spine (serratus anterior engagement). Your shoulders should draw back, not round forward toward your ears. You should feel active strength across your entire torso—this isn’t a passive hang.
Alignment checkpoint: A yoga teacher should be able to draw a straight line from your wrists through your hips to your ankles. If your hips sag toward the mat or your chest collapses, you’ve lost alignment.
STEP 7: Ground Your Feet
Press all four corners of your feet into the mat: the inner and outer edges of your heels and the bases of your big and little toes. Your feet should stay hip-width apart (not wider or closer). Your toes should point slightly inward—a few degrees—to activate your inner thighs.
Why this matters: Grounded feet anchor your entire pose. Feet that lift or slip indicate poor alignment or insufficient strength.
STEP 8: Breathe Deeply and Hold
Maintain this position for 5-10 full breaths (beginner) to 1-2 minutes (advanced practitioners). Your breath should be smooth and controlled—never held or strained. If your breath becomes shallow or rushed, lower your knees to tabletop to rest.
Exit: Inhale and shift forward to plank position or lower your knees to tabletop to rest.
MODIFICATIONS FOR DIFFERENT BODIES
Downward dog’s beauty lies in its accessibility through intelligent modifications. Honor your body’s current capacity rather than forcing yourself into the “textbook” version.
MODIFICATION 1: Knees Bent (Beginner)
Bend your knees generously and bring your hips slightly lower than shoulder height. This reduces hamstring stretch intensity, makes the pose more accessible to tight yogis, and increases comfort in the shoulders and wrists. Hold for 5-10 breaths. This modification is perfect if you’re just starting yoga or returning after a long break.
MODIFICATION 2: Hands on a Block (Wrist Relief)
If wrist pain or limited mobility restricts your practice, place your hands on a yoga block positioned at the highest height. This elevates your upper body and reduces pressure on your wrists by 30-40%. As your wrists strengthen, gradually lower the block height.
MODIFICATION 3: Forearm Downward Dog (Upper Body Relief)
Lower your forearms to the mat parallel to each other, shoulders-width apart. Your forearms support your upper body instead of your hands. This variation distributes weight more evenly across your arms and eliminates wrist load entirely. Many practitioners with chronic wrist pain do this variation permanently—it provides identical benefits with zero wrist strain.
MODIFICATION 4: Wide Feet (Hip and Hamstring Relief)
Widen your feet beyond hip-width apart. This reduces hamstring intensity, increases hip comfort, and feels less intense for tight practitioners. Your feet can be 12-18 inches apart if needed. This modification also improves balance and stability.
MODIFICATION 5: Feet Turned Out Slightly (Hip Opening)
Point your toes outward at 10-15 degrees. This externally rotates your hip joints and reduces pressure on tight hamstrings. It’s especially helpful for practitioners with tight or impinged hips.
MODIFICATION 6: One-Legged Downward Dog (Advanced Strengthening)
Lift one leg toward the ceiling while holding downward dog. Your lifted leg should stay aligned with your torso—not rotating or hiking higher. Hold for 3-5 breaths, then switch. This advanced variation dramatically increases core and shoulder strength.
MODIFICATION 7: Dolphin Pose (Full Wrist Relief)
This is essentially forearm downward dog with clasped hands. Clasp your hands together and lower your forearms to the mat. This variation completely removes wrist involvement while building incredible shoulder strength. Use this if you have wrist injuries or severe wrist pain.
MODIFICATION 8: Downward Dog at a Wall
Stand facing a wall, place your hands on the wall at shoulder height, and walk your feet back until your body forms an L-shape. This significantly reduces intensity and removes much of the inversion, making it suitable for practitioners with high blood pressure or who are new to inversions.
COMMON DOWNWARD DOG MISTAKES (AND HOW TO FIX THEM)
MISTAKE 1: Shoulders Rolled Forward (Collapsed Chest)
The problem: Your shoulders bunch up toward your ears, and your chest collapses toward your thighs. This strains the shoulder joints and reduces the chest-opening benefit.
The fix: Actively draw your shoulder blades down your back and away from your spine. Imagine squeezing a pencil between your shoulder blades—not hard, just engaged. Your chest should feel open and lifted, never caved in.
MISTAKE 2: Hips Sagging Too Low (Spine Compression)
The problem: Your hips sink toward the mat, creating a sag in your lower back. This compresses the lumbar spine and eliminates the decompression benefit.
The fix: Engage your core firmly. Press your hands down powerfully. If needed, bend your knees or lower to tabletop. A lower hips with bent knees beats a sagging hips with straight legs.
MISTAKE 3: Head Hanging Forward (Neck Strain)
The problem: You look forward toward your hands instead of down. This strains the cervical spine and defeats the purpose of the neutral spine position.
The fix: Gaze downward at your navel or slightly forward toward your mat. Let gravity support your head naturally. If you must see your hands, glance briefly, then return gaze downward.
MISTAKE 4: Wrists Misaligned (Wrist Pain and Injury)
The problem: Your hands turn outward, your wrists bend backward excessively, or your fingers collapse. This strains the delicate wrist joints and can lead to carpal tunnel or tendonitis.
The fix: Ensure your middle fingers point straight forward. Spread your fingers maximally. Press the heel of your hand down most firmly. If pain persists, use block modifications or forearm variations. Never push through wrist pain.
MISTAKE 5: Feet Too Wide or Misaligned (Instability and Hip Strain)
The problem: Your feet splay outward excessively or drift too far apart. This creates instability and reduces the hamstring stretch benefit.
The fix: Keep feet hip-width apart (6-8 inches for most bodies). Point toes slightly inward. Press all four corners of your feet into the mat. Your feet should feel firmly planted, not slippery or unstable.
WHEN TO PRACTICE DOWNWARD FACING DOG
In Your Daily Yoga Sequence:
Downward dog typically appears between standing poses and backbends in vinyasa flow sequences. It provides a moment of pause and reset, combining subtle stretching with active strengthening. Most yoga classes include downward dog 5-15 times per session.
For Desk Workers (Hourly Practice):
If you sit at a desk all day, practice downward dog every 60-90 minutes for 5-10 breaths. This counteracts forward shoulder rounding, decompresses the spine, and boosts circulation and mental clarity. Set a phone reminder to build this habit.
For Flexibility Training:
Hold downward dog for 1-2 minutes at the end of your practice when muscles are warm and pliable. The longer hold intensifies the hamstring and calf stretch.
For Shoulder Opening:
Practice downward dog first thing in the morning or during evening wind-down. The shoulder and chest opening benefits combine beautifully with breathwork for nervous system regulation.
For Stress Relief:
Hold downward dog for 3-5 minutes with deep, slow breathing (try 4-count inhales and 6-count exhales). This extended hold maximizes the parasympathetic nervous system activation and cortisol reduction.
Best Times of Day:
Morning (6-8 AM): Energizing, opens shoulders, improves mental clarity Midday (12-2 PM): Counteracts sitting, boosts circulation Evening (6-8 PM): Calming version for stress relief and wind-downCONTRAINDICATIONS: WHEN TO MODIFY OR AVOID
Downward dog is generally safe for most bodies, but several conditions warrant modification or avoidance:
TEMPORARY AVOIDANCE:
Pregnancy (first trimester): Forward folding and inversions may feel uncomfortable Acute wrist injury: Use forearm or wall modifications Recent shoulder surgery: Avoid for 6-8 weeks per your physical therapist Acute migraine: Skip inversions until pain subsides Detached retina: Avoid all inversions (consult your ophthalmologist)PERMANENT MODIFICATIONS:
Pregnancy (second/third trimester): Modify with feet wider, hands on blocks, or skip entirely if uncomfortable
Chronic wrist pain: Use forearm variation permanently
High blood pressure: Use wall modification to reduce inversion intensity
Rotator cuff injury: Work with a physical therapist on appropriate modifications
Severe hamstring tightness: Use bent knees, block under hands, or wall variation
KEY TAKEAWAYS
✓ Downward dog is a partial inversion and mild strengthening pose, not primarily a stretch
✓ Proper alignment requires wide finger spread, core engagement, and neutral spine—never a sagging hips or collapsed shoulders
✓ The pose benefits hamstrings, calves, shoulders, chest, and nervous system simultaneously
✓ Wrist pain indicates poor alignment or insufficient strength, not a flaw in the pose itself
✓ Modifications (knees bent, hands on blocks, forearm version) make downward dog accessible to all bodies
✓ Practice 5-10 breaths for beginners, 30-60 seconds for intermediate, or 1-3 minutes for advanced
✓ Daily practice is safe when form is correct and you listen to your body
✓ Hold the pose for 3-5 minutes with deep breathing for maximum stress relief and cortisol reduction
✓ Downward dog appears dozens of times in vinyasa sequences, making it one of yoga’s most important poses
✓ Common mistakes (sagging hips, collapsed shoulders, forward-gazing head) are easily fixable with awareness and consistent practice
✓ Pregnant practitioners, those with wrist injuries, or high blood pressure should use modifications or wall variations
✓ Forearm downward dog provides identical benefits while eliminating wrist involvement entirely
FAQ: DOWNWARD FACING DOG QUESTIONS ANSWERED
Q1: How long should I hold downward dog?
Beginners should hold 5-10 full breaths (20-40 seconds). Intermediate practitioners: 30-60 seconds. Advanced: 1-3 minutes. Never force a longer hold; focus on alignment and steady breathing over duration. Quality form for 30 seconds beats sloppy form for 2 minutes.
Q2: Can I practice downward dog every day?
Yes, downward dog is safe for daily practice. Most yogis practice it 3-6 times per week without issues. Daily practice is fine if you’re mindful of wrist health and avoid overuse injuries. Listen to your body and take rest days as needed.
Q3: Will downward dog give me wrist pain?
Downward dog only causes wrist pain if practiced with poor alignment or preexisting wrist weakness. Proper form—wide finger spread, pressing heels of hands down, avoiding wrist bending—prevents pain. If pain appears, switch to forearm variation immediately.
Q4: Which muscles does downward dog stretch?
Downward dog stretches: hamstrings (primary), calves, shoulders, chest, and spine. It also mildly stretches hip flexors and quadriceps. The degree of stretch depends on individual flexibility and hamstring tightness.
Q5: Is downward dog an inversion?
Downward dog is a partial inversion where your heart sits above your head, but not your entire body. It provides mild inversion benefits (improved circulation, reduced stress) without the demands of full inversions like headstand or shoulder stand.
CONCLUSION
Downward facing dog stands as one of yoga’s most transformative poses—when practiced with proper understanding and alignment. This guide has revealed everything from the specific anatomical benefits to step-by-step form progression, common mistakes, and intelligent modifications for every body.
The truth about downward dog is this: it’s far more than a stretch. It’s a pose that simultaneously builds strength in your shoulders and core, lengthens your hamstrings and calves, opens your chest, decompresses your spine, and calms your nervous system. No other single pose delivers this comprehensive benefit.
Yet improper alignment—sagging hips, collapsed shoulders, tensed wrists—transforms this gift into pain. The practitioners experiencing wrist ache aren’t discovering a flaw in downward dog. They’re discovering that their bodies need modification or strengthening work. This is valuable information.
As you move forward in your practice:
Prioritize alignment quality over hold duration Listen to your body’s signals—pain is feedback, not weakness Use modifications proudly—they’re advanced options, not shortcuts Practice consistently—8 weeks of regular downward dog reveals changes most yogis expect from months of practice Integrate downward dog throughout your day—every 90 minutes at your desk, at the start of your morning practice, or during evening wind-downYour downward dog journey doesn’t end with this guide. Each time you step into the pose, you’ll discover new subtleties in your alignment. Your shoulders will open further. Your wrists will strengthen. Your practice will deepen.
Start today with just 5 breaths of mindful downward dog. Feel the difference. Then return to this guide, try the modifications, and gradually build your practice from there.
Your body is ready. Your downward dog awaits.


















![AEO checker tools that measure answer engine visibility [2026]](https://53.fs1.hubspotusercontent-na1.net/hubfs/53/aeo-checker-1-20260903-3858273.webp)