Dragonfly Pose: Step-by-Step Instructions, Benefits, and Variations of this Playfully Challenging Arm Balance
The post Dragonfly Pose: Step-by-Step Instructions, Benefits, and Variations of this Playfully Challenging Arm Balance appeared first on The Yoga Nomads.
 ShanonG
The positive effects of yoga on general health are widely known, from improved flexibility and mobility to increased mindfulness, lower stress, and better overall quality of life. However, these positive changes develop gradually over time, and can be difficult to quantify or measure.
How can you tell you’re truly progressing in your practice? One sure way to measure your progress is to set a clear, specific goal for yourself. Choosing to work on more advanced postures like arm balances can help you clearly see your advancement over time.
Of course, not everybody is comfortable (or interested in) going fully upside-down in a handstand. But, there are so many more fun and interesting arm balancing poses that offer the opportunity for growth in your physical and mental practice of yoga.
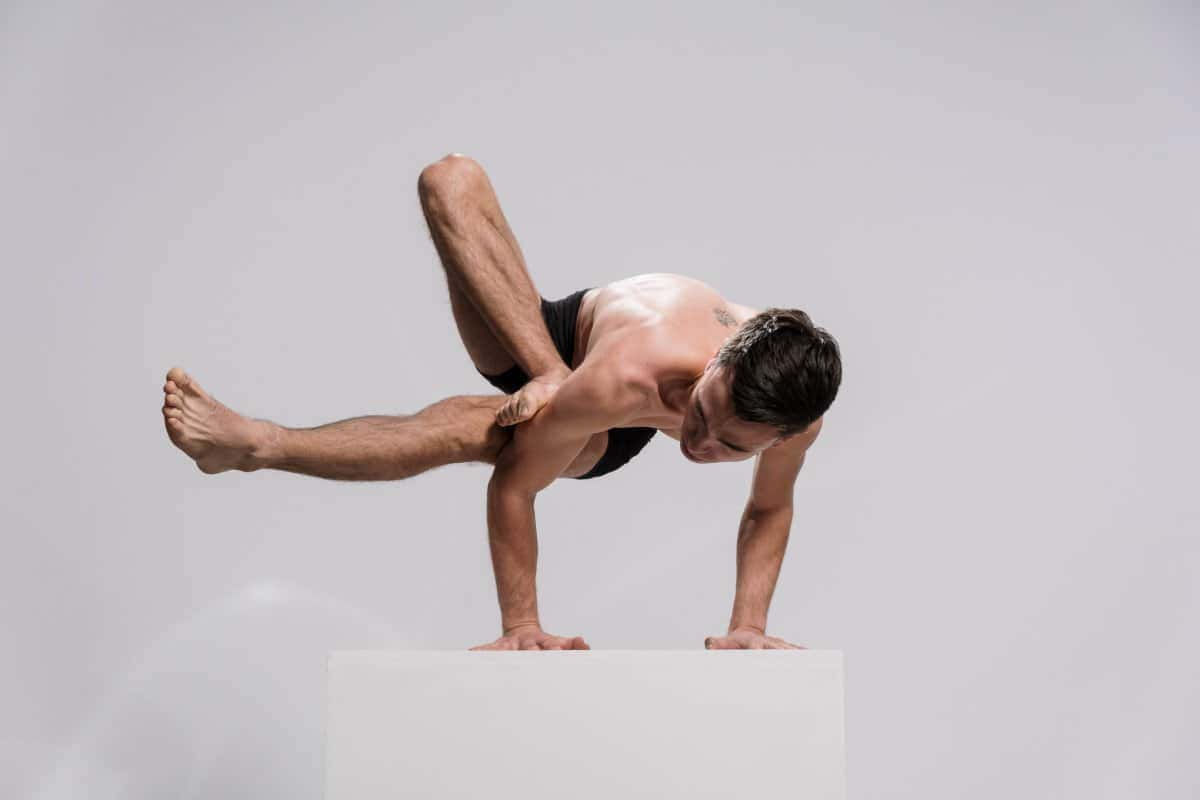
Here, we’ll break down a particularly fun and impressive-looking asana: Dragonfly Pose! This advanced arm balance combines elements of twisting and a slight forward bend, while balancing in an asymmetrical body position. Typically, you’ll practice Dragonfly as a peak pose, in yoga sequences that focus on arm balances.
A Pose of Many Names
As with many modern yoga poses, Dragonfly may be called by other names depending on the style of yoga or individual teacher. Other common names for this asana include Grasshopper Pose, Hummingbird Pose, and Side Arm Staff Pose (Parsva Bhuja Dandasana)
Alternatively, Grasshopper Pose (or Baby Grasshopper Pose) sometimes refers to a variation in which one foot remains on the floor and one hand grips the lifted foot of the extended leg. This variation can be used as a stepping stone before practicing the full version of Dragonfly (we’ve broken it down below in the “Variations” section).
You’ll hear these names in most styles of yoga, with Yin being the exception. Don’t confuse this Dragonfly Pose with the Yin Yoga version, which is a seated straddle stretch!
Benefits of Dragonfly Pose
It might be obvious that arm balancing poses strengthen the upper body. However, Dragonfly Pose in particular does so much more, as it requires strength as well as flexibility in the lower body. It is a complex pose as far as body positioning is concerned, which adds many other physical and mental benefits!
Overall, here are some of the greatest benefits of practicing Dragonfly Pose:
Builds upper body strength, specifically in arms, shoulders, and back muscles; keeping the upper body strong may help prevent osteoporosis and fragility later in life. Strengthens the wrists, forearms, and spine Tones the abdominal muscles Promotes flexibility in hips, legs, spine, hamstrings, groin, thighs, which improves overall mobility Improves digestion – as the abdomen twists it compresses the internal organs, giving a massaging effect to your digestive tract Develops proprioception (the sense of where your body is in space) and overall body awareness as you master the mechanics of asymmetrical body position while balancing on your arms Boosts confidence as you work towards achieving a specific goal Improves balance and focus, calms the mindHow to Practice Dragonfly Pose

Dragonfly might look intimidating and complicated; but, when broken down step-by-step, you’ll find familiar postures that act as building blocks to achieving the final pose. Ready to try it for yourself? Here’s how:
Begin standing in Mountain Pose. Shift your weight slightly into your left foot and pick up your right leg. Cross your right ankle over your left thigh as you bend your left leg, allowing your right knee to open to the side. This is One-Legged Chair Pose, or Standing Figure 4 Stretch. Twist your upper body to your left and bring your hands to the ground beside you. Bend your left leg even more, coming to sit on your left heel. Place the sole of your right foot high up onto your right tricep. Ground your palms to the floor at a shoulder width distance and begin to shift your weight forward. Bend your elbows into a Chaturanga arm position to create a shelf with your arms. Pull your navel in and up to activate your deepest core muscles. Puff out through your upper back, with your shoulder blades wide. Carefully begin to transfer a bit more weight into your arms, using your fingertips to grip the floor. Feel the deep twist in your hips as you lift through your pelvis; your sitting bones should be diagonally aligned. Set your gaze to a spot on the floor between your hands and slightly in front of you. When you feel ready, lift your left foot up off the ground. Press your left thigh against your right upper arm as well, above your right elbow. Finally, extend your left leg out to the side. Hold your Dragonfly Pose for a few steady breaths. To exit the pose, bend your left knee and bring your left foot the floor. Rest a moment or two, then try Dragonfly on your other side, beginning with Standing Figure 4 Stretch where your left ankle crosses over your right thigh.Contraindications
Dragonfly Pose is an advanced posture, and as with other arm balances, there are many instances in which it’s best to skip this one until you are in your optimum health. If you are experiencing any of the following conditions, be sure to consult with a medical physician before attempting any advanced arm balances:
Wrist injury or Carpal Tunnel Syndrome Recent injury in the shoulders, elbows, or other part of arms Lower back pain or injury 2nd or 3rd trimester of pregnancy High Blood PressureModifications for Dragonfly Pose
Dragonfly Pose is an advanced arm balance that requires a considerable amount of arm and core strength, as well as flexibility in the legs and hips. Using yoga props can help you gradually build strength and confidence, while giving your body time to become familiar with the twisted, asymmetrical balance.
Here are a couple modifications you can try to get comfortable with Dragonfly:
Place a bolster, cushion, or folded blanket in front of you as you are learning to balance; that way, if you do fall forward, your forehead will have a soft landing place. Block under foot of extended leg will help you hold your leg straight, and allow you to focus on building strength in your arms required to hold your whole body weight.Variations and Related Poses
If you’ve decided to add this funky, fun arm balance into your yoga practice, here are a few poses that go hand-in-hand with Dragonfly Pose. Each of these recommended yoga poses shares some essential element with Dragonfly, and will help you isolate each skill needed to take full flight in the final pose.
Baby Grasshopper Pose

If you’re lacking in arm strength, this pose is a perfect stepping stone before lifting off into full Dragon Fly Pose. In this more intermediate version, one leg hovers extended above the floor while your opposite foot stays planted on the ground to help support your body weight.
Begin seated on your yoga mat with your legs straight in Staff Pose. Flex your feet and sit tall, lengthening through your spine. Bend your right leg and squeeze your knee in towards your chest. Pick up your right foot and cross it over your left leg. Turn your upper body to your left and place your right foot flat on the floor to the outside of your left leg. Your toes should be facing your left, so your right foot is parallel to the short end of your yoga mat. Bring your left hand to the floor in front of your left hip, in line with the right foot with your fingers facing the same direction as your toes. Maintaining your spinal twist, begin to shift forward slightly, coming onto your left hip. Your left foot should remain flexed, with your toes now pointing towards the left as you roll slightly onto the left hip. Lean your torso forward a little more. Reach your right arm to the side, and take hold of the left foot from the inner arch. Engage your core by pulling your navel in and up. Keep your left elbow close to your body as you lean your chest forward, putting more weight into your left hand and right foot. Keep shifting forward, bending your left arm into a Chaturanga position, and finally lift your hips and right leg off the floor. Hold Baby Grasshopper for a few steady breaths, then gently lower your hips and right leg back down to your mat. Release your spinal twist, uncross your right leg, and return to Staff Pose. Repeat Baby Grasshopper on your other side, crossing the left foot over the right leg, and twisting your upper body to the right (on this side, you will balance on the left foot and right hand).Side Crow

Side Crow is another asymmetrical arm balance, and while still an advanced posture, it proves slightly more simple than Dragonfly as both legs remain tucked on the same side of the body. Practicing Side Crow will allow you to work on balance and arm strength while also adding the element of a twist, similar to the body position in Dragonfly.
To review how to practice Side Crow, visit our Crow Pose guide and scroll down to the “Variations of Crow Pose” section.
Eight Angle Pose

Eight Angle Pose is similar to Dragon Fly Pose in the the asymmetrical body position, balancing with your arms in a Chaturanga (Four Limber Staff Pose) shape, with both legs extended to one side. This asana, however, requires a bit less flexibility in the hips and leaves out the spinal twist; in this sense, Eight Angle Pose is a slightly more straightforward arm balancing pose (despite how impressive it looks!) that will help you build the skills necessary for Dragonfly.
To view step-by-step instructions for Eight Angle Pose, check out this fantastic list of 11 Inspiring Advanced Yoga Poses.
Preparatory Poses
One of the most common reasons Dragon Fly Pose feels difficult is due to not properly warming up. These suggested yoga poses each target a part of the body which is an important component to success in Dragonfly.
Standing Forward Fold

Uttanasana, or Standing Forward Fold, will open up your hamstrings and release your low back.
To Practice Standing Forward Fold:
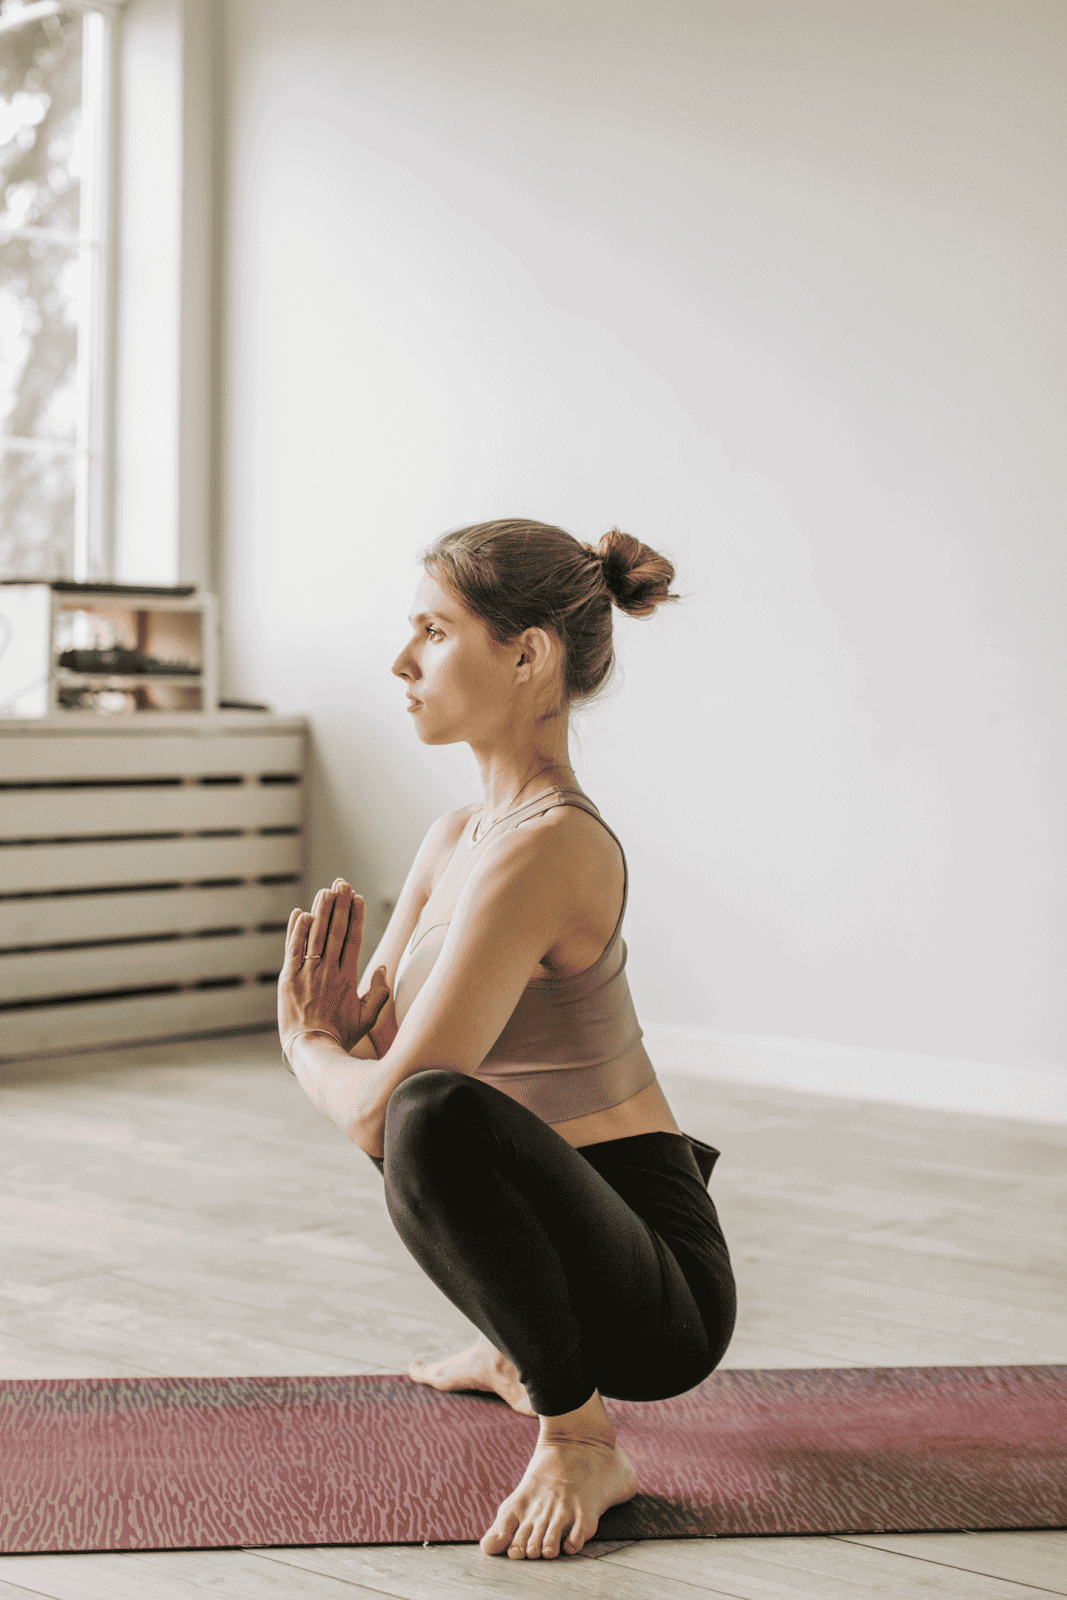
Stand with your feet slightly separated, grounding down through the four corners of your feet. Reach your arms up overhead as you breathe in, and dive forward as you exhale, releasing your hands to the floor. Allow your torso and head to hang, and relax the back of the neck. To help release your lower back, you may step your feet a little wider to hip width distance, and keep a slight bend in your knees.Yogi Squat (Malasana)
In order to place your foot on the tricep in Dragonfly, you’ll need your hips to and inner thighs be open. Malasana is the perfect pose to target both of these muscle groups!
To review how to properly practice Malasana, check out or Yoga Squat guide!
Four Limbed Staff Pose (Chaturanga Dandasana)

Having a solid Chaturanga (Four Limbed Staff Pose) will give you a solid foundation for many different arm balances. Practice a few Sun Salutation yoga sequences to warm up the whole body, and try to spend and extra breath or two in your Chaturanga. This will set you up for a solid balancing base in your Dragon Fly Pose, which use a similar arm position.
To practice Four Limbed Staff Pose:
Begin on all fours in a Table Top position. Pull your navel towards your spine to activate your core. Press the floor away as you lift up and out of your shoulder joint, feeling your upper arms activated. Step your feet back one at a time, coming into the top of a push-up. Your feet should be at a hip width distance, with your heels stacked over the balls of your feet. Pull up on your kneecaps to engage your thigh muscles. Take a breath in and shift forward slightly, pushing forward with the balls of your feet. As you exhale, lower down halfway to the floor, with your elbows bent at a 90-degree angle. Keep your elbows close to your body. Try to hold your Chaturanga for one or two breaths, then use control to slowly lower yourself all the way down to your belly.Standing Figure Four (One-Legged Chair Pose)

You’ll use this Chair Pose variation as a transitional pose when entering Dragonfly, so why not practice on its own first? As a bonus, this pose helps open the hips, which is one of the most essential parts of achieving Dragon Fly Pose.
For a reminder on how to practice One-Legged Chair, visit our complete Chair Pose Guide and check out the section on variations!
Revolved Chair Pose

This Chair variation activates the leg muscles as well as the core, while bringing the spine into the same deep twist required of Dragon Fly Pose. Definitely don’t skip this one if you’re working toward Dragonfly in your yoga sequence!
If you need some tips or instructions for Revolved Chair, you can find them included in the Chair Pose Guide linked above.
Counterposes to Follow Up Dragonfly Pose
Dragonfly Pose requires activation from the front side of the body, namely the abdominal muscles and chest, while the upper back rounds. For these reasons, backbends are an excellent type of posture to practice after Dragonfly pose. These poses will help you to lengthen your spine and back muscles used in the asymmetrical arm balance of Dragonfly Pose.
Bridge Pose
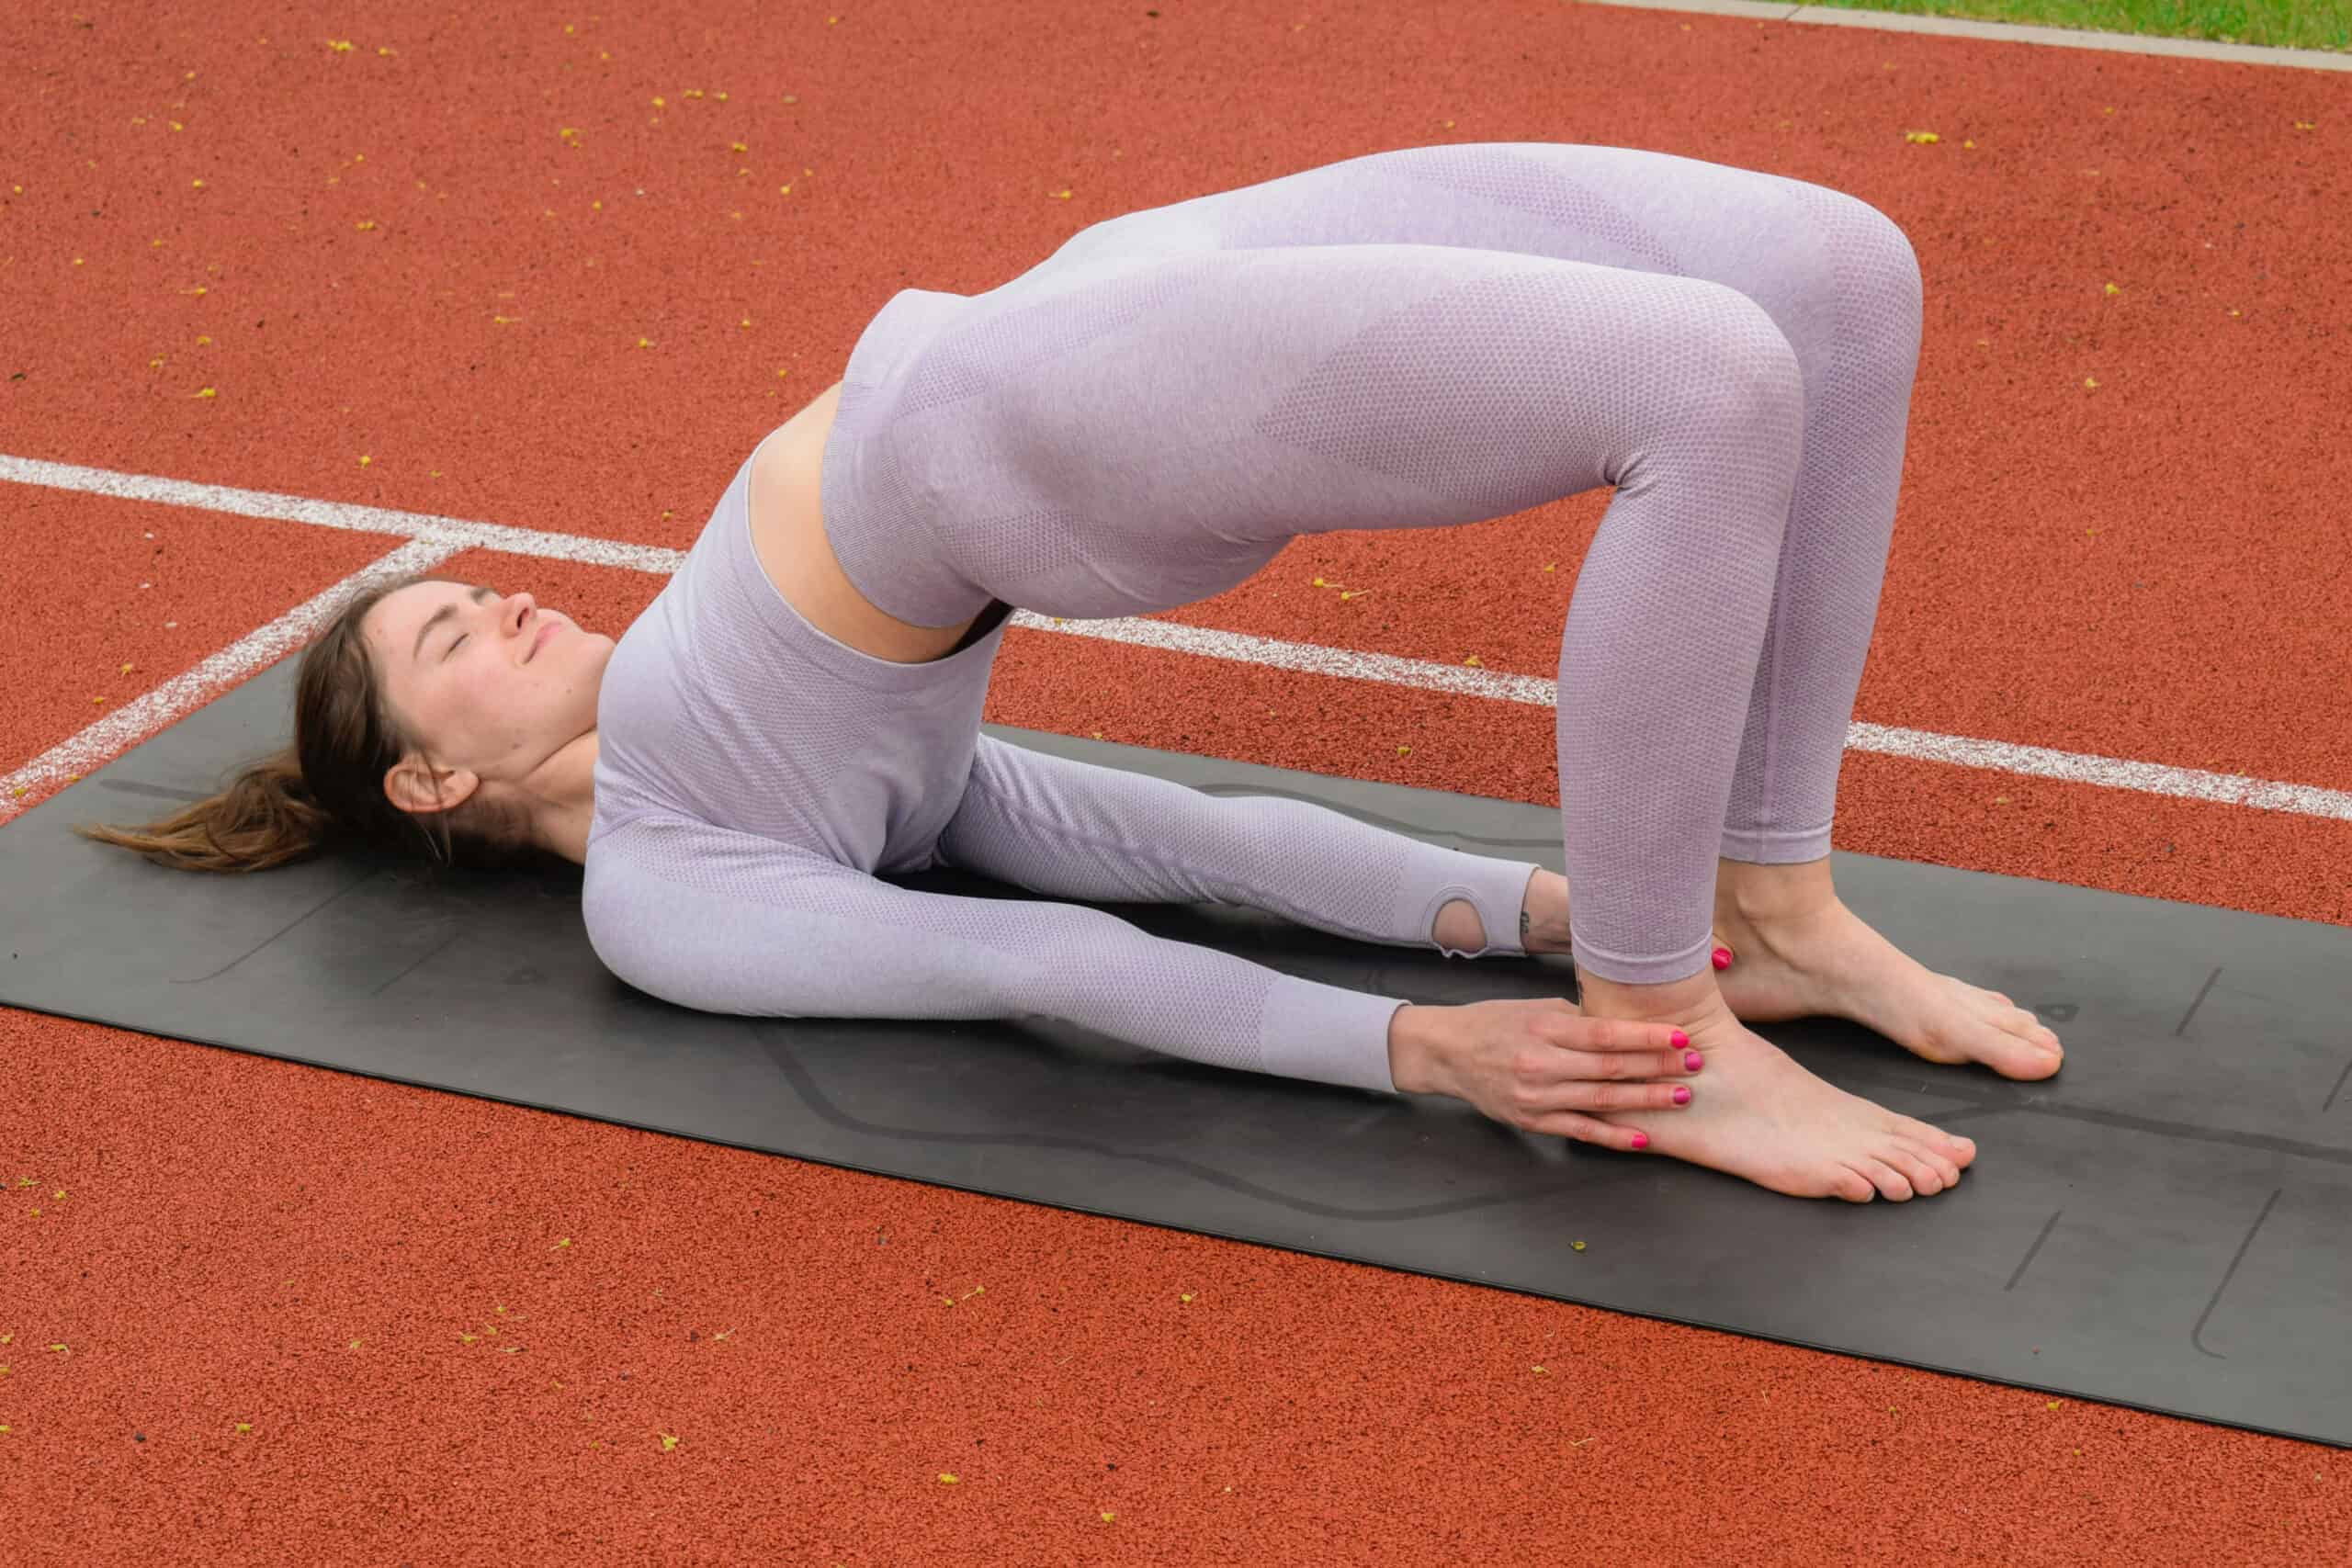
The spinal extension of Bridge Pose counteracts the spinal flexion required in Dragonfly. It also lengthens the front of the torso — especially the hip flexors — which are put to work in Grasshopper.
For instructions on how to practice Bridge Pose, follow this link.
Upward Facing Dog

Take your spinal extension to the next level with Upward Facing Dog. This will also give your abdominal muscles and hip flexors a nice stretch after being put to work in Dragonfly.
To practice Upward Facing Dog:
Begin lying face down on your yoga mat with the tops of your feet on the floor. Your feet may be together, or separated at about a hip width distance. Place your palms underneath your shoulders, with your elbows tucked in close to your sides. Press the tops of your feet into the floor to activate the muscles of your legs. Pull your navel in and up to engage the core. As you breathe in, press your hands into the floor and straighten your arms to lift your head, chest, hips, and legs off the floor. Keep space between your shoulders and your ears; widen your shoulder blades across your upper back. Gaze straight ahead to keep your head and neck aligned. Hold your Upward Facing Dog for 3-5 breaths. Then, gently lower your body down to your mat. Release your arms to your sides and turn your head to place one ear to the ground and rest.Child’s Pose
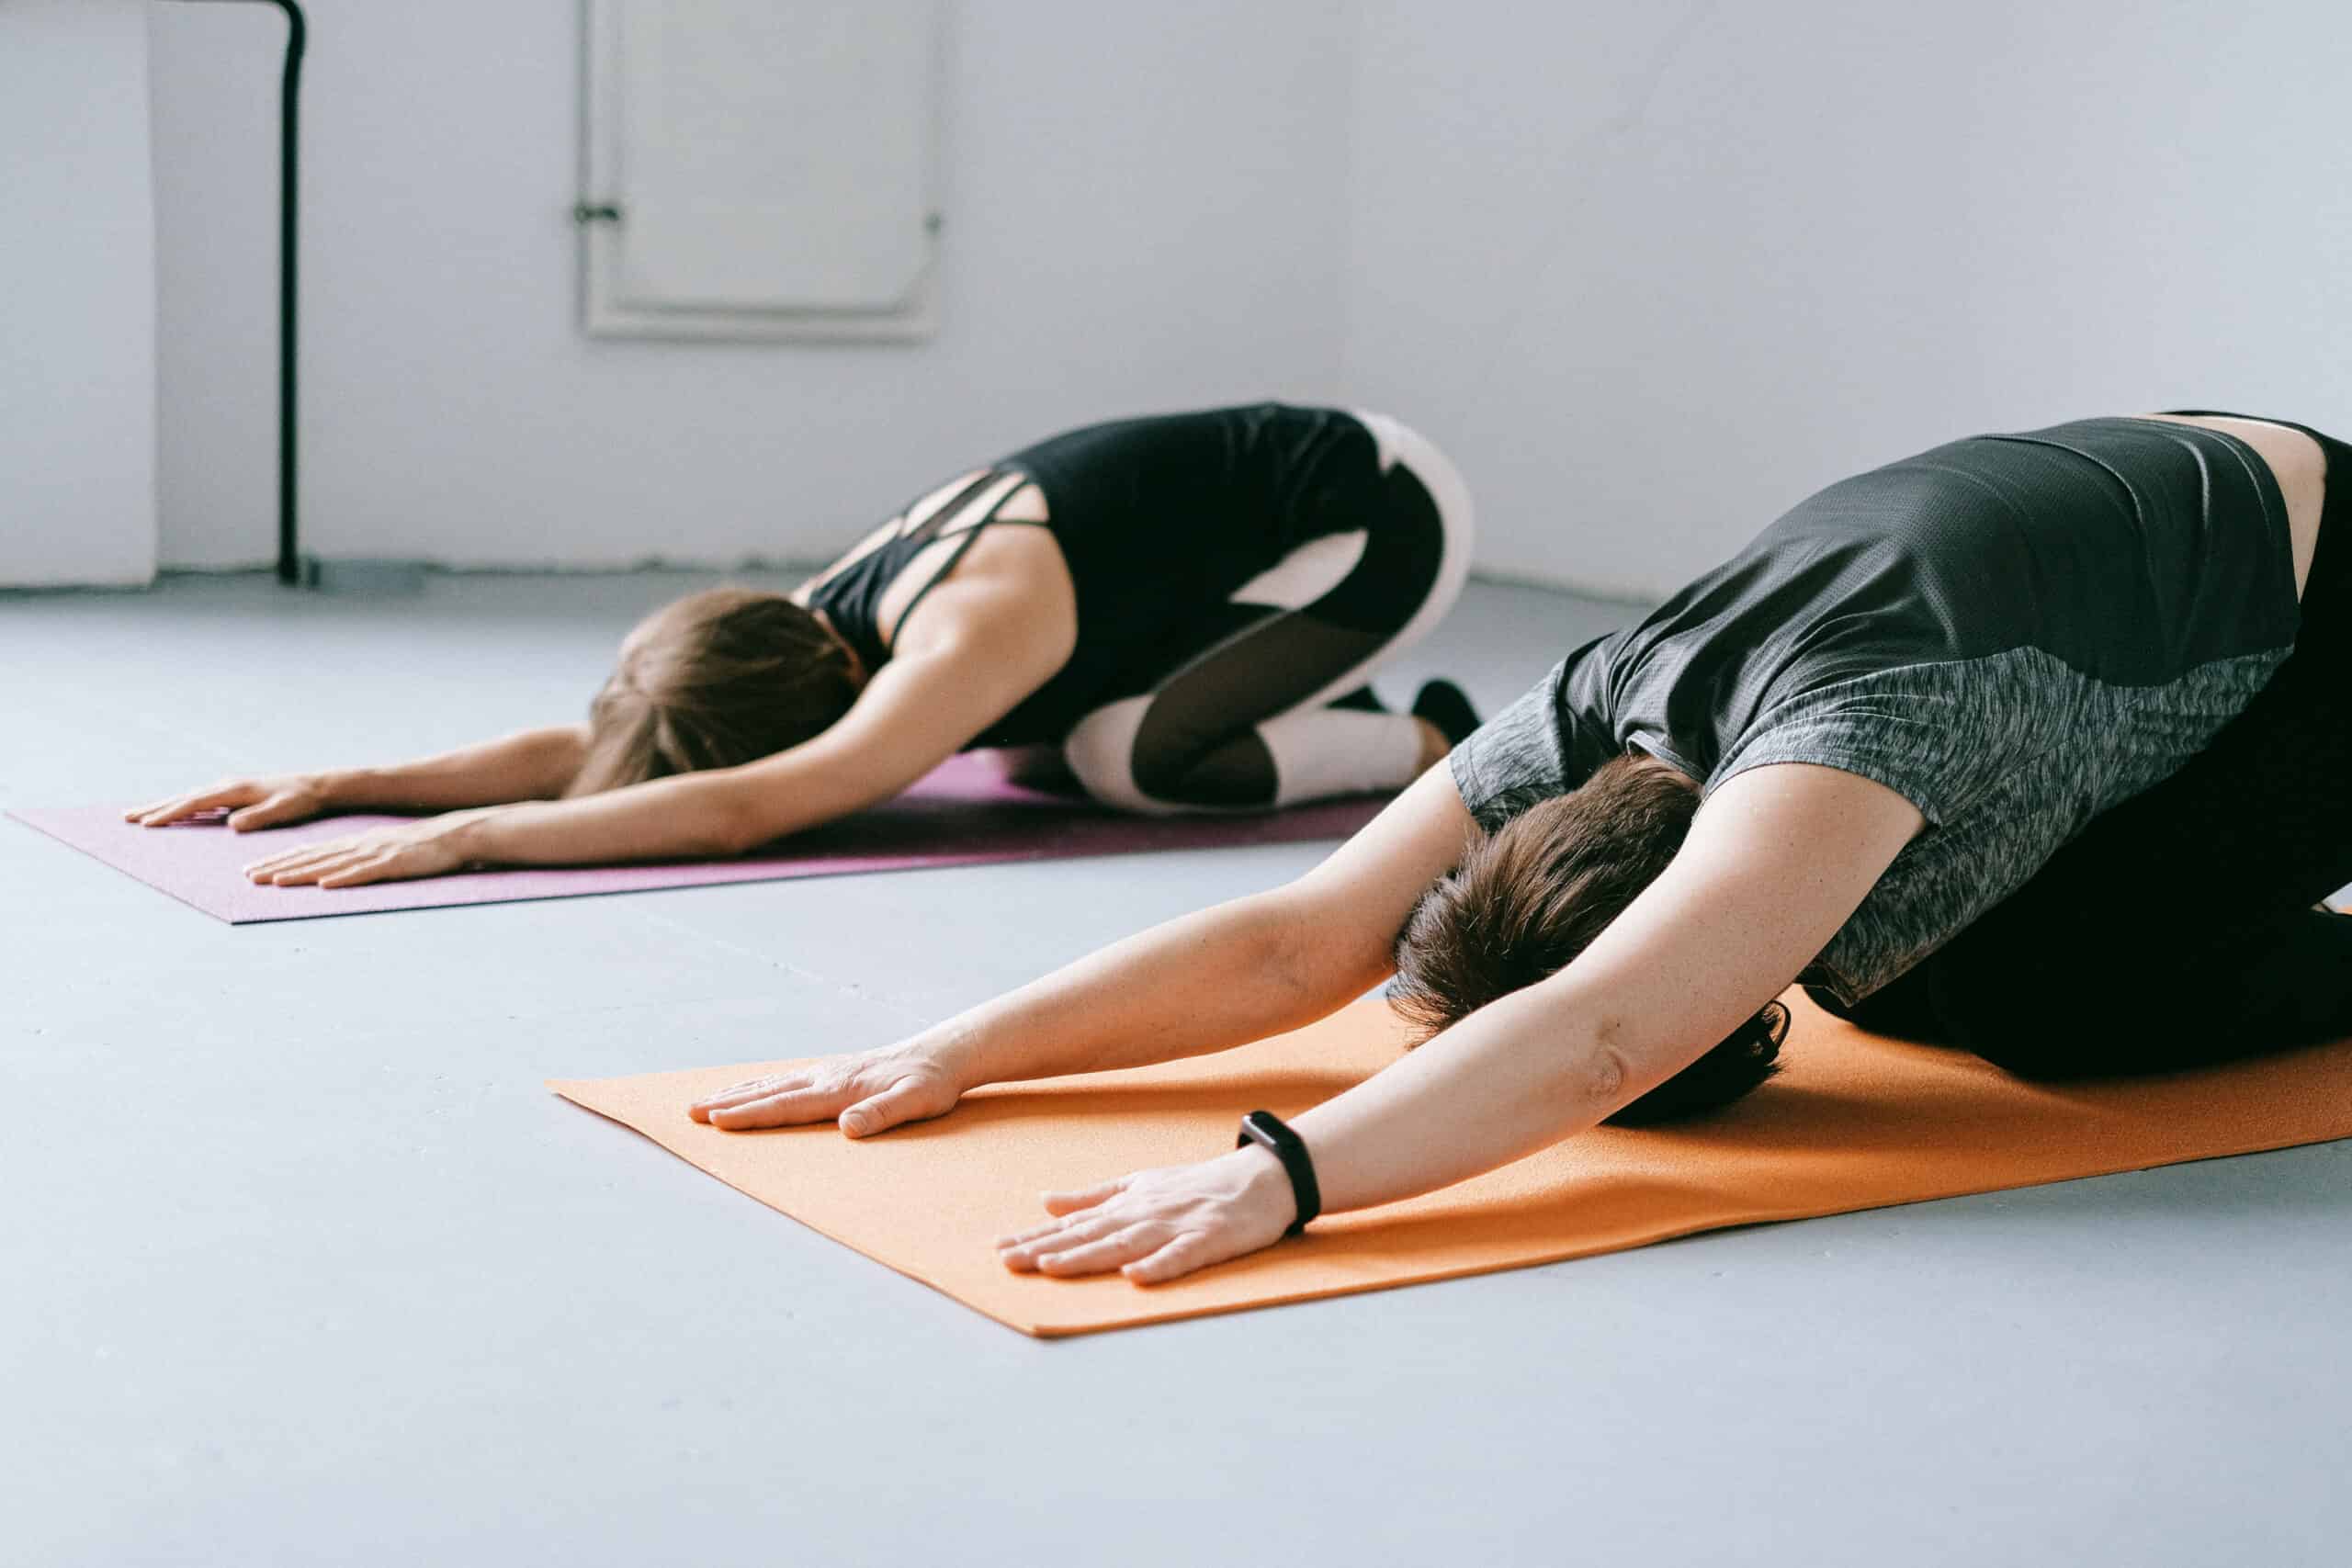
A classic resting pose, Child’s Pose feels especially soothing after the challenge of arm balancing postures. Try a variation where your knees are wide and your arms are placed down alongside your body, palms up.
Need a refresher on all things Child’s Pose? Click here for our step-by-step practice guide!
Common Questions About Dragonfly Pose
To maintain correct placement of your foot on your upper arm, you’ll need your hips to be open. If you’re having trouble with your foot sliding off, it’s likely because you haven’t warmed up your body enough and your hips are a bit tight. Try taking a break from Dragonfly and do a couple good hip opening poses like Lizard, Pigeon, or Bound Angle. Then, try Dragonfly again and see if you feel a difference.
Why should I practice arm balances?
Not everybody begins a yoga practice because they want to learn to do a handstand — and that’s totally fine! But, there are so many other arm balancing poses of different shapes and levels, you might eventually find one like Dragonfly that piques your interest.
All arm balancing poses share the benefit of building mental focus and determination as well as physical strength. Plus, choosing to learn an advanced arm balancing pose gives you a clearly defined goal to work towards in your yoga practice, leading to a sense of gratification and personal success!
I’m a beginner to yoga — how long until I can try advanced arm balancing poses like Dragonfly? Where do I start?
Every yoga practice is different, and we all start from different levels, so there is no set timeline determining when you can or should start working on more advanced poses. The most important factor is to be sure you possess the appropriate strength and flexibility required to avoid injury in more advanced asanas.
If you want to start practicing arm balancing poses, we recommend first beginning with a really solid Plank and Four Limbed Staff Pose, with the ability to hold each for several breaths without your upper arms becoming overly fatigued. A focus on core strength will also set you up for success when you progress to more advanced yoga postures like arm balances.