How to stress test your CPU to its limits — and why you should
Stress testing your CPU is a great way to make sure it's running as best it can and that its well cooled. Here's how to do just that.

Stress testing your CPU is a great way to ensure that your overclock is stable, check that your cooling is powerful enough, or run in some new heat paste that you've applied to your processor. But there are a range of ways you can do that, from just playing some games for an extended period of time to running a power-virus-like stress testing application.
Here's the best way to stress test your CPU to know that it's ready for whatever you throw at it.
A word of warning
Before we begin stress-testing your CPU, it's important to remember that this process is designed to work your processor hard—really hard. It's the kind of load that it's unlikely to experience in day-to-day operation unless you're constantly transcoding video or compiling complicated code. This can push the processor to exceed its manufacturer-suggested power limits.
It's perfectly fine to run these tests for an hour or so, but running them for extended periods can reduce your CPU's lifespan and result in thermal throttling and a hard reboot if your cooling can't keep up with its demands.
Whenever you are conducting any kind of stress test, be sure that your cooling is adequate for the job at hand, that your PC is clean and not clogged with dust, and that you can monitor the temperature of your processor at all times to ensure it isn't being pushed too hard.
How to stress test your CPU
There are a number of excellent CPU stress test applications, but we particularly like the nuance, options, and regular updates of OCCT. You can download it from the official site, here. Alternatives, include the classic Prime95, the more benchmark-centric, Cinebench 2024, and AIDA64.
Step 1: Download OCCT from the official website, then run the application.
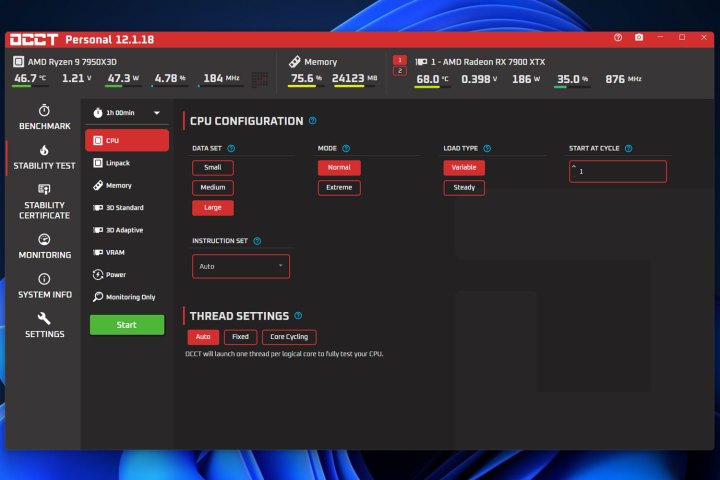
Step 2: You'll be presented with the standard benchmarking screen. If you want to run benchmark tests for some tangible numbers on how your processor is performing, hang out there for a while and play with the settings to get the result you want.
When you want to stress test your CPU, however, select Stability Test from the left-hand menu.
 Jon Martindale / DigitalTrends
Step 3: The standard settings will stress test your CPU effectively while also hunting for potential errors and problems with your CPU's configuration. For the most straightforward of stress tests, emulating a real world, day to day use case (albeit a demanding one), simply leave everything as is.
However, if you are confident in your processor and system cooling and want to see how your setup performs under a more strenuous load, then you'll want to change the data set to "Small" to have it target the CPU exclusively, leaving your memory un-stressed and your processor operating at a higher power draw and therefore temperature.
You can also set the test Mode to Extreme for added power draw. A "Steady" Load Type will ensure the CPU redlines and stays there for the duration of the test, or you can use a Variable load to have the CPU usage spike up and down in more akin to real-world use.
If you have a particular instruction set you want to test, choose that from the drop-down menu, otherwise, leave it as Auto. You can also choose the thread cycling to fix on all cores to emulate a more multi-threaded workload or have it target individual cores to maximize their frequency to focus the test on single-threaded stability.
 Jon Martindale / DigitalTrends
Step 4: Press the green Start button. Then wait the 10 seconds for the Patreon ad to subside (or subscribe to the OCCT Patreon page so that you can skip it in future), and then select the green Start button when ready.
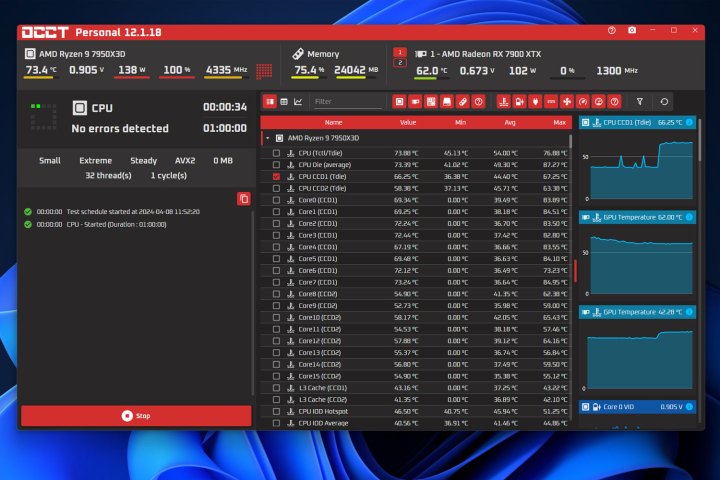
Step 5: Use the monitoring screen that appears or your own third-party CPU monitoring tool, to keep an eye on temperatures and power usage. You should see both increase dramatically and your CPU's cores load effectively depending on your choices in the stress test options.
 Jon Martindale / DigitalTrends
Step 6: Leave the test running for as long as you feel is necessary to ensure stability. If you're just looking to see if your stock system is stable or needs better cooling, that can be as little as 15 minutes — especially if you're using a more extreme test that isn't indicative of real-world use. If you're interested in seeing whether your overclock is stable after a lot of fine-tuning, you may want to leave it running for an hour or even longer.
If you see your CPU temperatures reach into the 90s and your clock speed fall, your cooling may not be effective enough to avoid thermal throttling. Similarly, if your system ends up freezing or crashing, you may need to undervolt your CPU or improve your cooling to avoid that in the future.
Play some games
If you're looking to stress-test your CPU in games, the best way is still to actually play some games. While there are a number of benchmarks you can run, like 3DMark's suite of tests, and many games have their own built-in benchmarks for performance testing, they can never run in the way real games play, because they don't have you controlling them.
To stress-test a CPU in games, you may want to play at lower resolutions, where the game is more CPU bound than graphically constrained, but in reality, just playing a game you plan to play for a few hours uninterrupted at your standard settings, will put plenty of real-world stress on a CPU. As with the stress testing applications, keep an eye on usage, clock speeds, temperatures, and power draw throughout using OCCT or your preferred third-party monitoring tool, and see how it fares.
Now that you know your CPU is stress-proof, do you want to see if it can run even faster? Here's how to overclock your CPU to get the most from it.

 Tekef
Tekef 


