How to Use SumIf in Google Sheets
When you’re managing spreadsheets, even a relatively small amount of data can become difficult to manage pretty quickly. But tools like Google Sheets have many functions that help you work with data more efficiently.

When you’re managing spreadsheets, even a relatively small amount of data can become difficult to manage pretty quickly. But tools like Google Sheets have many functions that help you work with data more efficiently. A common challenge is figuring out how many instances you have of specific values within a large spreadsheet. That’s where the SumIf function in Google Sheets comes into play. Using this function, you can add up numbers in a spreadsheet based on certain conditions. Using a SumIf function in Google Sheets effectively can take some practice, especially in more complex situations. So here are step-by-step instructions and examples of using SumIf in Google Sheets to help you on your way. Table of Contents: In Google Sheets, the SumIf function adds up the values in a range of cells that meet certain criteria. It allows you to add numbers in a specific range based on a given condition, such as values that meet a specified condition, fall within a certain range, or match a particular text string. The syntax of the SumIf function in Google Sheets is as follows: =SUMIF(range, criteria, [sum_range]) Let’s say you have a column of sales data, and you want to sum up a particular person’s sales. You could use the SumIf function. You would specify the range of cells that contain the sales data, the criteria that specify which salesperson's sales you want to sum up, and the sum range (which, in this case, would be the same as the range argument). The function would then calculate the sum of all the sales that match your specified criteria. Sometimes, you may need to sum up values in a range based on specific criteria or conditions. Without the SumIf function, you would need to manually sort, filter, and add up the values that meet your criteria, which can be time-consuming and result in many errors. You might also need to perform dynamic calculations that update automatically as your data changes. By using the SumIf function, you can create formulas that are linked to your data and update automatically whenever new data is added or existing data is changed. The SumIf function is also very flexible and easy to customize. It can be as straightforward or as complex as you need it to be. Google Sheets allows you to select a wide range of criteria and conditions for summing up values through the SumIf function. Plus, it’s compatible with plenty of other functions within Google Sheets if you need to extend your formula or create complex calculations. This includes AverageIf, CountIf, MaxIf, and more. You can also use the SumIf function to sum up values based on multiple criteria by using the "&" operator to combine the criteria. For example, to sum up the sales for the "Boots" product for 2023 so far, you would use the formula: "=SUMIF(B2:B11,"Boots",C2:C11&A2:A11,">=1/1/23")" In this instance, B2:B11 contains the product names, C2:C11 contains the sales values, and A2:A11 contains the dates. To get a sense of how useful SumIf can be with large data sets, let’s take a look at a more in-depth example. In this instance, you need the SumIf statement to use data from multiple sheets. Suppose you have a list of employees and their corresponding salaries on one sheet and a separate sheet containing each employee's job title. In this instance, we’ll use the SumIf function to sum up the overall salary spent on employees with a specific job title. If you wanted to know this information about each job title in the company, you would simply create another table in a separate sheet with one instance of each job title and copy the formula down, replacing the criteria for each row to match the job title you want to reference. So, in just a couple of steps, you’d be left with a table that sums up all the information in one place rather than manually counting and adding up hundreds of cells. The SumIf function is fairly simple and easy to use. But like all spreadsheet functions, it’s easy to get an ERROR result if your formula isn’t formatted correctly or if you don’t stick to some key best practices. Using descriptive criteria can help make your formula more readable and understandable. For example, if you are summing sales data for a particular region, use the name of the region as your criteria, rather than a generic term like "Region A". Using cell references instead of typing criteria directly into your formula makes it easier to update your criteria if needed. For example, if you need to change the name of the region you are summing, you can simply update the cell reference instead of editing the formula. Make sure that the range you are summing and the range you are using for criteria are the same size and have the same layout. If the ranges are different, you may get unexpected results or errors. The syntax of the SUMIF function is SUMIF(range, criteria, sum_range). Make sure that you are using the correct order of arguments and that each argument is separated by a comma. Testing your formula with a small subset of data can help you catch errors or unexpected results before applying it to a larger dataset. This is especially important if you are using more complex criteria or formulas. If you need to sum data based on more complex criteria, consider using other functions such as SUMIFS, which allows you to specify multiple criteria. For example, you can use SUMIFS to sum sales data for a particular region and time period. Keeping your data organized and well-formatted can make it easier to use SUMIF and other functions in Google Sheets. Consider using tables or formatting your data as a named range to make it easier to reference in your formulas. You can also use filters or sorting to quickly find the data you need. The SumIf function is a simple solution to summing up data based on specific criteria. By using cell references, descriptive criteria, and other best practices, you can make your formulas more readable, accurate, and efficient. Whether you are summing sales data, tracking expenses, or analyzing survey results, the SumIf function can help you quickly and easily calculate totals based on specific conditions. With a little practice, you’ll soon be using this function with ease.
What does SumIf do in Google Sheets?
The Benefits of Using SumIf in Google Sheets
How to Use SumIf in Google Sheets
Open a new or existing Google Sheets document.
Enter your data into the worksheet. For example, you might have a list of sales transactions with columns for date, product, quantity, and price.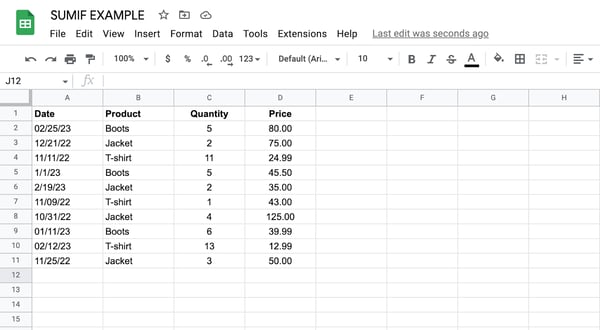 Decide what criteria you want to use to sum up your data. For example, you might want to sum up the sales for a particular product or for a specific date range.
Click on the cell where you want to display the sum of your data.
Type "=SUMIF(" into the cell. This will start the SUMIF formula.
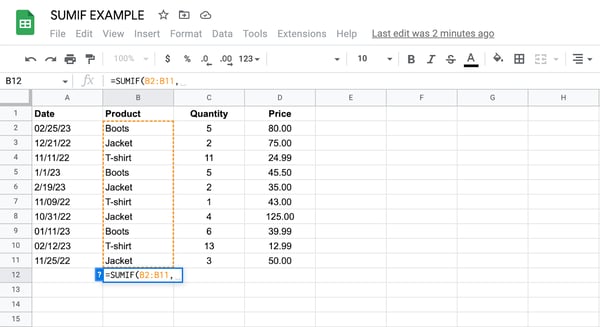
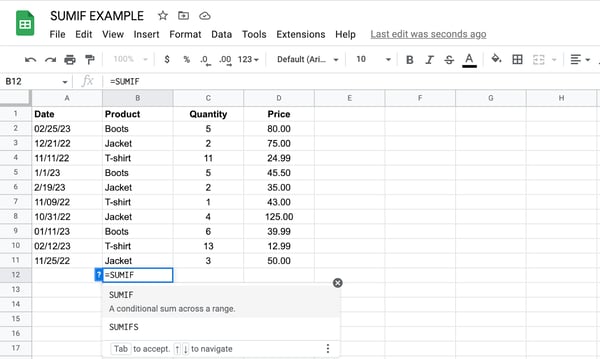 Select the range of cells that you want to search for the criteria. For example, if you want to sum up the sales for a particular product, you would select the column that contains the product names.
Type a comma "," after the range of cells.
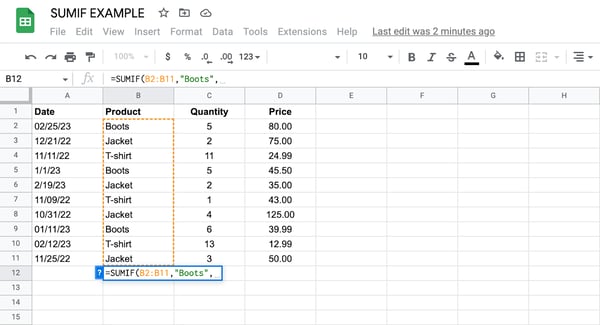
 Enter the criteria that you want to use for summing up the data. For example, if you want to sum up the sales for a product named "Boots", you would enter "Boots" in quotation marks.
Type another comma "," after the criteria.
 Select the range of cells that contains the values that you want to sum up. For example, to sum up the sales for the "Boots" product, you would select the column that contains the sales values.
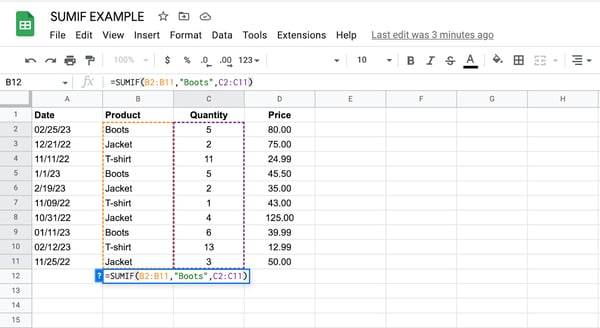 Close the formula by typing ")" and press Enter. The sum of the values that meet your criteria will be displayed in the cell. In this instance, the SumIf function shows us that 16 pairs of boots have been sold in total.
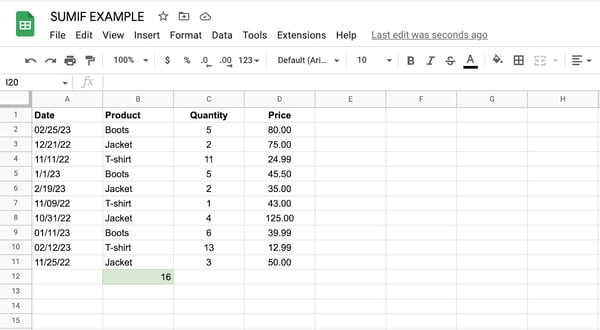
SumIf in Google Sheets Example
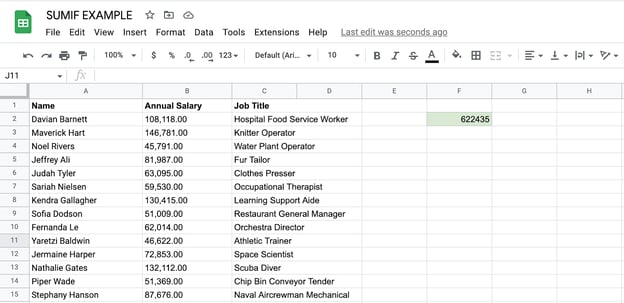
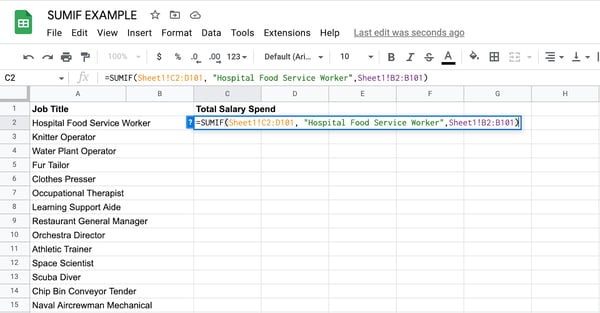
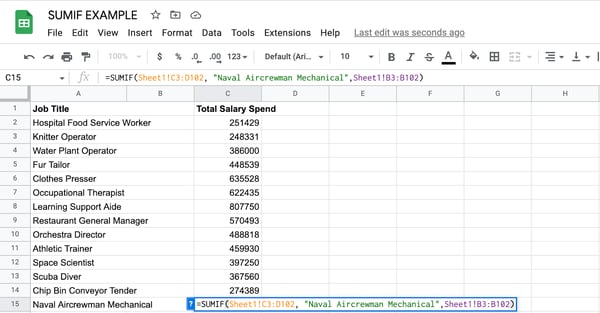
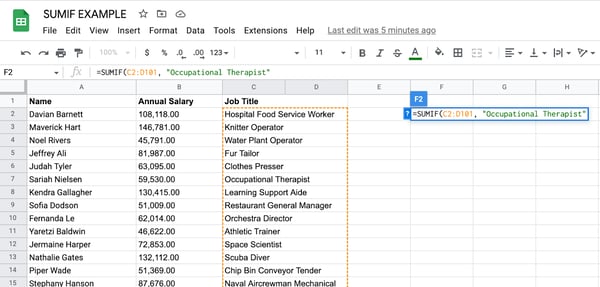 In this case, we’re trying to find out how many Occupational Therapists are on the payroll. So, “Occupational Therapist” has been entered into the formula as the criteria.
Next, we need to tell the function the range of cells you want to sum up based on the criteria. We want to know about the salaries of occupational therapists, which means selecting the data under Column B (“Annual Salary”).
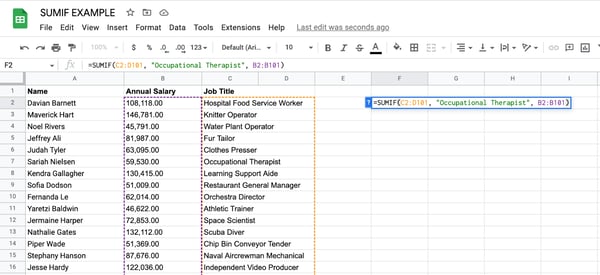 When the Enter key is hit after closing the formula with “)”, we can see that the company spends $622,435 annually on salaries for Occupational Therapists.
Best Practices for Using SumIf
Use descriptive criteria.
Use cell references.
Check your ranges.
Use the correct syntax.
Test your formula.
Use other functions for more complex criteria.
Keep your data organized.
Getting Started

 Fransebas
 ![Google Sheets Templates [Free Kit]](https://no-cache.hubspot.com/cta/default/53/e7cd3f82-cab9-4017-b019-ee3fc550e0b5.png)


