This DIY Cheese Press Is Better Than Anything You Can Buy
At some point in your cheesemaking journey, you’ll need a cheese press. But before you run off to the big warehouse in the cloud to get one, you should know a few things about cheese presses, so you buy...
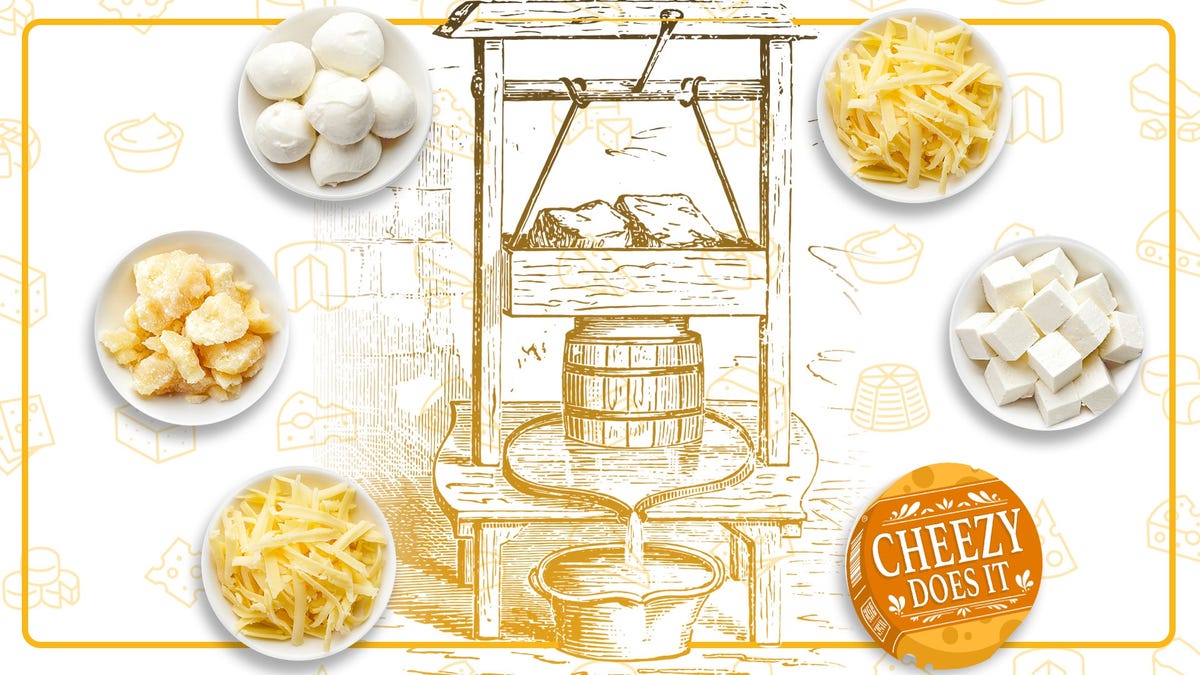
At some point in your cheesemaking journey, you’ll need a cheese press. But before you run off to the big warehouse in the cloud to get one, you should know a few things about cheese presses, so you buy the right one. (Hint: I couldn’t find one on Amazon that met the grade.)
What is a Cheese press?
All cheesemaking recipes involve allowing the milk to set into curds, which are big, pillowy cheese puffs that look like tofu. What we do with those curds is determined by the kind of cheese you’re making. To make hard cheeses, we need those curds to knit together to form a cheese wheel, and a cheese press acts as our knitter.
We put the curds into a cheese mold, along with a follower, a flat piece that goes into the mold to keep everything nice and even. Then we use the press to exert some force.
If it was as simple as throwing as much weight as possible onto the cheese, it’d be easy. But the recipes you encounter will have you start out light and gradually increase the weight. There are a lot of reasons for this but primarily, we need to give whey an opportunity to escape the curds. That’s why cheese molds have holes in them. A press needs to be able to add weight, while measuring the amount of weight added. That alone knocked out about 90% of Amazon cheese presses.
Your press also needs to be able to accommodate the molds in the press itself, so you want to think about the size of cheeses you’ll make, and ensure there’s enough space for the appropriately sized molds. (That kicked out the last cheese press left on Amazon; it only accommodates small molds.)
Understanding the different styles of cheese presses
To re-cap: A good press lets you add weight on top of the cheese mold, tells you how much weight you’ve added, has a way for the whey to drain, and accommodates the cheese molds you have. There are three kinds of presses I’ve seen in the wild.
The Dutch press uses a large lever, on which you place the weight, and the other end of the lever actuates pressure on the cheese. These are always wood, and you can buy them from a few different purveyors in the United States.
The second style relies on springs to exert the needed pressure. Strong springs are nestled between two pieces of wood, then secured down by wing nuts. Instead of using actual weights, you just turn the wing nuts to apply the amount of pressure that would be exerted by that weight. These presses are made out of plastic, steel, or wood.
Lastly, there is a pretty basic press that uses two sheets of wood, some steel threaded dowels, and wing nuts. It’s similar to the spring-loaded press, but in this case, there are no springs. You place an actual weight on top of the press and continually crank down the wing nuts. These are always made of pressed wood or similarly inexpensive (and not sturdy looking) wood, and requires the use of weights. I haven’t tried these, but I doubt their usefulness, because the wood looks flexible and flimsy, and I imagine you’d still have problems with tip overs. They are, however, cheap, so might be worth a try.
Can’t I just put something heavy on top of the cheese?
Lord knows I’ve tried, particularly when I’ve got a few different cheeses going that all need a press. The trouble is this: No matter what you use—books, weights, bags of clay—the cheese eventually gets a little off balance. The bottom of your cheese is a mass of unstable, gooey curd, and uneven pressure can cause the whole thing to collapse, giving you uneven cheese, and a mess to clean up. I’ve been woken up by a falling stack of books or weights more times than I can count.
The good news? You can build a press for much cheaper than any of the presses on the market, and it will work much better than anything you’ll find on Amazon.
How to build Your Own Cheese Press
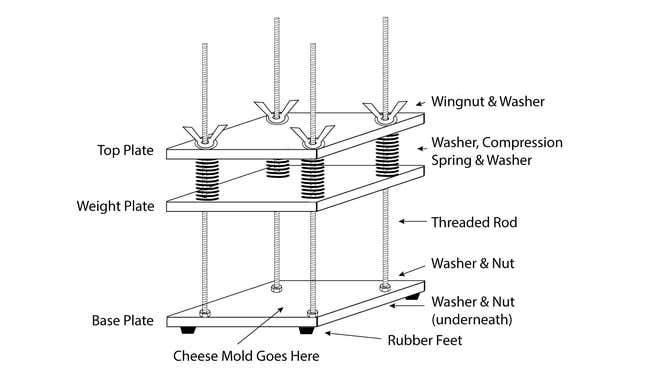
Illustration: Amanda Blum
I built a spring-loaded press of my own, and it was relatively simple. You can make it as large as you want (I made my first one too small), but the formula is always the same.
Use a decent hardwood if you can, since you won’t need much of it. You’ll have three matching plates of wood, the base, the weight plate, and the top plate. Two or four metal threaded rods will extend from the corners through all of the plates, to align them. They’ll be held in place with nuts and washers underneath the bottom plate.
Heavy springs will go between the weight plate and top plate, and wing nuts will secure the rods to the top plate. The diameter of the rods, and thus the diameter of the compression springs, should scale with the size of the press, but ultimately, it should be able to exert from five to 50 pounds of weight.
Now it’s just about assembling. You can make your press as fancy as you’d like, but fanciness is not necessary.
You’ll need:
3 pieces of hardwood, in the size you’ve determined for your press2 or 4 threaded rods (If your press is under 8 inches wide, you can get away with two. The diameter will be determined below.)2 or 4 compression springs of a slightly larger diameter than your threaded rods2 or 4 wingnuts4 nuts8 or 16 washersA piece of paper50 pounds of weight (Read more below for details.)Rubber feet (optional)Start by determining the size you’ll need. Look at your largest mold for hard cheese, then add three inches on all sides, since you’ll need room for the threaded rods, and you want those at least 1-1/2 inches in from the edge of the wood.
Cut the plates to the desired size, and while you don’t need to, you certainly can router or sand the sides and corners so they’re soft. You should use a food safe wood oil on the wood.
Now you’re going to drill holes in all three plates. It helps to create a paper template for this, so the rods are in the same exact place for all three plates. You only need a hand drill for this. The hole size is determined by the diameter of the threaded rod you chose. For our purposes, any rod over ⅜-inch is strong enough for a smaller press, but you may want to scale up to ½ or 3/4 of an inch for a larger press. Your hardware store can cut the rods for you to 18 inches.
Use washers and nuts to secure the rods to the baseplate. Now thread the weight plate on, and then the compression springs, the top plate, and the washers and wing nuts. You’re almost there, we just need to create a gauge for measuring the weight on the springs.
How to calibrate your new cheese press
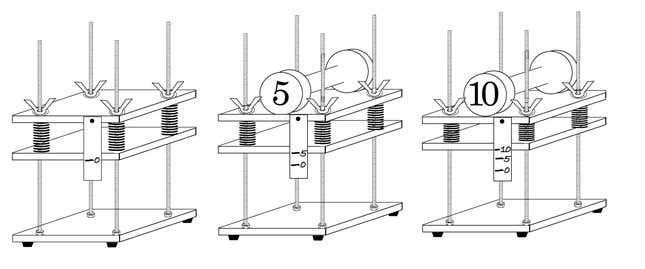
Illustration: Amanda Blum
For this, you’ll need your scale and either weights or other items around ten pounds a piece. Take a strip of paper an inch longer than the distance between the weight plate and top plate, and using a nail, tap it into the side of the top plate. Make a mark on the paper exactly where it meets the bottom of the weight plate. Next to it, write “0.” Right now, there is 0 pounds of weight.
Place a five pound weight on top of the top plate. The top plate should move closer to the weight plate. Make another mark on the paper where it meets the bottom of the weight plate, and now write 5 next to it. That is five pounds of pressure. Keep repeating this until you have lines for 0, 5, 10, 20, 30, 40 and 50 pounds. You now know precisely how much weight is being put on your cheeses, so you won’t need those weights again.
You now have a working cheese press! You can add some things to make it nicer; rubber feet are a good touch so it doesn’t move around. Laminate the paper with the weights on it. If you can’t laminate it, fake it with clear packing tape. This will allow you to clean it, and make sure it doesn’t run if it gets wet.
How to Use Your New Cheese Press
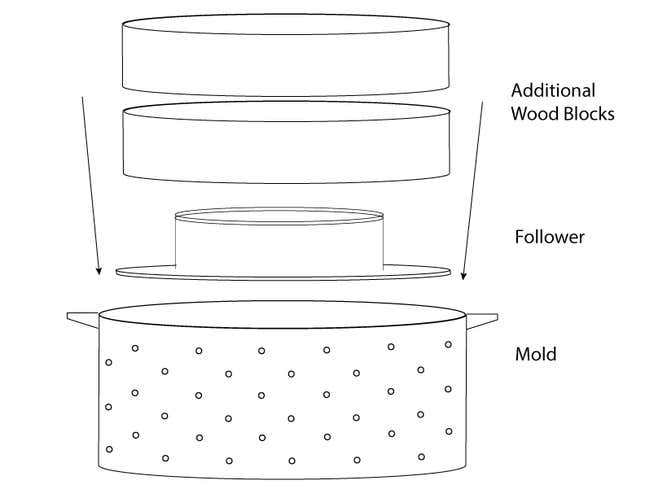
Illustration: Amanda Blum
Take the press and put it on a rimmed cookie sheet. Make sure your cheese mold has a follower, and it’s in the mold. Center the mold in your cheese press, between the base plate and weight plate. Take the weight plate and push it so it’s resting on top of the follower. Now begin using the wing nuts to move the top plate closer to the weight plate, until the mark on the paper is aligned to the weight plate in the amount you need.
The cookie sheet will collect the expelled whey, and when you need to turn the cheese, you can usually just push the mold out of the press and reset it.
In some cases, the molds may be tall enough that the follower will be inside the mold, lower than the rim of the mold itself. In these cases, you’ll need a wood follower—sanitized blocks of wood that you place on top of the follower, so the weight plate has something to push against. These should be as close to the size of the follower as possible, so you get even weight on your cheese for the best-tasting, best-looking homemade cheese possible.

 Konoly


